Spring Cloud Sleuth
Spring Cloud Sleuth implements a distributed tracing solution for Spring Cloud.
Terminology
Spring Cloud Sleuth borrows Dapper’s terminology.
Span: The basic unit of work. For example, sending an RPC is a new span, as is sending a response to an RPC. Span’s are identified by a unique 64-bit ID for the span and another 64-bit ID for the trace the span is a part of. Spans also have other data, such as descriptions, timestamped events, key-value annotations (tags), the ID of the span that caused them, and process ID’s (normally IP address).
Spans are started and stopped, and they keep track of their timing information. Once you create a span, you must stop it at some point in the future.
Trace: A set of spans forming a tree-like structure. For example, if you are running a distributed big-data store, a trace might be formed by a put request.
Annotation: is used to record existence of an event in time. Some of the core annotations used to define the start and stop of a request are:
-
cs - Client Sent - The client has made a request. This annotation depicts the start of the span.
-
sr - Server Received - The server side got the request and will start processing it. If one subtracts the cs timestamp from this timestamp one will receive the network latency.
-
ss - Server Sent - Annotated upon completion of request processing (when the response got sent back to the client). If one subtracts the sr timestamp from this timestamp one will receive the time needed by the server side to process the request.
-
cr - Client Received - Signifies the end of the span. The client has successfully received the response from the server side. If one subtracts the cs timestamp from this timestamp one will receive the whole time needed by the client to receive the response from the server.
Visualization of what Span and Trace will look in a system together with the Zipkin annotations:

Each color of a note signifies a span (7 spans - from A to G). If you have such information in the note:
Trace Id = X
Span Id = D
Client Sent
That means that the current span has Trace-Id set to X, Span-Id set to D. It also has emitted Client Sent event.
This is how the visualization of the parent / child relationship of spans would look like:

Purpose
In the following sections the example from the image above will be taken into consideration.
Distributed tracing with Zipkin
Altogether there are 10 spans . If you go to traces in Zipkin you will see this number:

However if you pick a particular trace then you will see 7 spans:

|
Note
|
When picking a particular trace you will see merged spans. That means that if there were 2 spans sent to Zipkin with Server Received and Server Sent / Client Received and Client Sent annotations then they will presented as a single span. |
In the image depicting the visualization of what Span and Trace is you can see 20 colorful labels. How does it happen that in Zipkin 10 spans are received?
-
2 span A labels signify span started and closed. Upon closing a single span is sent to Zipkin.
-
4 span B labels are in fact are single span with 4 annotations. However this span is composed of two separate instances. One sent from service 1 and one from service 2. So in fact two span instances will be sent to Zipkin and merged there.
-
2 span C labels signify span started and closed. Upon closing a single span is sent to Zipkin.
-
4 span B labels are in fact are single span with 4 annotations. However this span is composed of two separate instances. One sent from service 2 and one from service 3. So in fact two span instances will be sent to Zipkin and merged there.
-
2 span E labels signify span started and closed. Upon closing a single span is sent to Zipkin.
-
4 span B labels are in fact are single span with 4 annotations. However this span is composed of two separate instances. One sent from service 2 and one from service 4. So in fact two span instances will be sent to Zipkin and merged there.
-
2 span G labels signify span started and closed. Upon closing a single span is sent to Zipkin.
So 1 span from A, 2 spans from B, 1 span from C, 2 spans from D, 1 span from E, 2 spans from F and 1 from G. Altogether 10 spans.
Log correlation
When grepping the logs of those four applications by trace id equal to e.g. 2485ec27856c56f4 one would get the following:
service1.log:2016-02-26 11:15:47.561  INFO [service1,2485ec27856c56f4,2485ec27856c56f4,true] 68058 --- [nio-8081-exec-1] i.s.c.sleuth.docs.service1.Application   : Hello from service1. Calling service2
service2.log:2016-02-26 11:15:47.710  INFO [service2,2485ec27856c56f4,9aa10ee6fbde75fa,true] 68059 --- [nio-8082-exec-1] i.s.c.sleuth.docs.service2.Application   : Hello from service2. Calling service3 and then service4
service3.log:2016-02-26 11:15:47.895  INFO [service3,2485ec27856c56f4,1210be13194bfe5,true] 68060 --- [nio-8083-exec-1] i.s.c.sleuth.docs.service3.Application   : Hello from service3
service2.log:2016-02-26 11:15:47.924  INFO [service2,2485ec27856c56f4,9aa10ee6fbde75fa,true] 68059 --- [nio-8082-exec-1] i.s.c.sleuth.docs.service2.Application   : Got response from service3 [Hello from service3]
service4.log:2016-02-26 11:15:48.134  INFO [service4,2485ec27856c56f4,1b1845262ffba49d,true] 68061 --- [nio-8084-exec-1] i.s.c.sleuth.docs.service4.Application   : Hello from service4
service2.log:2016-02-26 11:15:48.156  INFO [service2,2485ec27856c56f4,9aa10ee6fbde75fa,true] 68059 --- [nio-8082-exec-1] i.s.c.sleuth.docs.service2.Application   : Got response from service4 [Hello from service4]
service1.log:2016-02-26 11:15:48.182  INFO [service1,2485ec27856c56f4,2485ec27856c56f4,true] 68058 --- [nio-8081-exec-1] i.s.c.sleuth.docs.service1.Application   : Got response from service2 [Hello from service2, response from service3 [Hello from service3] and from service4 [Hello from service4]]
If you’re using a log aggregating tool like Kibana, Splunk etc. you can order the events that took place. An example of Kibana would look like this:
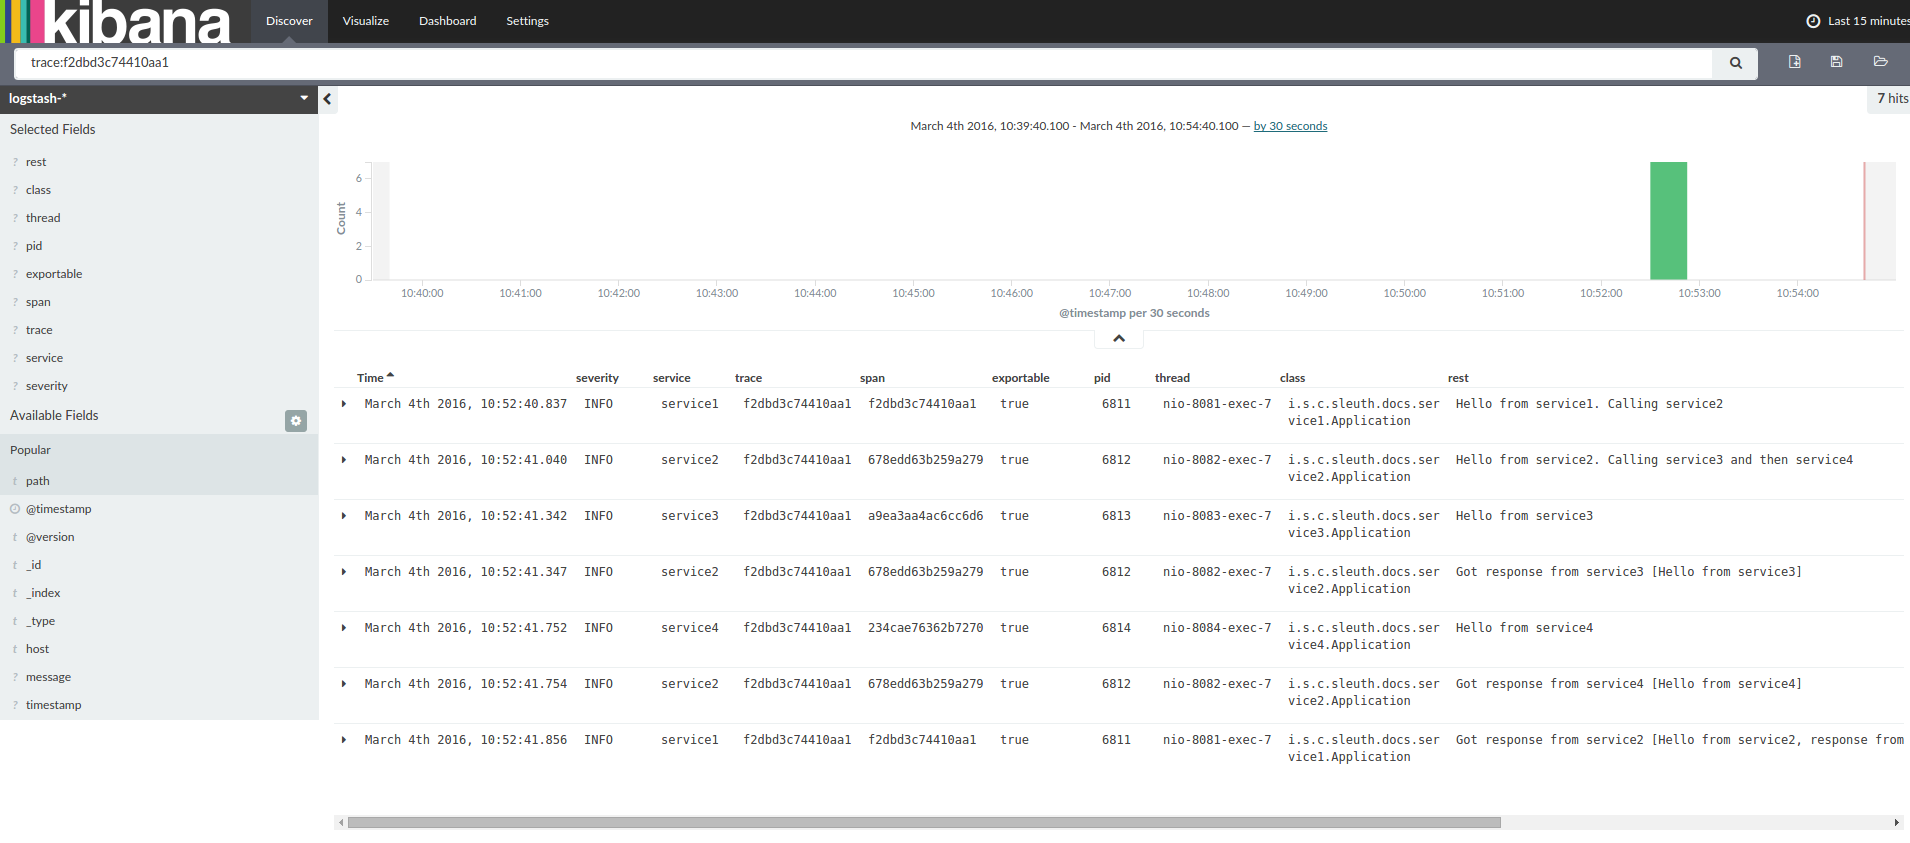
If you want to use Logstash here is the Grok pattern for Logstash:
filter {
       # pattern matching logback pattern
       grok {
              match => { "message" => "%{TIMESTAMP_ISO8601:timestamp}\s+%{LOGLEVEL:severity}\s+\[%{DATA:service},%{DATA:trace},%{DATA:span},%{DATA:exportable}\]\s+%{DATA:pid}---\s+\[%{DATA:thread}\]\s+%{DATA:class}\s+:\s+%{GREEDYDATA:rest}" }
       }
}|
Note
|
If you want to use Grok together with the logs from Cloud Foundry you have to use this pattern: |
filter {
       # pattern matching logback pattern
       grok {
              match => { "message" => "(?m)OUT\s+%{TIMESTAMP_ISO8601:timestamp}\s+%{LOGLEVEL:severity}\s+\[%{DATA:service},%{DATA:trace},%{DATA:span},%{DATA:exportable}\]\s+%{DATA:pid}---\s+\[%{DATA:thread}\]\s+%{DATA:class}\s+:\s+%{GREEDYDATA:rest}" }
       }
}
Adding to the project
In general if you want to profit only from Spring Cloud Sleuth without the Zipkin integration just add the spring-cloud-starter-sleuth module to your project.
If you want both Sleuth and Zipkin just add the spring-cloud-starter-zipkin dependency.
Features
-
Adds trace and span ids to the Slf4J MDC, so you can extract all the logs from a given trace or span in a log aggregator. Example logs:
2016-02-02 15:30:57.902  INFO [bar,6bfd228dc00d216b,6bfd228dc00d216b,false] 23030 --- [nio-8081-exec-3] ...
2016-02-02 15:30:58.372 ERROR [bar,6bfd228dc00d216b,6bfd228dc00d216b,false] 23030 --- [nio-8081-exec-3] ...
2016-02-02 15:31:01.936  INFO [bar,46ab0d418373cbc9,46ab0d418373cbc9,false] 23030 --- [nio-8081-exec-4] ...
notice the
[appname,traceId,spanId,exportable]entries from the MDC:-
spanId - the id of a specific operation that took place
-
appname - the name of the application that logged the span
-
traceId - the id of the latency graph that contains the span
-
exportable - whether the log should be exported to Zipkin or not
-
-
Provides an abstraction over common distributed tracing data models: traces, spans (forming a DAG), annotations, key-value annotations. Loosely based on HTrace, but Zipkin (Dapper) compatible.
-
Sleuth records timing information to aid in latency analysis. Using sleuth, you can pinpoint causes of latency in your applications. Sleuth is written to not log too much, and to not cause your production application to crash.
-
propagates structural data about your call-graph in-band, and the rest out-of-band.
-
includes opinionated instrumentation of layers such as HTTP
-
includes sampling policy to manage volume
-
can report to a Zipkin system for query and visualization
-
-
Instruments common ingress and egress points from Spring applications (servlet filter, async endpoints, rest template, scheduled actions, message channels, zuul filters, feign client).
-
Provides simple metrics of accepted / dropped spans.
-
If
spring-cloud-sleuth-zipkinthen the app will generate and collect Zipkin-compatible traces. By default it sends them via HTTP to a Zipkin server on localhost (port 9411). Configure the location of the service usingspring.zipkin.baseUrl. -
If
spring-cloud-sleuth-streamthen the app will generate and collect traces via Spring Cloud Stream. Your app automatically becomes a producer of tracer messages that are sent over your broker of choice (e.g. RabbitMQ, Apache Kafka, Redis).
|
Important
|
If using Zipkin or Stream, configure the percentage of spans exported using spring.sleuth.sampler.percentage
(default 0.1, i.e. 10%). Otherwise you might think that Sleuth is not working cause it’s omitting some spans.
|
|
Note
|
the SLF4J MDC is always set and logback users will immediately see the trace and span ids in logs per the example
above. Other logging systems have to configure their own formatter to get the same result. The default is
logging.pattern.level set to %clr(%5p) %clr([${spring.application.name:},%X{X-Trace-Id:-},%X{X-Span-Id:-},%X{X-Span-Export:-}]){yellow}
(this is a Spring Boot feature for logback users).
This means that if you’re not using SLF4J this pattern WILL NOT be automatically applied.
|
Sampling
In distributed tracing the data volumes can be very high so sampling
can be important (you usually don’t need to export all spans to get a
good picture of what is happening). Spring Cloud Sleuth has a
Sampler strategy that you can implement to take control of the
sampling algorithm. Samplers do not stop span (correlation) ids from
being generated, but they do prevent the tags and events being
attached and exported. By default you get a strategy that continues to
trace if a span is already active, but new ones are always marked as
non-exportable. If all your apps run with this sampler you will see
traces in logs, but not in any remote store. For testing the default
is often enough, and it probably is all you need if you are only using
the logs (e.g. with an ELK aggregator). If you are exporting span data
to Zipkin or Spring Cloud Stream, there is also an AlwaysSampler
that exports everything and a PercentageBasedSampler that samples a
fixed fraction of spans.
|
Note
|
the PercentageBasedSampler is the default if you are using
spring-cloud-sleuth-zipkin or spring-cloud-sleuth-stream. You can
configure the exports using spring.sleuth.sampler.percentage.
|
A sampler can be installed just by creating a bean definition, e.g:
@Bean
public Sampler defaultSampler() {
	return new AlwaysSampler();
}
Instrumentation
Spring Cloud Sleuth instruments all your Spring application
automatically, so you shouldn’t have to do anything to activate
it. The instrumentation is added using a variety of technologies
according to the stack that is available, e.g. for a servlet web
application we use a Filter, and for Spring Integration we use
ChannelInterceptors.
You can customize the keys used in span tags. To limit the volume of
span data, by default an HTTP request will be tagged only with a
handful of metadata like the status code, host and URL. You can add
request headers by configuring spring.sleuth.keys.http.headers (a
list of header names).
|
Note
|
Remember that tags are only collected and exported if there is a
Sampler that allows it (by default there is not, so there is no
danger of accidentally collecting too much data without configuring
something).
|
|
Note
|
Currently the instrumentation in Spring Cloud Sleuth is eager - it means that we’re actively trying to pass the tracing context between threads. Also timing events are captured even when sleuth isn’t exporting data to a tracing system. This approach may change in the future towards being lazy on this matter. |
Span lifecycle
You can do the following operations on the Span by means of Tracer interface:
-
start - when you start a span its name is assigned and start timestamp is recorded.
-
close - the span gets finished (the end time of the span is recorded) and if the span is exportable then it will be eligible for collection to Zipkin. The span is also removed from the current thread.
-
continue - a new instance of span will be created whereas it will be a copy of the one that it continues.
-
detach - the span doesn’t get stopped or closed. It only gets removed from the current thread.
-
create with explicit parent - you can create a new span and set an explicit parent to it
Creating and closing spans
You can manually create spans by using the Tracer interface.
// Start a span. If there was a span present in this thread it will become
// the `newSpan`'s parent.
Span newSpan = this.tracer.createSpan("calculateTax");
try {
	// ...
	// You can tag a span
	this.tracer.addTag("taxValue", taxValue);
	// ...
	// You can log an event on a span
	newSpan.logEvent("taxCalculated");
} finally {
	// Once done remember to close the span. This will allow collecting
	// the span to send it to Zipkin
	this.tracer.close(newSpan);
}
In this example we could see how to create a new instance of span. Assuming that there already was a span present in this thread then it would become the parent of that span.
|
Important
|
Always clean after you create a span! Don’t forget to close a span if you want to send it to Zipkin. |
Continuing spans
Sometimes you don’t want to create a new span but you want to continue one. Example of such a situation might be (of course it all depends on the use-case):
-
AOP - If there was already a span created before an aspect was reached then you might not want to create a new span.
-
Hystrix - executing a Hystrix command is most likely a logical part of the current processing. It’s in fact only a technical implementation detail that you wouldn’t necessarily want to reflect in tracing as a separate being.
The continued instance of span is equal to the one that it continues:
Span continuedSpan = this.tracer.continueSpan(spanToContinue);
assertThat(continuedSpan).isEqualTo(spanToContinue);
To continue a span you can use the Tracer interface.
// let's assume that we're in a thread Y and we've received
// the `initialSpan` from thread X
Span continuedSpan = this.tracer.continueSpan(initialSpan);
try {
	// ...
	// You can tag a span
	this.tracer.addTag("taxValue", taxValue);
	// ...
	// You can log an event on a span
	continuedSpan.logEvent("taxCalculated");
} finally {
	// Once done remember to detach the span. That way you'll
	// safely remove it from the current thread without closing it
	this.tracer.detach(continuedSpan);
}|
Important
|
Always clean after you create a span! Don’t forget to detach a span if some work was done started in one thread (e.g. thread X) and it’s waiting for other threads (e.g. Y, Z) to finish. Then the spans in the threads Y, Z should be detached at the end of their work. When the results are collected the span in thread X should be closed. |
Creating spans with an explicit parent
There is a possibility that you want to start a new span and provide an explicit parent of that span.
Let’s assume that the parent of a span is in one thread and you want to start a new span in another thread. The
startSpan method of the Tracer interface is the method you are looking for.
// let's assume that we're in a thread Y and we've received
// the `initialSpan` from thread X. `initialSpan` will be the parent
// of the `newSpan`
Span newSpan = this.tracer.createSpan("calculateCommission", initialSpan);
try {
	// ...
	// You can tag a span
	this.tracer.addTag("commissionValue", commissionValue);
	// ...
	// You can log an event on a span
	newSpan.logEvent("commissionCalculated");
} finally {
	// Once done remember to close the span. This will allow collecting
	// the span to send it to Zipkin. The tags and events set on the
	// newSpan will not be present on the parent
	this.tracer.close(newSpan);
}|
Important
|
After having created such a span remember to close it. Otherwise you will see a lot of warnings in your logs related to the fact that you have a span present in the current thread other than the one you’re trying to close. What’s worse your spans won’t get closed properly thus will not get collected to Zipkin. |
Naming spans
Picking a span name is not a trivial task. Span name should depict an operation name. The name should be low cardinality (e.g. not include identifiers).
Since there is a lot of instrumentation going on some of the span names will be artificial like:
-
http:pathwhen received an http request on a given path -
asyncfor asynchronous operations done via wrappedCallableandRunnable. -
@Scheduledannotated methods will return the simple name of the class.
Fortunately, for the asynchronous processing you can provide explicit naming.
@SpanName annotation
You can do name the span explicitly via the @SpanName annotation.
@SpanName("calculateTax")
class TaxCountingRunnable implements Runnable {

	@Override public void run() {
		// perform logic
	}
}
In this case, when processed in the following manner:
Runnable runnable = new TraceRunnable(tracer, spanNamer, new TaxCountingRunnable());
Future<?> future = executorService.submit(runnable);
// ... some additional logic ...
future.get();
The span will be named calculateTax.
toString() method
It’s pretty rare to create separate classes for Runnable or Callable. Typically one creates an anonymous
instance of those classes. You can’t annotate such classes thus to override that, if there is no @SpanName annotation present,
we’re checking if the class has a custom implementation of the toString() method.
So executing such code:
Runnable runnable = new TraceRunnable(tracer, spanNamer, new Runnable() {
	@Override public void run() {
		// perform logic
	}

	@Override public String toString() {
		return "calculateTax";
	}
});
Future<?> future = executorService.submit(runnable);
// ... some additional logic ...
future.get();
will lead in creating a span named calculateTax.
Span Data as Messages
You can accumulate and send span data over
Spring Cloud Stream by
including the spring-cloud-sleuth-stream jar as a dependency, and
adding a Channel Binder implementation
(e.g. spring-cloud-starter-stream-rabbit for RabbitMQ or
spring-cloud-starter-stream-kafka for Kafka). This will
automatically turn your app into a producer of messages with payload
type Spans.
Zipkin Consumer
There is a special convenience annotation for setting up a message consumer
for the Span data and pushing it into a Zipkin SpanStore. This application
@SpringBootApplication
@EnableZipkinStreamServer
public class Consumer {
	public static void main(String[] args) {
		SpringApplication.run(Consumer.class, args);
	}
}
will listen for the Span data on whatever transport you provide via a
Spring Cloud Stream Binder (e.g. include
spring-cloud-starter-stream-rabbit for RabbitMQ, and similar
starters exist for Redis and Kafka). The app will also be a
Zipkin query server, so you
can point a standard Zipkin UI at it (e.g. run the consumer app on
port 9411 if you want the query server on the same host and the
default configuration).
The default SpanStore is in-memory (good for demos and getting
started quickly). For a more robust solution you can add MySQL and
spring-boot-starter-jdbc to your classpath and enable the JDBC
SpanStore via configuration, e.g.:
spring:
  rabbitmq:
    host: ${RABBIT_HOST:localhost}
  datasource:
    schema: classpath:/mysql.sql
    url: jdbc:mysql://${MYSQL_HOST:localhost}/test
    username: root
    password: root
# Switch this on to create the schema on startup:
    initialize: true
    continueOnError: true
  sleuth:
    enabled: false
zipkin:
  store:
type: mysql|
Note
|
The @EnableZipkinStreamServer is also annotated with
@EnableZipkinServer so the process will also expose the standard
Zipkin server endpoints for collecting spans over HTTP, and for
querying in the Zipkin Web UI.
|
Custom Consumer
A custom consumer can also easily be implemented using
spring-cloud-sleuth-stream and binding to the SleuthSink. Example:
@EnableBinding(SleuthSink.class)
@SpringBootApplication(exclude = SleuthStreamAutoConfiguration.class)
@MessageEndpoint
public class Consumer {

    @ServiceActivator(inputChannel = SleuthSink.INPUT)
    public void sink(Spans input) throws Exception {
        // ... process spans
    }
}|
Note
|
the sample consumer application above explicitly excludes
SleuthStreamAutoConfiguration so it doesn’t send messages to itself,
but this is optional (you might actually want to trace requests into
the consumer app).
|
Metrics
Currently Spring Cloud Sleuth registers very simple metrics related to spans. It’s using the Spring Boot’s metrics support to calculate the number of accepted and dropped spans. Each time a span gets sent to Zipkin the number of accepted spans will increase. If there’s an error then the number of dropped spans will get increased.
Integrations
Runnable and Callable
If you’re wrapping your logic in Runnable or Callable it’s enough to wrap those classes in their Sleuth representative.
Example for Runnable:
Runnable runnable = new Runnable() {
	@Override
	public void run() {
		// do some work
	}

	@Override
	public String toString() {
		return "spanNameFromToStringMethod";
	}
};
// Manual `TraceRunnable` creation with explicit "calculateTax" Span name
Runnable traceRunnable = new TraceRunnable(tracer, spanNamer, runnable, "calculateTax");
// Wrapping `Runnable` with `Tracer`. The Span name will be taken either from the
// `@SpanName` annotation or from `toString` method
Runnable traceRunnableFromTracer = tracer.wrap(runnable);
Example for Callable:
Callable<String> callable = new Callable<String>() {
	@Override
	public String call() throws Exception {
		return someLogic();
	}

	@Override
	public String toString() {
		return "spanNameFromToStringMethod";
	}
};
// Manual `TraceCallable` creation with explicit "calculateTax" Span name
Callable<String> traceCallable = new TraceCallable<>(tracer, spanNamer, callable, "calculateTax");
// Wrapping `Callable` with `Tracer`. The Span name will be taken either from the
// `@SpanName` annotation or from `toString` method
Callable<String> traceCallableFromTracer = tracer.wrap(callable);
That way you will ensure that a new Span is created and closed for each execution.
Hystrix
Custom Concurrency Strategy
We’re registering a custom HystrixConcurrencyStrategy
that wraps all Callable instances into their Sleuth representative -
the TraceCallable. The strategy either starts or continues a span depending on the fact whether tracing was already going
on before the Hystrix command was called. To disable the custom Hystrix Concurrency Strategy set the spring.sleuth.hystrix.strategy.enabled to false.
Manual Command setting
Assuming that you have the following HystrixCommand:
HystrixCommand<String> hystrixCommand = new HystrixCommand<String>(setter) {
	@Override
	protected String run() throws Exception {
		return someLogic();
	}
};
In order to pass the tracing information you have to wrap the same logic in the Sleuth version of the HystrixCommand which is the
TraceCommand:
TraceCommand<String> traceCommand = new TraceCommand<String>(tracer, traceKeys, setter) {
	@Override
	public String doRun() throws Exception {
		return someLogic();
	}
};
HTTP integration
Features from this section can be disabled by providing the spring.sleuth.web.enabled property with value equal to false.
HTTP Filter
Via the TraceFilter all sampled incoming requests result in creation of a Span. That Span’s name is http: + the path to which
the request was sent. E.g. if the request was sent to /foo/bar then the name will be http:/foo/bar. You can configure which URIs you would
like to skip via the spring.sleuth.web.skipPattern property. If you have ManagementServerProperties on classpath then
its value of contextPath gets appended to the provided skip pattern.
Async Servlet support
If your controller returns a Callable or a WebAsyncTask Spring Cloud Sleuth will continue the existing span instead of creating a new one.
HTTP client integration
Synchronous Rest Template
We’re injecting a RestTemplate interceptor that ensures that all the tracing information is passed to the requests. Each time a
call is made a new Span is created. It gets closed upon receiving the response. In order to block the synchronous RestTemplate features
just set spring.sleuth.web.client.enabled to false.
Asynchronous Rest Template
Custom instrumentation is set to create and close Spans upon sending and receiving requests. To block the AsyncRestTemplate
features set spring.sleuth.web.async.client.enabled to false.
Feign
By default Spring Cloud Sleuth provides integration with feign via the TraceFeignClientAutoConfiguration. You can disable it entirely
by setting spring.sleuth.feign.enabled to false. If you do so then no Feign related instrumentation will take place.
Part of Feign instrumentation is done via a FeignBeanPostProcessor. You can disable it by providing the spring.sleuth.feign.processor.enabled equal to false.
If you set it like this then Spring Cloud Sleuth will not instrument any of your custom Feign components. All the default instrumentation
however will be still there.
Asynchronous communication
@Async annotated methods
In Spring Cloud Sleuth we’re instrumenting async related components so that the tracing information is passed between threads. You can disable this behaviour
by setting the value of spring.sleuth.async.enabled to false.
If you annotate your method with @Async then we’ll automatically create a new Span with the following characteristics:
-
the Span name will be the annotated method name
-
the Span will be tagged with that method’s class name and the method name too
@Scheduled annotated methods
In Spring Cloud Sleuth we’re instrumenting scheduled method execution so that the tracing information is passed between threads. You can disable this behaviour
by setting the value of spring.sleuth.scheduled.enabled to false.
If you annotate your method with @Scheduled then we’ll automatically create a new Span with the following characteristics:
-
the Span name will be the annotated method name
-
the Span will be tagged with that method’s class name and the method name too
If you want to skip Span creation for some @Scheduled annotated classes you can set the
spring.sleuth.scheduled.skipPattern with a regular expression that will match the fully qualified name of the
@Scheduled annotated class.
Executor, ExecutorService and ScheduledExecutorService
We’re providing LazyTraceExecutor, TraceableExecutorService and TraceableScheduledExecutorService. Those implementations
are creating Spans each time a new task is submitted, invoked or scheduled.
Messaging
Spring Cloud Sleuth integrates with Spring Integration. It creates spans for publish and
subscribe events. To disable Spring Integration instrumentation, set spring.sleuth.integration.enabled to false.
Zuul
We’re registering Zuul filters to propagate the tracing information (the request header is enriched with tracing data).
To disable Zuul support set the spring.sleuth.zuul.enabled property to false.