Spring Cloud provides tools for developers to quickly build some of the common patterns in distributed systems (e.g. configuration management, service discovery, circuit breakers, intelligent routing, micro-proxy, control bus, one-time tokens, global locks, leadership election, distributed sessions, cluster state). Coordination of distributed systems leads to boiler plate patterns, and using Spring Cloud developers can quickly stand up services and applications that implement those patterns. They will work well in any distributed environment, including the developer’s own laptop, bare metal data centres, and managed platforms such as Cloud Foundry.
Features
Spring Cloud focuses on providing good out of box experience for typical use cases and extensibility mechanism to cover others.
-
Distributed/versioned configuration
-
Service registration and discovery
-
Routing
-
Service-to-service calls
-
Load balancing
-
Circuit Breakers
-
Global locks
-
Leadership election and cluster state
-
Distributed messaging
Cloud Native Applications
Cloud Native is a style of application development that encourages easy adoption of best practices in the areas of continuous delivery and value-driven development. A related discipline is that of building 12-factor Apps in which development practices are aligned with delivery and operations goals, for instance by using declarative programming and management and monitoring. Spring Cloud facilitates these styles of development in a number of specific ways and the starting point is a set of features that all components in a distributed system either need or need easy access to when required.
Many of those features are covered by Spring Boot, which we build on in Spring Cloud. Some more are delivered by Spring Cloud as two libraries: Spring Cloud Context and Spring Cloud Commons. Spring Cloud Context provides utilities and special services for the ApplicationContext of a Spring Cloud application (bootstrap context, encryption, refresh scope and environment endpoints). Spring Cloud Commons is a set of abstractions and common classes used in different Spring Cloud implementations (eg. Spring Cloud Netflix vs. Spring Cloud Consul).
If you are getting an exception due to "Illegal key size" and you are using Sun’s JDK, you need to install the Java Cryptography Extension (JCE) Unlimited Strength Jurisdiction Policy Files. See the following links for more information:
Extract files into JDK/jre/lib/security folder (whichever version of JRE/JDK x64/x86 you are using).
|
Note
|
Spring Cloud is released under the non-restrictive Apache 2.0 license. If you would like to contribute to this section of the documentation or if you find an error, please find the source code and issue trackers in the project at github. |
Spring Cloud Context: Application Context Services
Spring Boot has an opinionated view of how to build an application with Spring: for instance it has conventional locations for common configuration file, and endpoints for common management and monitoring tasks. Spring Cloud builds on top of that and adds a few features that probably all components in a system would use or occasionally need.
The Bootstrap Application Context
A Spring Cloud application operates by creating a "bootstrap"
context, which is a parent context for the main application. Out of
the box it is responsible for loading configuration properties from
the external sources, and also decrypting properties in the local
external configuration files. The two contexts share an Environment
which is the source of external properties for any Spring
application. Bootstrap properties are added with high precedence, so
they cannot be overridden by local configuration.
The bootstrap context uses a different convention for locating
external configuration than the main application context, so instead
of application.yml (or .properties) you use bootstrap.yml,
keeping the external configuration for bootstrap and main context
nicely separate. Example:
spring:
  application:
    name: foo
  cloud:
    config:
      uri: ${SPRING_CONFIG_URI:http://localhost:8888}
It is a good idea to set the spring.application.name (in
bootstrap.yml or application.yml) if your application needs any
application-specific configuration from the server.
You can disable the bootstrap process completely by setting
spring.cloud.bootstrap.enabled=false (e.g. in System properties).
Application Context Hierarchies
If you build an application context from SpringApplication or
SpringApplicationBuilder, then the Bootstrap context is added as a
parent to that context. It is a feature of Spring that child contexts
inherit property sources and profiles from their parent, so the "main"
application context will contain additional property sources, compared
to building the same context without Spring Cloud Config. The
additional property sources are:
-
"bootstrap": an optional
CompositePropertySourceappears with high priority if anyPropertySourceLocatorsare found in the Bootstrap context, and they have non-empty properties. An example would be properties from the Spring Cloud Config Server. See below for instructions on how to customize the contents of this property source. -
"applicationConfig: [classpath:bootstrap.yml]" (and friends if Spring profiles are active). If you have a
bootstrap.yml(or properties) then those properties are used to configure the Bootstrap context, and then they get added to the child context when its parent is set. They have lower precedence than theapplication.yml(or properties) and any other property sources that are added to the child as a normal part of the process of creating a Spring Boot application. See below for instructions on how to customize the contents of these property sources.
Because of the ordering rules of property sources the "bootstrap"
entries take precedence, but note that these do not contain any data
from bootstrap.yml, which has very low precedence, but can be used
to set defaults.
You can extend the context hierarchy by simply setting the parent
context of any ApplicationContext you create, e.g. using its own
interface, or with the SpringApplicationBuilder convenience methods
(parent(), child() and sibling()). The bootstrap context will be
the parent of the most senior ancestor that you create yourself.
Every context in the hierarchy will have its own "bootstrap" property
source (possibly empty) to avoid promoting values inadvertently from
parents down to their descendants. Every context in the hierarchy can
also (in principle) have a different spring.application.name and
hence a different remote property source if there is a Config
Server. Normal Spring application context behaviour rules apply to
property resolution: properties from a child context override those in
the parent, by name and also by property source name (if the child has
a property source with the same name as the parent, the one from the
parent is not included in the child).
Note that the SpringApplicationBuilder allows you to share an
Environment amongst the whole hierarchy, but that is not the
default. Thus, sibling contexts in particular do not need to have the
same profiles or property sources, even though they will share common
things with their parent.
Changing the Location of Bootstrap Properties
The bootstrap.yml (or .properties) location can be specified using
spring.cloud.bootstrap.name (default "bootstrap") or
spring.cloud.bootstrap.location (default empty), e.g. in System
properties. Those properties behave like the spring.config.*
variants with the same name, in fact they are used to set up the
bootstrap ApplicationContext by setting those properties in its
Environment. If there is an active profile (from
spring.profiles.active or through the Environment API in the
context you are building) then properties in that profile will be
loaded as well, just like in a regular Spring Boot app, e.g. from
bootstrap-development.properties for a "development" profile.
Customizing the Bootstrap Configuration
The bootstrap context can be trained to do anything you like by adding
entries to /META-INF/spring.factories under the key
org.springframework.cloud.bootstrap.BootstrapConfiguration. This is
a comma-separated list of Spring @Configuration classes which will
be used to create the context. Any beans that you want to be available
to the main application context for autowiring can be created here,
and also there is a special contract for @Beans of type
ApplicationContextInitializer. Classes can be marked with an @Order
if you want to control the startup sequence (the default order is
"last").
|
Warning
|
Be careful when adding custom BootstrapConfiguration that the
classes you add are not @ComponentScanned by mistake into your
"main" application context, where they might not be needed.
Use a separate package name for boot configuration classes that is
not already covered by your @ComponentScan or @SpringBootApplication
annotated configuration classes.
|
The bootstrap process ends by injecting initializers into the main
SpringApplication instance (i.e. the normal Spring Boot startup
sequence, whether it is running as a standalone app or deployed in an
application server). First a bootstrap context is created from the
classes found in spring.factories and then all @Beans of type
ApplicationContextInitializer are added to the main
SpringApplication before it is started.
Customizing the Bootstrap Property Sources
The default property source for external configuration added by the
bootstrap process is the Config Server, but you can add additional
sources by adding beans of type PropertySourceLocator to the
bootstrap context (via spring.factories). You could use this to
insert additional properties from a different server, or from a
database, for instance.
As an example, consider the following trivial custom locator:
@Configuration
public class CustomPropertySourceLocator implements PropertySourceLocator {

    @Override
    public PropertySource<?> locate(Environment environment) {
        return new MapPropertySource("customProperty",
                Collections.<String, Object>singletonMap("property.from.sample.custom.source", "worked as intended"));
    }

}
The Environment that is passed in is the one for the
ApplicationContext about to be created, i.e. the one that we are
supplying additional property sources for. It will already have its
normal Spring Boot-provided property sources, so you can use those to
locate a property source specific to this Environment (e.g. by
keying it on the spring.application.name, as is done in the default
Config Server property source locator).
If you create a jar with this class in it and then add a
META-INF/spring.factories containing:
org.springframework.cloud.bootstrap.BootstrapConfiguration=sample.custom.CustomPropertySourceLocator
then the "customProperty" PropertySource will show up in any
application that includes that jar on its classpath.
Environment Changes
The application will listen for an EnvironmentChangedEvent and react
to the change in a couple of standard ways (additional
ApplicationListeners can be added as @Beans by the user in the
normal way). When an EnvironmentChangedEvent is observed it will
have a list of key values that have changed, and the application will
use those to:
-
Re-bind any
@ConfigurationPropertiesbeans in the context -
Set the logger levels for any properties in
logging.level.*
Note that the Config Client does not by default poll for changes in
the Environment, and generally we would not recommend that approach
for detecting changes (although you could set it up with a
@Scheduled annotation). If you have a scaled-out client application
then it is better to broadcast the EnvironmentChangedEvent to all
the instances instead of having them polling for changes (e.g. using
the Spring Cloud
Bus).
The EnvironmentChangedEvent covers a large class of refresh use
cases, as long as you can actually make a change to the Environment
and publish the event (those APIs are public and part of core
Spring). You can verify the changes are bound to
@ConfigurationProperties beans by visiting the /configprops
endpoint (normal Spring Boot Actuator feature). For instance a
DataSource can have its maxPoolSize changed at runtime (the
default DataSource created by Spring Boot is an
@ConfigurationProperties bean) and grow capacity
dynamically. Re-binding @ConfigurationProperties does not cover
another large class of use cases, where you need more control over the
refresh, and where you need a change to be atomic over the whole
ApplicationContext. To address those concerns we have
@RefreshScope.
Refresh Scope
A Spring @Bean that is marked as @RefreshScope will get special
treatment when there is a configuration change. This addresses the
problem of stateful beans that only get their configuration injected
when they are initialized. For instance if a DataSource has open
connections when the database URL is changed via the Environment, we
probably want the holders of those connections to be able to complete
what they are doing. Then the next time someone borrows a connection
from the pool he gets one with the new URL.
Refresh scope beans are lazy proxies that initialize when they are used (i.e. when a method is called), and the scope acts as a cache of initialized values. To force a bean to re-initialize on the next method call you just need to invalidate its cache entry.
The RefreshScope is a bean in the context and it has a public method
refreshAll() to refresh all beans in the scope by clearing the
target cache. There is also a refresh(String) method to refresh an
individual bean by name. This functionality is exposed in the
/refresh endpoint (over HTTP or JMX).
|
Note
|
@RefreshScope works (technically) on an @Configuration
class, but it might lead to surprising behaviour: e.g. it does not
mean that all the @Beans defined in that class are themselves
@RefreshScope. Specifically, anything that depends on those beans
cannot rely on them being updated when a refresh is initiated, unless
it is itself in @RefreshScope (in which it will be rebuilt on a
refresh and its dependencies re-injected, at which point they will be
re-initialized from the refreshed @Configuration).
|
Encryption and Decryption
Spring Cloud has an Environment pre-processor for decrypting
property values locally. It follows the same rules as the Config
Server, and has the same external configuration via encrypt.*. Thus
you can use encrypted values in the form {cipher}* and as long as
there is a valid key then they will be decrypted before the main
application context gets the Environment. To use the encryption
features in an application you need to include Spring Security RSA in
your classpath (Maven co-ordinates
"org.springframework.security:spring-security-rsa") and you also need
the full strength JCE extensions in your JVM.
If you are getting an exception due to "Illegal key size" and you are using Sun’s JDK, you need to install the Java Cryptography Extension (JCE) Unlimited Strength Jurisdiction Policy Files. See the following links for more information:
Extract files into JDK/jre/lib/security folder (whichever version of JRE/JDK x64/x86 you are using).
Endpoints
For a Spring Boot Actuator application there are some additional management endpoints:
-
POST to
/envto update theEnvironmentand rebind@ConfigurationPropertiesand log levels -
/refreshfor re-loading the boot strap context and refreshing the@RefreshScopebeans -
/restartfor closing theApplicationContextand restarting it (disabled by default) -
/pauseand/resumefor calling theLifecyclemethods (stop()andstart()on theApplicationContext)
Spring Cloud Commons: Common Abstractions
Patterns such as service discovery, load balancing and circuit breakers lend themselves to a common abstraction layer that can be consumed by all Spring Cloud clients, independent of the implementation (e.g. discovery via Eureka or Consul).
Spring RestTemplate as a Load Balancer Client
RestTemplate can be automatically configured to use ribbon. To create a load balanced RestTemplate create a RestTemplate @Bean and use the @LoadBalanced qualifier.
|
Warning
|
A RestTemplate bean is no longer created via auto configuration. It must be created by individual applications.
|
@Configuration
public class MyConfiguration {

    @LoadBalanced
    @Bean
    RestTemplate restTemplate() {
        return new RestTemplate();
    }
}

public class MyClass {
    @Autowired
    private RestTemplate restTemplate;

    public String doOtherStuff() {
        String results = restTemplate.getForObject("http://stores/stores", String.class);
        return results;
    }
}
The URI needs to use a virtual host name (ie. service name, not a host name).
The Ribbon client is used to create a full physical address. See
RibbonAutoConfiguration
for details of how the RestTemplate is set up.
Multiple RestTemplate objects
If you want a RestTemplate that is not load balanced, create a RestTemplate
bean and inject it as normal. To access the load balanced RestTemplate use
the `@LoadBalanced qualifier when you create your @Bean.
|
Important
|
Notice the @Primary annotation on the plain RestTemplate declaration in the example below, to disambiguate the unqualified @Autowired injection.
|
@Configuration
public class MyConfiguration {

    @LoadBalanced
    @Bean
    RestTemplate loadBalanced() {
        return new RestTemplate();
    }

    @Primary
    @Bean
    RestTemplate restTemplate() {
        return new RestTemplate();
    }
}

public class MyClass {
    @Autowired
    private RestTemplate restTemplate;

    @Autowired
    @LoadBalanced
    private RestTemplate loadBalanced;

    public String doOtherStuff() {
        return loadBalanced.getForObject("http://stores/stores", String.class);
    }

    public String doStuff() {
        return restTemplate.getForObject("http://example.com", String.class);
    }
}|
Tip
|
If you see errors like java.lang.IllegalArgumentException: Can not set org.springframework.web.client.RestTemplate field com.my.app.Foo.restTemplate to com.sun.proxy.$Proxy89 try injecting RestOperations instead or setting spring.aop.proxyTargetClass=true.
|
Ignore Network Interfaces
Sometimes it is useful to ignore certain named network interfaces so they can be excluded from Service Discovery registration (eg. running in a Docker container). A list of regular expressions can be set that will cause the desired network interfaces to be ignored. The following configuration will ignore the "docker0" interface and all interfaces that start with "veth".
spring:
  cloud:
    inetutils:
      ignoredInterfaces:
        - docker0
        - veth.*
Spring Cloud Config
Environment and PropertySource abstractions, so they fit very well with Spring applications, but can be used with any application running in any language. As an application moves through the deployment pipeline from dev to test and into production you can manage the configuration between those environments and be certain that applications have everything they need to run when they migrate. The default implementation of the server storage backend uses git so it easily supports labelled versions of configuration environments, as well as being accessible to a wide range of tooling for managing the content. It is easy to add alternative implementations and plug them in with Spring configuration.
Quick Start
Start the server:
$ cd spring-cloud-config-server
$ mvn spring-boot:run
The server is a Spring Boot application so you can run it from your
IDE instead if you prefer (the main class is
ConfigServerApplication). Then try it out a client:
$ curl localhost:8888/foo/development
{"name":"development","label":"master","propertySources":[
  {"name":"https://github.com/scratches/config-repo/foo-development.properties","source":{"bar":"spam"}},
  {"name":"https://github.com/scratches/config-repo/foo.properties","source":{"foo":"bar"}}
]}
The default strategy for locating property sources is to clone a git
repository (at spring.cloud.config.server.git.uri) and use it to
initialize a mini SpringApplication. The mini-application’s
Environment is used to enumerate property sources and publish them
via a JSON endpoint.
The HTTP service has resources in the form:
/{application}/{profile}[/{label}]
/{application}-{profile}.yml
/{label}/{application}-{profile}.yml
/{application}-{profile}.properties
/{label}/{application}-{profile}.properties
where the "application" is injected as the spring.config.name in the
SpringApplication (i.e. what is normally "application" in a regular
Spring Boot app), "profile" is an active profile (or comma-separated
list of properties), and "label" is an optional git label (defaults to
"master".)
The YAML and properties forms are coalesced into a single map, even if the origin of the values (reflected in the "propertySources" of the "standard" form) has multiple sources.
Spring Cloud Config Server pulls configuration for remote clients from a git repository (which must be provided):
spring:
  cloud:
    config:
      server:
        git:
          uri: https://github.com/spring-cloud-samples/config-repo
Client Side Usage
To use these features in an application, just build it as a Spring
Boot application that depends on spring-cloud-config-client (e.g. see
the test cases for the config-client, or the sample app). The most
convenient way to add the dependency is via a Spring Boot starter
org.springframework.cloud:spring-cloud-starter-config. There is also a
parent pom and BOM (spring-cloud-starter-parent) for Maven users and a
Spring IO version management properties file for Gradle and Spring CLI
users. Example Maven configuration:
<parent>
    <groupId>org.springframework.boot</groupId>
    <artifactId>spring-boot-starter-parent</artifactId>
    <version>1.2.3.RELEASE</version>
    <relativePath /> <!-- lookup parent from repository -->
</parent>

<dependencyManagement>
    <dependencies>
        <dependency>
            <groupId>org.springframework.cloud</groupId>
            <artifactId>spring-cloud-starter-parent</artifactId>
            <version>1.0.1.RELEASE</version>
            <type>pom</type>
            <scope>import</scope>
        </dependency>
    </dependencies>
</dependencyManagement>

<dependencies>
    <dependency>
        <groupId>org.springframework.cloud</groupId>
        <artifactId>spring-cloud-starter-config</artifactId>
    </dependency>
    <dependency>
        <groupId>org.springframework.boot</groupId>
        <artifactId>spring-boot-starter-test</artifactId>
        <scope>test</scope>
    </dependency>
</dependencies>

<build>
    <plugins>
        <plugin>
            <groupId>org.springframework.boot</groupId>
            <artifactId>spring-boot-maven-plugin</artifactId>
        </plugin>
    </plugins>
</build>

<!-- repositories also needed for snapshots and milestones -->
Then you can create a standard Spring Boot application, like this simple HTTP server:
@SpringBootApplication
@RestController
public class Application {

    @RequestMapping("/")
    public String home() {
        return "Hello World!";
    }

    public static void main(String[] args) {
        SpringApplication.run(Application.class, args);
    }

}
When it runs it will pick up the external configuration from the
default local config server on port 8888 if it is running. To modify
the startup behaviour you can change the location of the config server
using bootstrap.properties (like application.properties but for
the bootstrap phase of an application context), e.g.
spring.cloud.config.uri: http://myconfigserver.com
The bootstrap properties will show up in the /env endpoint as a
high-priority property source, e.g.
$ curl localhost:8080/env
{
  "profiles":[],
  "configService:https://github.com/spring-cloud-samples/config-repo/bar.properties":{"foo":"bar"},
  "servletContextInitParams":{},
  "systemProperties":{...},
  ...
}
(a property source called "configService:<URL of remote repository>/<file name>" contains the property "foo" with value "bar" and is highest priority).
|
Note
|
the URL in the property source name is the git repository not the config server URL. |
Spring Cloud Config Server
The Server provides an HTTP, resource-based API for external
configuration (name-value pairs, or equivalent YAML content). The
server is easily embeddable in a Spring Boot application using the
@EnableConfigServer annotation. So this app is a config server:
@SpringBootApplication
@EnableConfigServer
public class ConfigServer {
  public static void main(String[] args) {
    SpringApplication.run(ConfigServer.class, args);
  }
}
Like all Spring Boot apps it runs on port 8080 by default, but you
can switch it to the conventional port 8888 in various ways. The
easiest, which also sets a default configuration repository,
is by launching it with spring.config.name=configserver (there
is a configserver.yml in the Config Server jar). Another is
to use your own application.properties, e.g.
server.port: 8888
spring.cloud.config.server.git.uri: file://${user.home}/config-repo
where ${user.home}/config-repo is a git repository containing
YAML and properties files.
|
Note
|
in Windows you need an extra "/" in the file URL if it is
absolute with a drive prefix, e.g. file:///${user.home}/config-repo.
|
|
Tip
|
Here’s a recipe for creating the git repository in the example above: $ cd $HOME $ mkdir config-repo $ cd config-repo $ git init . $ echo info.foo: bar > application.properties $ git add -A . $ git commit -m "Add application.properties" |
|
Warning
|
using the local filesystem for your git repository is intended for testing only. Use a server to host your configuration repositories in production. |
|
Warning
|
the initial clone of your configuration repository will be quick and efficient if you only keep text files in it. If you start to store binary files, especially large ones, you may experience delays on the first request for configuration and/or out of memory errors in the server. |
Environment Repository
Where do you want to store the configuration data for the Config
Server? The strategy that governs this behaviour is the
EnvironmentRepository, serving Environment objects. This
Environment is a shallow copy of the domain from the Spring
Environment (including propertySources as the main feature). The
Environment resources are parametrized by three variables:
-
{application}maps to "spring.application.name" on the client side; -
{profile}maps to "spring.active.profiles" on the client (comma separated list); and -
{label}which is a server side feature labelling a "versioned" set of config files.
Repository implementations generally behave just like a Spring Boot
application loading configuration files from a "spring.config.name"
equal to the {application} parameter, and "spring.profiles.active"
equal to the {profiles} parameter. Precedence rules for profiles are
also the same as in a regular Boot application: active profiles take
precedence over defaults, and if there are multiple profiles the last
one wins (like adding entries to a Map).
Example: a client application has this bootstrap configuration:
spring:
  application:
    name: foo
  profiles:
    active: dev,mysql
(as usual with a Spring Boot application, these properties could also be set as environment variables or command line arguments).
If the repository is file-based, the server will create an
Environment from application.yml (shared between all clients), and
foo.yml (with foo.yml taking precedence). If the YAML files have
documents inside them that point to Spring profiles, those are applied
with higher precendence (in order of the profiles listed), and if
there are profile-specific YAML (or properties) files these are also
applied with higher precedence than the defaults. Higher precendence
translates to a PropertySource listed earlier in the
Environment. (These are the same rules as apply in a standalone
Spring Boot application.)
Git Backend
The default implementation of EnvironmentRepository uses a Git
backend, which is very convenient for managing upgrades and physical
environments, and also for auditing changes. To change the location of
the repository you can set the "spring.cloud.config.server.git.uri"
configuration property in the Config Server (e.g. in
application.yml). If you set it with a file: prefix it should work
from a local repository so you can get started quickly and easily
without a server, but in that case the server operates directly on the
local repository without cloning it (it doesn’t matter if it’s not
bare because the Config Server never makes changes to the "remote"
repository). To scale the Config Server up and make it highly
available, you would need to have all instances of the server pointing
to the same repository, so only a shared file system would work. Even
in that case it is better to use the ssh: protocol for a shared
filesystem repository, so that the server can clone it and use a local
working copy as a cache.
This repository implementation maps the {label} parameter of the
HTTP resource to a git label (commit id, branch name or tag). If the
git branch or tag name contains a slash ("/") then the label in the
HTTP URL should be specified with the special string "(_)" instead (to
avoid ambiguity with other URL paths). Be careful with the brackets in
the URL if you are using a command line client like curl (e.g. escape
them from the shell with quotes '').
Placeholders in Git URI
Spring Cloud Config Server supports a git repository URL with
placeholders for the {application} and {profile} (and {label} if
you need it, but remember that the label is applied as a git label
anyway). So you can easily support a "one repo per application" policy
using (for example):
spring:
  cloud:
    config:
      server:
        git:
          uri: https://github.com/myorg/{application}
or a "one repo per profile" policy using a similar pattern but with
{profile}.
Pattern Matching and Multiple Repositories
There is also support for more complex requirements with pattern
matching on the application and profile name. The pattern format is a
comma-separated list of {application}/{profile} names with wildcards
(where a pattern beginning with a wildcard may need to be
quoted). Example:
spring:
  cloud:
    config:
      server:
        git:
          uri: https://github.com/spring-cloud-samples/config-repo
          repos:
            simple: https://github.com/simple/config-repo
            special:
              pattern: special*/dev*,*special*/dev*
              uri: https://github.com/special/config-repo
            local:
              pattern: local*
              uri: file:/home/configsvc/config-repo
If {application}/{profile} does not match any of the patterns, it
will use the default uri defined under
"spring.cloud.config.server.git.uri". In the above example, for the
"simple" repository, the pattern is simple/* (i.e. it only matches
one application named "simple" in all profiles). The "local"
repository matches all application names beginning with "local" in all
profiles (the /* suffix is added automatically to any pattern that
doesn’t have a profile matcher).
|
Note
|
the "one-liner" short cut used in the "simple" example above can only be used if the only property to be set is the URI. If you need to set anything else (credentials, pattern, etc.) you need to use the full form. |
The pattern property in the repo is actually an array, so you can
use a YAML array (or [0], [1], etc. suffixes in properties files)
to bind to multiple patterns. You may need to do this if you are going
to run apps with multiple profiles. Example:
spring:
  cloud:
    config:
      server:
        git:
          uri: https://github.com/spring-cloud-samples/config-repo
          repos:
            development:
              pattern:
                - */development
                - */staging
              uri: https://github.com/development/config-repo
            staging:
              pattern:
                - */qa
                - */production
uri: https://github.com/staging/config-repo|
Note
|
Spring Cloud will guess that a pattern containing a profile that
doesn’t end in * implies that you actually want to match a list of
profiles starting with this pattern (so */staging is a shortcut for
["*/staging", "*/staging,*"]). This is common where you need to run
apps in the "development" profile locally but also the "cloud" profile
remotely, for instance.
|
Every repository can also optionally store config files in
sub-directories, and patterns to search for those directories can be
specified as searchPaths. For example at the top level:
spring:
  cloud:
    config:
      server:
        git:
          uri: https://github.com/spring-cloud-samples/config-repo
          searchPaths: foo,bar*
In this example the server searches for config files in the top level and in the "foo/" sub-directory and also any sub-directory whose name begins with "bar".
By default the server clones remote repositories when configuration is first requested. The server can be configured to clone the repositories at startup. For example at the top level:
spring:
  cloud:
    config:
      server:
        git:
          uri: https://git/common/config-repo.git
          repos:
            team-a:
                pattern: team-a-*
                cloneOnStart: true
                uri: http://git/team-a/config-repo.git
            team-b:
                pattern: team-b-*
                cloneOnStart: false
                uri: http://git/team-b/config-repo.git
            team-c:
                pattern: team-c-*
                uri: http://git/team-a/config-repo.git
In this example the server clones team-a’s config-repo on startup before it accepts any requests. All other repositories will not be cloned until configuration from the repository is requested.
To use HTTP basic authentication on the remote repository add the "username" and "password" properties separately (not in the URL), e.g.
spring:
  cloud:
    config:
      server:
        git:
          uri: https://github.com/spring-cloud-samples/config-repo
          username: trolley
          password: strongpassword
If you don’t use HTTPS and user credentials, SSH should also work out
of the box when you store keys in the default directories (~/.ssh)
and the uri points to an SSH location,
e.g. "git@github.com:configuration/cloud-configuration". The
repository is accessed using JGit, so any documentation you find on
that should be applicable. HTTPS proxy settings can be set in
~/.git/config or in the same way as for any other JVM process via
system properties (-Dhttps.proxyHost and -Dhttps.proxyPort).
Placeholders in Git Search Paths
Spring Cloud Config Server also supports a search path with
placeholders for the {application} and {profile} (and {label} if
you need it). Example:
spring:
  cloud:
    config:
      server:
        git:
          uri: https://github.com/spring-cloud-samples/config-repo
          searchPaths: '{application}'
searches the repository for files in the same name as the directory (as well as the top level). Wildcards are also valid in a search path with placeholders (any matching directory is included in the search).
File System Backend
There is also a "native" profile in the Config Server that doesn’t use Git, but just loads the config files from the local classpath or file system (any static URL you want to point to with "spring.cloud.config.server.native.searchLocations"). To use the native profile just launch the Config Server with "spring.profiles.active=native".
|
Note
|
Remember to use the file: prefix for file resources (the
default without a prefix is usually the classpath). Just as with any
Spring Boot configuration you can embed ${}-style environment
placeholders, but remember that absolute paths in Windows require an
extra "/", e.g. file:///${user.home}/config-repo
|
|
Warning
|
The default value of the searchLocations is identical to a
local Spring Boot application (so [classpath:/, classpath:/config,
file:./, file:./config]). This does not expose the
application.properties from the server to all clients because any
property sources present in the server are removed before being sent
to the client.
|
|
Tip
|
A filesystem backend is great for getting started quickly and for testing. To use it in production you need to be sure that the file system is reliable, and shared across all instances of the Config Server. |
The search locations can contain placeholders for {application},
{profile} and {label}. In this way you can segregate the
directories in the path, and choose a strategy that makes sense for
you (e.g. sub-directory per application, or sub-directory per
profile).
If you don’t use placeholders in the search locations, this repository
also appends the {label} parameter of the HTTP resource to a suffix
on the search path, so properties files are loaded from each search
location and a subdirectory with the same name as the label (the
labelled properties take precedence in the Spring Environment). Thus
the default behaviour with no placeholders is the same as adding a
search location ending with /{label}/. For example `file:/tmp/config
is the same as file:/tmp/config,file:/tmp/config/{label}
Sharing Configuration With All Applications
With file-based (i.e. git, svn and native) repositories, resources
with file names in application* are shared between all client
applications (so application.properties, application.yml,
application-*.properties etc.). You can use resources with these
file names to configure global defaults and have them overridden by
application-specific files as necessary.
The #_property_overrides[property overrides] feature can also be used for setting global defaults, and with placeholders applications are allowed to override them locally.
|
Tip
|
With the "native" profile (local file system backend) it is
recommended that you use an explicit search location that isn’t part
of the server’s own configuration. Otherwise the application*
resources in the default search locations are removed because they are
part of the server.
|
Property Overrides
The Config Server has an "overrides" feature that allows the operator
to provide configuration properties to all applications that cannot be
accidentally changed by the application using the normal Spring Boot
hooks. To declare overrides just add a map of name-value pairs to
spring.cloud.config.server.overrides. For example
spring:
  cloud:
    config:
      server:
        overrides:
          foo: bar
will cause all applications that are config clients to read foo=bar
independent of their own configuration. (Of course an application can
use the data in the Config Server in any way it likes, so overrides
are not enforceable, but they do provide useful default behaviour if
they are Spring Cloud Config clients.)
|
Tip
|
Normal, Spring environment placeholders with "${}" can be escaped
(and resolved on the client) by using backslash ("\") to escape the
"$" or the "{", e.g. \${app.foo:bar} resolves to "bar" unless the
app provides its own "app.foo". Note that in YAML you don’t need to
escape the backslash itself, but in properties files you do, when you
configure the overrides on the server.
|
You can change the priority of all overrides in the client to be more like default values, allowing applications to supply their own values in environment variables or System properties, by setting the flag `
Health Indicator
Config Server comes with a Health Indicator that checks if the configured
EnvironmentRepository is working. By default it asks the EnvironmentRepository
for an application named app, the default profile and the default
label provided by the EnvironmentRepository implementation.
You can configure the Health Indicator to check more applications along with custom profiles and custom labels, e.g.
spring:
  cloud:
    config:
      server:
        health:
          repositories:
            myservice:
              label: mylabel
            myservice-dev:
              name: myservice
              profiles: development
You can disable the Health Indicator by setting spring.cloud.config.server.health.enabled=false.
Security
You are free to secure your Config Server in any way that makes sense to you (from physical network security to OAuth2 bearer tokens), and Spring Security and Spring Boot make it easy to do pretty much anything.
To use the default Spring Boot configured HTTP Basic security, just
include Spring Security on the classpath (e.g. through
spring-boot-starter-security). The default is a username of "user"
and a randomly generated password, which isn’t going to be very useful
in practice, so we recommend you configure the password (via
security.user.password) and encrypt it (see below for instructions
on how to do that).
Encryption and Decryption
|
Important
|
Prerequisites: to use the encryption and decryption features you need the full-strength JCE installed in your JVM (it’s not there by default). You can download the "Java Cryptography Extension (JCE) Unlimited Strength Jurisdiction Policy Files" from Oracle, and follow instructions for installation (essentially replace the 2 policy files in the JRE lib/security directory with the ones that you downloaded). |
If the remote property sources contain encrypted content (values
starting with {cipher}) they will be decrypted before sending to
clients over HTTP. The main advantage of this set up is that the
property values don’t have to be in plain text when they are "at rest"
(e.g. in a git repository). If a value cannot be decrypted it is
removed from the property source and an additional property is added
with the same key, but prefixed with "invalid." and a value that means
"not applicable" (usually "<n/a>"). This is largely to prevent cipher
text being used as a password and accidentally leaking.
If you are setting up a remote config repository for config client
applications it might contain an application.yml like this, for
instance:
spring:
  datasource:
    username: dbuser
    password: '{cipher}FKSAJDFGYOS8F7GLHAKERGFHLSAJ'
Encrypted values in a .properties file must not be wrapped in quotes, otherwise the value will not be decrypted:
spring.datasource.username: dbuser
spring.datasource.password: {cipher}FKSAJDFGYOS8F7GLHAKERGFHLSAJ
You can safely push this plain text to a shared git repository and the secret password is protected.
The server also exposes /encrypt and /decrypt endpoints (on the
assumption that these will be secured and only accessed by authorized
agents). If you are editing a remote config file you can use the Config Server
to encrypt values by POSTing to the /encrypt endpoint, e.g.
$ curl localhost:8888/encrypt -d mysecret
682bc583f4641835fa2db009355293665d2647dade3375c0ee201de2a49f7bda
The inverse operation is also available via /decrypt (provided the server is
configured with a symmetric key or a full key pair):
$ curl localhost:8888/decrypt -d 682bc583f4641835fa2db009355293665d2647dade3375c0ee201de2a49f7bda
mysecret
|
Tip
|
If you are testing like this with curl, then use
--data-urlencode (instead of -d) or set an explicit Content-Type:
text/plain to make sure curl encodes the data correctly when there
are special characters ('+' is particularly tricky).
|
Take the encrypted value and add the {cipher} prefix before you put
it in the YAML or properties file, and before you commit and push it
to a remote, potentially insecure store.
The /encrypt and /decrypt endpoints also both accept paths of the
form /*/{name}/{profiles} which can be used to control cryptography
per application (name) and profile when clients call into the main
Environment resource.
|
Note
|
to control the cryptography in this granular way you must also
provide a @Bean of type TextEncryptorLocator that creates a
different encryptor per name and profiles. The one that is provided
by default does not do this (so all encryptions use the same key).
|
The spring command line client (with Spring Cloud CLI extensions
installed) can also be used to encrypt and decrypt, e.g.
$ spring encrypt mysecret --key foo
682bc583f4641835fa2db009355293665d2647dade3375c0ee201de2a49f7bda
$ spring decrypt --key foo 682bc583f4641835fa2db009355293665d2647dade3375c0ee201de2a49f7bda
mysecret
To use a key in a file (e.g. an RSA public key for encryption) prepend the key value with "@" and provide the file path, e.g.
$ spring encrypt mysecret --key @${HOME}/.ssh/id_rsa.pub
AQAjPgt3eFZQXwt8tsHAVv/QHiY5sI2dRcR+...
The key argument is mandatory (despite having a -- prefix).
Key Management
The Config Server can use a symmetric (shared) key or an asymmetric one (RSA key pair). The asymmetric choice is superior in terms of security, but it is often more convenient to use a symmetric key since it is just a single property value to configure.
To configure a symmetric key you just need to set encrypt.key to a
secret String (or use an enviroment variable ENCRYPT_KEY to keep it
out of plain text configuration files).
To configure an asymmetric key you can either set the key as a
PEM-encoded text value (in encrypt.key), or via a keystore (e.g. as
created by the keytool utility that comes with the JDK). The
keystore properties are encrypt.keyStore.* with * equal to
-
location(aResourcelocation), -
password(to unlock the keystore) and -
alias(to identify which key in the store is to be used).
The encryption is done with the public key, and a private key is needed for decryption. Thus in principle you can configure only the public key in the server if you only want to do encryption (and are prepared to decrypt the values yourself locally with the private key). In practice you might not want to do that because it spreads the key management process around all the clients, instead of concentrating it in the server. On the other hand it’s a useful option if your config server really is relatively insecure and only a handful of clients need the encrypted properties.
Creating a Key Store for Testing
To create a keystore for testing you can do something like this:
$ keytool -genkeypair -alias mytestkey -keyalg RSA \
  -dname "CN=Web Server,OU=Unit,O=Organization,L=City,S=State,C=US" \
  -keypass changeme -keystore server.jks -storepass letmein
Put the server.jks file in the classpath (for instance) and then in
your application.yml for the Config Server:
encrypt:
  keyStore:
    location: classpath:/server.jks
    password: letmein
    alias: mytestkey
    secret: changeme
Using Multiple Keys and Key Rotation
In addition to the {cipher} prefix in encrypted property values, the
Config Server looks for {name:value} prefixes (zero or many) before
the start of the (Base64 encoded) cipher text. The keys are passed to
a TextEncryptorLocator which can do whatever logic it needs to
locate a TextEncryptor for the cipher. If you have configured a
keystore (encrypt.keystore.location) the default locator will look
for keys in the store with aliases as supplied by the "key" prefix,
i.e. with a cipher text like this:
foo:
  bar: `{cipher}{key:testkey}...`
the locator will look for a key named "testkey". A secret can also be
supplied via a {secret:…} value in the prefix, but if it is not
the default is to use the keystore password (which is what you get
when you build a keytore and don’t specify a secret). If you do
supply a secret it is recommended that you also encrypt the secrets
using a custom SecretLocator.
Key rotation is hardly ever necessary on cryptographic grounds if the
keys are only being used to encrypt a few bytes of configuration data
(i.e. they are not being used elsewhere), but occasionally you might
need to change the keys if there is a security breach for instance. In
that case all the clients would need to change their source config
files (e.g. in git) and use a new {key:…} prefix in all the
ciphers, checking beforehand of course that the key alias is available
in the Config Server keystore.
|
Tip
|
the {name:value} prefixes can also be added to plaintext posted
to the /encrypt endpoint, if you want to let the Config Server
handle all encryption as well as decryption.
|
Serving Encrypted Properties
Sometimes you want the clients to decrypt the configuration locally,
instead of doing it in the server. In that case you can still have
/encrypt and /decrypt endpoints (if you provide the encrypt.*
configuration to locate a key), but you need to explicitly switch off
the decryption of outgoing properties using
spring.cloud.config.server.encrypt.enabled=false. If you don’t care
about the endpoints, then it should work if you configure neither the
key nor the enabled flag.
Serving Plain Text
Instead of using the Environment abstraction (or one of the
alternative representations of it in YAML or properties format) your
applications might need generic plain text configuration files,
tailored to their environment. The Config Server provides these
through an additional endpoint at /{name}/{profile}/{label}/{path}
where "name", "profile" and "label" have the same meaning as the
regular environment endpoint, but "path" is a file name
(e.g. log.xml). The source files for this endpoint are located in
the same way as for the environment endpoints: the same search path is
used as for properties or YAML files, but instead of aggregating all
matching resources, only the first one to match is returned.
After a resource is located, placeholders in the normal format
(${…}) are resolved using the effective Environment for the
application name, profile and label supplied. In this way the resource
endpoint is tightly integrated with the environment
endpoints. Example, if you have this layout for a GIT (or SVN)
repository:
application.yml
nginx.conf
where nginx.conf looks like this:
server {
    listen              80;
    server_name         ${nginx.server.name};
}
and application.yml like this:
nginx:
  server:
    name: example.com
---
spring:
  profiles: development
nginx:
  server:
    name: develop.com
then the /foo/default/master/nginx.conf resource looks like this:
server {
    listen              80;
    server_name         example.com;
}
and /foo/development/master/nginx.conf like this:
server {
    listen              80;
    server_name         develop.com;
}
|
Note
|
just like the source files for environment configuration, the
"profile" is used to resolve the file name, so if you want a
profile-specific file then /*/development/*/logback.xml will be
resolved by a file called logback-development.xml (in preference
to logback.xml).
|
Embedding the Config Server
The Config Server runs best as a standalone application, but if you
need to you can embed it in another application. Just use the
@EnableConfigServer annotation. An optional property that can be
useful in this case is spring.cloud.config.server.bootstrap which is
a flag to indicate that the server should configure itself from its
own remote repository. The flag is off by default because it can delay
startup, but when embedded in another application it makes sense to
initialize the same way as any other application.
|
Note
|
It should be obvious, but remember that if you use the bootstrap
flag the config server will need to have its name and repository URI
configured in bootstrap.yml.
|
To change the location of the server endpoints you can (optionally)
set spring.cloud.config.server.prefix, e.g. "/config", to serve the
resources under a prefix. The prefix should start but not end with a
"/". It is applied to the @RequestMappings in the Config Server
(i.e. underneath the Spring Boot prefixes server.servletPath and
server.contextPath).
If you want to read the configuration for an application directly from
the backend repository (instead of from the config server) that’s
basically an embedded config server with no endpoints. You can switch
off the endpoints entirely if you don’t use the @EnableConfigServer
annotation (just set spring.cloud.config.server.bootstrap=true).
Push Notifications and Spring Cloud Bus
Many source code repository providers (like Github, Gitlab or Bitbucket
for instance) will notify you of changes in a repository through a
webhook. You can configure the webhook via the provider’s user
interface as a URL and a set of events in which you are
interested. For instance
Github
will POST to the webhook with a JSON body containing a list of
commits, and a header "X-Github-Event" equal to "push". If you add a
dependency on the spring-cloud-config-monitor library and activate
the Spring Cloud Bus in your Config Server, then a "/monitor" endpoint
is enabled.
When the webhook is activated the Config Server will send a
RefreshRemoteApplicationEvent targeted at the applications it thinks
might have changed. The change detection can be strategized, but by
default it just looks for changes in files that match the application
name (e.g. "foo.properties" is targeted at the "foo" application, and
"application.properties" is targeted at all applications). The strategy
if you want to override the behaviour is PropertyPathNotificationExtractor
which accepts the request headers and body as parameters and returns a list
of file paths that changed.
The default configuration works out of the box with Github, Gitlab or
Bitbucket. In addition to the JSON notifications from Github, Gitlab
or Bitbucket you can trigger a change notification by POSTing to
"/monitor" with a form-encoded body parameters path={name}. This will
broadcast to applications matching the "{name}" pattern (can contain
wildcards).
|
Note
|
the RefreshRemoteApplicationEvent will only be transmitted if
the spring-cloud-bus is activated in the Config Server and in the
client application.
|
|
Note
|
the default configuration also detects filesystem changes in local git repositories (the webhook is not used in that case but as soon as you edit a config file a refresh will be broadcast). |
Spring Cloud Config Client
A Spring Boot application can take immediate advantage of the Spring
Config Server (or other external property sources provided by the
application developer), and it will also pick up some additional
useful features related to Environment change events.
Config First Bootstrap
This is the default behaviour for any application which has the Spring
Cloud Config Client on the classpath. When a config client starts up
it binds to the Config Server (via the bootstrap configuration
property spring.cloud.config.uri) and initializes Spring
Environment with remote property sources.
The net result of this is that all client apps that want to consume
the Config Server need a bootstrap.yml (or an environment variable)
with the server address in spring.cloud.config.uri (defaults to
"http://localhost:8888").
Eureka First Bootstrap
If you are using Spring Cloud Netflix and Eureka Service Discovery, then you can have the Config Server register with Eureka if you want to, but in the default "Config First" mode, clients won’t be able to take advantage of the registration.
If you prefer to use Eureka to locate the Config Server, you can do
that by setting spring.cloud.config.discovery.enabled=true (default
"false"). The net result of that is that client apps all need a
bootstrap.yml (or an environment variable) with the Eureka server
address, e.g. in eureka.client.serviceUrl.defaultZone. The price
for using this option is an extra network round trip on start up to
locate the service registration. The benefit is that the Config Server
can change its co-ordinates, as long as Eureka is a fixed point. The
default service id is "CONFIGSERVER" but you can change that on the
client with spring.cloud.config.discovery.serviceId (and on the server
in the usual way for a service, e.g. by setting spring.application.name).
The discovery client implementations all support some kind of metadata
map (e.g. for Eureka we have eureka.instance.metadataMap). Some
additional properties of the Config Server may need to be configured
in its service registration metadata so that clients can connect
correctly. If the Config Server is secured with HTTP Basic you can
configure the credentials as "username" and "password". And if the
Config Server has a context path you can set "configPath". Example,
for a Config Server that is a Eureka client:
eureka:
  instance:
    ...
    metadataMap:
      user: osufhalskjrtl
      password: lviuhlszvaorhvlo5847
      configPath: /config
Config Client Fail Fast
In some cases, it may be desirable to fail startup of a service if
it cannot connect to the Config Server. If this is the desired
behavior, set the bootstrap configuration property
spring.cloud.config.failFast=true and the client will halt with
an Exception.
Config Client Retry
If you expect that the config server may occasionally be unavailable when
your app starts, you can ask it to keep trying after a failure. First you need
to set spring.cloud.config.failFast=true, and then you need to add
spring-retry and spring-boot-starter-aop to your classpath. The default
behaviour is to retry 6 times with an initial backoff interval of 1000ms and an
exponential multiplier of 1.1 for subsequent backoffs. You can configure these
properties (and others) using spring.cloud.config.retry.* configuration properties.
|
Tip
|
To take full control of the retry add a @Bean of type
RetryOperationsInterceptor with id "configServerRetryInterceptor". Spring
Retry has a RetryInterceptorBuilder that makes it easy to create one.
|
Locating Remote Configuration Resources
The Config Service serves property sources from /{name}/{profile}/{label}, where the default bindings in the client app are
-
"name" =
${spring.application.name} -
"profile" =
${spring.profiles.active}(actuallyEnvironment.getActiveProfiles()) -
"label" = "master"
All of them can be overridden by setting spring.cloud.config.*
(where * is "name", "profile" or "label"). The "label" is useful for
rolling back to previous versions of configuration; with the default
Config Server implementation it can be a git label, branch name or
commit id. Label can also be provided as a comma-separated list, in
which case the items in the list are tried on-by-one until one succeeds.
This can be useful when working on a feature branch, for instance,
when you might want to align the config label with your branch, but
make it optional (e.g. spring.cloud.config.label=myfeature,develop).
Security
If you use HTTP Basic security on the server then clients just need to know the password (and username if it isn’t the default). You can do that via the config server URI, or via separate username and password properties, e.g.
spring:
  cloud:
    config:
     uri: https://user:secret@myconfig.mycompany.com
or
spring:
  cloud:
    config:
     uri: https://myconfig.mycompany.com
     username: user
     password: secret
The spring.cloud.config.password and spring.cloud.config.username
values override anything that is provided in the URI.
If you deploy your apps on Cloud Foundry then the best way to provide the password is through service credentials, e.g. in the URI, since then it doesn’t even need to be in a config file. An example which works locally and for a user-provided service on Cloud Foundry named "configserver":
spring:
  cloud:
    config:
     uri: ${vcap.services.configserver.credentials.uri:http://user:password@localhost:8888}
If you use another form of security you might need to provide a
RestTemplate to the ConfigServicePropertySourceLocator (e.g. by
grabbing it in the bootstrap context and injecting one).
Spring Cloud Netflix
Service Discovery: Eureka Clients
Service Discovery is one of the key tenets of a microservice based architecture. Trying to hand configure each client or some form of convention can be very difficult to do and can be very brittle. Eureka is the Netflix Service Discovery Server and Client. The server can be configured and deployed to be highly available, with each server replicating state about the registered services to the others.
Registering with Eureka
When a client registers with Eureka, it provides meta-data about itself such as host and port, health indicator URL, home page etc. Eureka receives heartbeat messages from each instance belonging to a service. If the heartbeat fails over a configurable timetable, the instance is normally removed from the registry.
Example eureka client:
@Configuration
@ComponentScan
@EnableAutoConfiguration
@EnableEurekaClient
@RestController
public class Application {

    @RequestMapping("/")
    public String home() {
        return "Hello world";
    }

    public static void main(String[] args) {
        new SpringApplicationBuilder(Application.class).web(true).run(args);
    }

}
(i.e. utterly normal Spring Boot app). In this example we use
@EnableEurekaClient explicitly, but with only Eureka available you
could also use @EnableDiscoveryClient. Configuration is required to
locate the Eureka server. Example:
eureka:
  client:
    serviceUrl:
      defaultZone: http://localhost:8761/eureka/
where "defaultZone" is a magic string fallback value that provides the service URL for any client that doesn’t express a preference (i.e. it’s a useful default).
The default application name (service ID), virtual host and non-secure
port, taken from the Environment, are ${spring.application.name},
${spring.application.name} and ${server.port} respectively.
@EnableEurekaClient makes the app into both a Eureka "instance"
(i.e. it registers itself) and a "client" (i.e. it can query the
registry to locate other services). The instance behaviour is driven
by eureka.instance.* configuration keys, but the defaults will be
fine if you ensure that your application has a
spring.application.name (this is the default for the Eureka service
ID, or VIP).
See EurekaInstanceConfigBean and EurekaClientConfigBean for more details of the configurable options.
Authenticating with the Eureka Server
HTTP basic authentication will be automatically added to your eureka
client if one of the eureka.client.serviceUrl.defaultZone URLs has
credentials embedded in it (curl style, like
http://user:password@localhost:8761/eureka). For more complex needs
you can create a @Bean of type DiscoveryClientOptionalArgs and
inject ClientFilter instances into it, all of which will be applied
to the calls from the client to the server.
|
Note
|
Because of a limitation in Eureka it isn’t possible to support per-server basic auth credentials, so only the first set that are found will be used. |
Status Page and Health Indicator
The status page and health indicators for a Eureka instance default to
"/info" and "/health" respectively, which are the default locations of
useful endpoints in a Spring Boot Actuator application. You need to
change these, even for an Actuator application if you use a
non-default context path or servlet path
(e.g. server.servletPath=/foo) or management endpoint path
(e.g. management.contextPath=/admin). Example:
eureka:
  instance:
    statusPageUrlPath: ${management.context-path}/info
    healthCheckUrlPath: ${management.context-path}/health
These links show up in the metadata that is consumed by clients, and used in some scenarios to decide whether to send requests to your application, so it’s helpful if they are accurate.
Registering a Secure Application
If your app wants to be contacted over HTTPS you can set two flags in
the EurekaInstanceConfig, viz
eureka.instance.[nonSecurePortEnabled,securePortEnabled]=[false,true]
respectively. This will make Eureka publish instance information
showing an explicit preference for secure communication. The Spring
Cloud DiscoveryClient will always return an https://…; URI for a
service configured this way, and the Eureka (native) instance
information will have a secure health check URL.
Because of the way Eureka works internally, it will still publish a non-secure URL for status and home page unless you also override those explicitly. You can use placeholders to configure the eureka instance urls, e.g.
eureka:
  instance:
    statusPageUrl: https://${eureka.hostname}/info
    healthCheckUrl: https://${eureka.hostname}/health
    homePageUrl: https://${eureka.hostname}/
(Note that ${eureka.hostname} is a native placeholder only available
in later versions of Eureka. You could achieve the same thing with
Spring placeholders as well, e.g. using ${eureka.instance.hostName}.)
|
Note
|
If your app is running behind a proxy, and the SSL termination is in the proxy (e.g. if you run in Cloud Foundry or other platforms as a service) then you will need to ensure that the proxy "forwarded" headers are intercepted and handled by the application. An embedded Tomcat container in a Spring Boot app does this automatically if it has explicit configuration for the 'X-Forwarded-\*` headers. A sign that you got this wrong will be that the links rendered by your app to itself will be wrong (the wrong host, port or protocol). |
Eureka’s Health Checks
By default, Eureka uses the client heartbeat to determine if a client is up. Unless specified otherwise the Discovery Client will not propagate the current health check status of the application per the Spring Boot Actuator. Which means that after successful registration Eureka will always announce that the application is in 'UP' state. This behaviour can be altered by enabling Eureka health checks, which results in propagating application status to Eureka. As a consequence every other application won’t be sending traffic to application in state other then 'UP'.
eureka:
  client:
    healthcheck:
      enabled: true
If you require more control over the health checks, you may consider
implementing your own com.netflix.appinfo.HealthCheckHandler.
Eureka Metadata for Instances and Clients
It’s worth spending a bit of time understanding how the Eureka metadata works, so you can use it in a way that makes sense in your platform. There is standard metadata for things like hostname, IP address, port numbers, status page and health check. These are published in the service registry and used by clients to contact the services in a straightforward way. Additional metadata can be added to the instance registration in the eureka.instance.metadataMap, and this will be accessible in the remote clients, but in general will not change the behaviour of the client, unless it is made aware of the meaning of the metadata. There are a couple of special cases described below where Spring Cloud already assigns meaning to the metadata map.
Using Eureka on Cloudfoundry
Cloudfoundry has a global router so that all instances of the same app have the same hostname (it’s the same in other PaaS solutions with a similar architecture). This isn’t necessarily a barrier to using Eureka, but if you use the router (recommended, or even mandatory depending on the way your platform was set up), you need to explicitly set the hostname and port numbers (secure or non-secure) so that they use the router. You might also want to use instance metadata so you can distinguish between the instances on the client (e.g. in a custom load balancer). By default, the eureka.instance.instanceId is vcap.application.instance_id. For example:
eureka:
  instance:
    hostname: ${vcap.application.uris[0]}
    nonSecurePort: 80
Depending on the way the security rules are set up in your Cloudfoundry instance, you might be able to register and use the IP address of the host VM for direct service-to-service calls. This feature is not (yet) available on Pivotal Web Services (PWS).
Using Eureka on AWS
If the application is planned to be deployed to an AWS cloud, then the Eureka instance will have to be configured to be Amazon aware and this can be done by customizing the EurekaInstanceConfigBean the following way:
@Bean
@Profile("!default")
public EurekaInstanceConfigBean eurekaInstanceConfig() {
  EurekaInstanceConfigBean b = new EurekaInstanceConfigBean();
  AmazonInfo info = AmazonInfo.Builder.newBuilder().autoBuild("eureka");
  b.setDataCenterInfo(info);
  return b;
}
Changing the Eureka Instance ID
A vanilla Netflix Eureka instance is registered with an ID that is equal to its host name (i.e. only one service per host). Spring Cloud Eureka provides a sensible default that looks like this: ${spring.cloud.client.hostname}:${spring.application.name}:${spring.application.instance_id:${server.port}}}. For example myhost:myappname:8080.
Using Spring Cloud you can override this by providing a unique identifier in eureka.instance.instanceId. For example:
eureka:
  instance:
    instanceId: ${spring.application.name}:${spring.application.instance_id:${random.value}}
With this metadata, and multiple service instances deployed on
localhost, the random value will kick in there to make the instance
unique. In Cloudfoundry the spring.application.instance_id will be
populated automatically in a Spring Boot Actuator application, so the
random value will not be needed.
Using the EurekaClient
Once you have an app that is @EnableDiscoveryClient (or @EnableEurekaClient) you can use it to
discover service instances from the Eureka Server. One way to do that is to use the native
com.netflix.discovery.EurekaClient (as opposed to the Spring
Cloud DiscoveryClient), e.g.
@Autowired
private EurekaClient discoveryClient;

public String serviceUrl() {
    InstanceInfo instance = discoveryClient.getNextServerFromEureka("STORES", false);
    return instance.getHomePageUrl();
}
|
Tip
|
Don’t use the |
Alternatives to the native Netflix EurekaClient
You don’t have to use the raw Netflix EurekaClient and usually it
is more convenient to use it behind a wrapper of some sort. Spring
Cloud has support for Feign (a REST client
builder) and also Spring RestTemplate using
the logical Eureka service identifiers (VIPs) instead of physical
URLs. To configure Ribbon with a fixed list of physical servers you
can simply set <client>.ribbon.listOfServers to a comma-separated
list of physical addresses (or hostnames), where <client> is the ID
of the client.
You can also use the org.springframework.cloud.client.discovery.DiscoveryClient
which provides a simple API for discovery clients that is not specific
to Netflix, e.g.
@Autowired
private DiscoveryClient discoveryClient;

public String serviceUrl() {
    List<ServiceInstance> list = discoveryClient.getInstances("STORES");
    if (list != null && list.size() > 0 ) {
        return list.get(0).getUri();
    }
    return null;
}
Why is it so Slow to Register a Service?
Being an instance also involves a periodic heartbeat to the registry
(via the client’s serviceUrl) with default duration 30 seconds. A
service is not available for discovery by clients until the instance,
the server and the client all have the same metadata in their local
cache (so it could take 3 hearbeats). You can change the period using
eureka.instance.leaseRenewalIntervalInSeconds and this will speed up
the process of getting clients connected to other services. In
production it’s probably better to stick with the default because
there are some computations internally in the server that make
assumptions about the lease renewal period.
Service Discovery: Eureka Server
Example eureka server (e.g. using spring-cloud-starter-eureka-server to set up the classpath):
@SpringBootApplication
@EnableEurekaServer
public class Application {

    public static void main(String[] args) {
        new SpringApplicationBuilder(Application.class).web(true).run(args);
    }

}
The server has a home page with a UI, and HTTP API endpoints per the
normal Eureka functionality under /eureka/*.
Eureka background reading: see flux capacitor and google group discussion.
|
Tip
|
Due to Gradle’s dependency resolution rules and the lack of a parent bom feature, simply depending on spring-cloud-starter-eureka-server can cause failures on application startup. To remedy this the Spring dependency management plugin must be added and the Spring cloud starter parent bom must be imported like so: build.gradle
|
High Availability, Zones and Regions
The Eureka server does not have a backend store, but the service instances in the registry all have to send heartbeats to keep their registrations up to date (so this can be done in memory). Clients also have an in-memory cache of eureka registrations (so they don’t have to go to the registry for every single request to a service).
By default every Eureka server is also a Eureka client and requires (at least one) service URL to locate a peer. If you don’t provide it the service will run and work, but it will shower your logs with a lot of noise about not being able to register with the peer.
See also below for details of Ribbon support on the client side for Zones and Regions.
Standalone Mode
The combination of the two caches (client and server) and the heartbeats make a standalone Eureka server fairly resilient to failure, as long as there is some sort of monitor or elastic runtime keeping it alive (e.g. Cloud Foundry). In standalone mode, you might prefer to switch off the client side behaviour, so it doesn’t keep trying and failing to reach its peers. Example:
server:
  port: 8761

eureka:
  instance:
    hostname: localhost
  client:
    registerWithEureka: false
    fetchRegistry: false
    serviceUrl:
      defaultZone: http://${eureka.instance.hostname}:${server.port}/eureka/
Notice that the serviceUrl is pointing to the same host as the local
instance.
Peer Awareness
Eureka can be made even more resilient and available by running
multiple instances and asking them to register with each other. In
fact, this is the default behaviour, so all you need to do to make it
work is add a valid serviceUrl to a peer, e.g.
---
spring:
  profiles: peer1
eureka:
  instance:
    hostname: peer1
  client:
    serviceUrl:
      defaultZone: http://peer2/eureka/

---
spring:
  profiles: peer2
eureka:
  instance:
    hostname: peer2
  client:
    serviceUrl:
      defaultZone: http://peer1/eureka/
In this example we have a YAML file that can be used to run the same
server on 2 hosts (peer1 and peer2), by running it in different
Spring profiles. You could use this configuration to test the peer
awareness on a single host (there’s not much value in doing that in
production) by manipulating /etc/hosts to resolve the host names. In
fact, the eureka.instance.hostname is not needed if you are running
on a machine that knows its own hostname (it is looked up using
java.net.InetAddress by default).
You can add multiple peers to a system, and as long as they are all connected to each other by at least one edge, they will synchronize the registrations amongst themselves. If the peers are physically separated (inside a data centre or between multiple data centres) then the system can in principle survive split-brain type failures.
Prefer IP Address
In some cases, it is preferable for Eureka to advertise the IP Adresses
of services rather than the hostname. Set eureka.instance.preferIpAddress
to true and when the application registers with eureka, it will use its
IP Address rather than its hostname.
Circuit Breaker: Hystrix Clients
Netflix has created a library called Hystrix that implements the circuit breaker pattern. In a microservice architecture it is common to have multiple layers of service calls.

A service failure in the lower level of services can cause cascading failure all the way up to the user. When calls to a particular service reach a certain threshold (20 failures in 5 seconds is the default in Hystrix), the circuit opens and the call is not made. In cases of error and an open circuit a fallback can be provided by the developer.

Having an open circuit stops cascading failures and allows overwhelmed or failing services time to heal. The fallback can be another Hystrix protected call, static data or a sane empty value. Fallbacks may be chained so the first fallback makes some other business call which in turn falls back to static data.
Example boot app:
@SpringBootApplication
@EnableCircuitBreaker
public class Application {

    public static void main(String[] args) {
        new SpringApplicationBuilder(Application.class).web(true).run(args);
    }

}

@Component
public class StoreIntegration {

    @HystrixCommand(fallbackMethod = "defaultStores")
    public Object getStores(Map<String, Object> parameters) {
        //do stuff that might fail
    }

    public Object defaultStores(Map<String, Object> parameters) {
        return /* something useful */;
    }
}
The @HystrixCommand is provided by a Netflix contrib library called
"javanica".
Spring Cloud automatically wraps Spring beans with that
annotation in a proxy that is connected to the Hystrix circuit
breaker. The circuit breaker calculates when to open and close the
circuit, and what to do in case of a failure.
To configure the @HystrixCommand you can use the commandProperties
attribute with a list of @HystrixProperty annotations. See
here
for more details. See the Hystrix wiki
for details on the properties available.
Propagating the Security Context or using Spring Scopes
If you want some thread local context to propagate into a @HystrixCommand the default declaration will not work because it executes the command in a thread pool (in case of timeouts). You can switch Hystrix to use the same thread as the caller using some configuration, or directly in the annotation, by asking it to use a different "Isolation Strategy". For example:
@HystrixCommand(fallbackMethod = "stubMyService",
    commandProperties = {
      @HystrixProperty(name="execution.isolation.strategy", value="SEMAPHORE")
    }
)
...
The same thing applies if you are using @SessionScope or @RequestScope. You will know when you need to do this because of a runtime exception that says it can’t find the scoped context.
Health Indicator
The state of the connected circuit breakers are also exposed in the
/health endpoint of the calling application.
{
    "hystrix": {
        "openCircuitBreakers": [
            "StoreIntegration::getStoresByLocationLink"
        ],
        "status": "CIRCUIT_OPEN"
    },
    "status": "UP"
}
Hystrix Metrics Stream
To enable the Hystrix metrics stream include a dependency on spring-boot-starter-actuator. This will expose the /hystrix.stream as a management endpoint.
    <dependency>
        <groupId>org.springframework.boot</groupId>
        <artifactId>spring-boot-starter-actuator</artifactId>
    </dependency>
Circuit Breaker: Hystrix Dashboard
One of the main benefits of Hystrix is the set of metrics it gathers about each HystrixCommand. The Hystrix Dashboard displays the health of each circuit breaker in an efficient manner.

To run the Hystrix Dashboard annotate your Spring Boot main class with @EnableHystrixDashboard. You then visit /hystrix and point the dashboard to an individual instances /hystrix.stream endpoint in a Hystrix client application.
Turbine
Looking at an individual instances Hystrix data is not very useful in terms of the overall health of the system. Turbine is an application that aggregates all of the relevant /hystrix.stream endpoints into a combined /turbine.stream for use in the Hystrix Dashboard. Individual instances are located via Eureka. Running Turbine is as simple as annotating your main class with the @EnableTurbine annotation (e.g. using spring-cloud-starter-turbine to set up the classpath). All of the documented configuration properties from the Turbine 1 wiki apply. The only difference is that the turbine.instanceUrlSuffix does not need the port prepended as this is handled automatically unless turbine.instanceInsertPort=false.
The configuration key turbine.appConfig is a list of eureka serviceIds that turbine will use to lookup instances. The turbine stream is then used in the Hystrix dashboard using a url that looks like: http://my.turbine.sever:8080/turbine.stream?cluster=<CLUSTERNAME>; (the cluster parameter can be omitted if the name is "default"). The cluster parameter must match an entry in turbine.aggregator.clusterConfig. Values returned from eureka are uppercase, thus we expect this example to work if there is an app registered with Eureka called "customers":
turbine:
  aggregator:
    clusterConfig: CUSTOMERS
  appConfig: customers
The clusterName can be customized by a SPEL expression in turbine.clusterNameExpression with root an instance of InstanceInfo. The default value is appName, which means that the Eureka serviceId ends up as the cluster key (i.e. the InstanceInfo for customers has an appName of "CUSTOMERS"). A different example would be turbine.clusterNameExpression=aSGName, which would get the cluster name from the AWS ASG name. Another example:
turbine:
  aggregator:
    clusterConfig: SYSTEM,USER
  appConfig: customers,stores,ui,admin
  clusterNameExpression: metadata['cluster']
In this case, the cluster name from 4 services is pulled from their metadata map, and is expected to have values that include "SYSTEM" and "USER".
To use the "default" cluster for all apps you need a string literal expression (with single quotes):
turbine:
  appConfig: customers,stores
  clusterNameExpression: 'default'
Spring Cloud provides a spring-cloud-starter-turbine that has all the dependencies you need to get a Turbine server running. Just create a Spring Boot application and annotate it with @EnableTurbine.
Turbine AMQP
In some environments (e.g. in a PaaS setting), the classic Turbine model of pulling metrics from all the distributed Hystrix commands doesn’t work. In that case you might want to have your Hystrix commands push metrics to Turbine, and Spring Cloud enables that with AMQP messaging. All you need to do on the client is add a dependency to spring-cloud-netflix-hystrix-amqp and make sure there is a Rabbit broker available (see Spring Boot documentation for details on how to configure the client credentials, but it should work out of the box for a local broker or in Cloud Foundry).
On the server side Just create a Spring Boot application and annotate it with @EnableTurbineAmqp and by default it will come up on port 8989 (point your Hystrix dashboard to that port, any path). You can customize the port using either server.port or turbine.amqp.port. If you have spring-boot-starter-web and spring-boot-starter-actuator on the classpath as well, then you can open up the Actuator endpoints on a separate port (with Tomcat by default) by providing a management.port which is different.
You can then point the Hystrix Dashboard to the Turbine AMQP Server instead of individual Hystrix streams. If Turbine AMQP is running on port 8989 on myhost, then put http://myhost:8989 in the stream input field in the Hystrix Dashboard. Circuits will be prefixed by their respective serviceId, followed by a dot, then the circuit name.
Spring Cloud provides a spring-cloud-starter-turbine-amqp that has all the dependencies you need to get a Turbine AMQP server running. You need Java 8 to run the app because it is Netty-based.
Customizing the AMQP ConnectionFactory
If you are using AMQP there needs to be a ConnectionFactory (from
Spring Rabbit) in the application context. If there is a single
ConnectionFactory it will be used, or if there is a one qualified as
@HystrixConnectionFactory (on the client) and
@TurbineConnectionFactory (on the server) it will be preferred over
others, otherwise the @Primary one will be used. If there are
multiple unqualified connection factories there will be an error.
Note that Spring Boot (as of 1.2.2) creates a ConnectionFactory that
is not @Primary, so if you want to use one connection factory for
the bus and another for business messages, you need to create both,
and annotate them @*ConnectionFactory and @Primary respectively.
Client Side Load Balancer: Ribbon
Ribbon is a client side load balancer which gives you a lot of control
over the behaviour of HTTP and TCP clients. Feign already uses Ribbon,
so if you are using @FeignClient then this section also applies.
A central concept in Ribbon is that of the named client. Each load
balancer is part of an ensemble of components that work together to
contact a remote server on demand, and the ensemble has a name that
you give it as an application developer (e.g. using the @FeignClient
annotation). Spring Cloud creates a new ensemble as an
ApplicationContext on demand for each named client using
RibbonClientConfiguration. This contains (amongst other things) an
ILoadBalancer, a RestClient, and a ServerListFilter.
Customizing the Ribbon Client
You can configure some bits of a Ribbon client using external
properties in <client>.ribbon.*, which is no different than using
the Netflix APIs natively, except that you can use Spring Boot
configuration files. The native options can
be inspected as static fields in CommonClientConfigKey (part of
ribbon-core).
Spring Cloud also lets you take full control of the client by
declaring additional configuration (on top of the
RibbonClientConfiguration) using @RibbonClient. Example:
@Configuration
@RibbonClient(name = "foo", configuration = FooConfiguration.class)
public class TestConfiguration {
}
In this case the client is composed from the components already in
RibbonClientConfiguration together with any in FooConfiguration
(where the latter generally will override the former).
|
Warning
|
The FooConfiguration has to be @Configuration but take
care that it is not in a @ComponentScan for the main application
context, otherwise it will be shared by all the @RibbonClients. If
you use @ComponentScan (or @SpringBootApplication) you need to
take steps to avoid it being included (for instance put it in a
separate, non-overlapping package, or specify the packages to scan
explicitly in the @ComponentScan).
|
Spring Cloud Netflix provides the following beans by default for ribbon
(BeanType beanName: ClassName):
-
IClientConfigribbonClientConfig:DefaultClientConfigImpl -
IRuleribbonRule:ZoneAvoidanceRule -
IPingribbonPing:NoOpPing -
ServerList<Server>ribbonServerList:ConfigurationBasedServerList -
ServerListFilter<Server>ribbonServerListFilter:ZonePreferenceServerListFilter -
ILoadBalancerribbonLoadBalancer:ZoneAwareLoadBalancer
Creating a bean of one of those type and placing it in a @RibbonClient
configuration (such as FooConfiguration above) allows you to override each
one of the beans described. Example:
@Configuration
public class FooConfiguration {
    @Bean
    public IPing ribbonPing(IClientConfig config) {
        return new PingUrl();
    }
}
This replaces the NoOpPing with PingUrl.
Using Ribbon with Eureka
When Eureka is used in conjunction with Ribbon the ribbonServerList
is overridden with an extension of DiscoveryEnabledNIWSServerList
which populates the list of servers from Eureka. It also replaces the
IPing interface with NIWSDiscoveryPing which delegates to Eureka
to determine if a server is up. The ServerList that is installed by
default is a DomainExtractingServerList and the purpose of this is
to make physical metadata available to the load balancer without using
AWS AMI metadata (which is what Netflix relies on). By default the
server list will be constructed with "zone" information as provided in
the instance metadata (so on the client set
eureka.instance.metadataMap.zone), and if that is missing it can use
the domain name from the server hostname as a proxy for zone (if the
flag approximateZoneFromHostname is set). Once the zone information is
available it can be used in a ServerListFilter (by default it will
be used to locate a server in the same zone as the client because the
default is a ZonePreferenceServerListFilter).
Example: How to Use Ribbon Without Eureka
Eureka is a convenient way to abstract the discovery of remote servers
so you don’t have to hard code their URLs in clients, but if you
prefer not to use it, Ribbon and Feign are still quite
amenable. Suppose you have declared a @RibbonClient for "stores",
and Eureka is not in use (and not even on the classpath). The Ribbon
client defaults to a configured server list, and you can supply the
configuration like this
stores:
  ribbon:
    listOfServers: example.com,google.com
Example: Disable Eureka use in Ribbon
Setting the property ribbon.eureka.enabled = false will explicitly
disable the use of Eureka in Ribbon.
ribbon:
  eureka:
   enabled: false
Using the Ribbon API Directly
You can also use the LoadBalancerClient directly. Example:
public class MyClass {
    @Autowired
    private LoadBalancerClient loadBalancer;

    public void doStuff() {
        ServiceInstance instance = loadBalancer.choose("stores");
        URI storesUri = URI.create(String.format("http://%s:%s", instance.getHost(), instance.getPort()));
        // ... do something with the URI
    }
}
Declarative REST Client: Feign
Feign is a declarative web service client. It makes writing web service clients easier. To use Feign create an interface and annotate it. It has pluggable annotation support including Feign annotations and JAX-RS annotations. Feign also supports pluggable encoders and decoders. Spring Cloud adds support for Spring MVC annotations and for using the same HttpMessageConverters used by default in Spring Web. Spring Cloud integrates Ribbon and Eureka to provide a load balanced http client when using Feign.
Example spring boot app
@Configuration
@ComponentScan
@EnableAutoConfiguration
@EnableEurekaClient
@EnableFeignClients
public class Application {

    public static void main(String[] args) {
        SpringApplication.run(Application.class, args);
    }

}@FeignClient("stores")
public interface StoreClient {
@RequestMapping(method = RequestMethod.GET, value = "/stores")
List<Store> getStores();
@RequestMapping(method = RequestMethod.POST, value = "/stores/{storeId}", consumes = "application/json")
Store update(@PathVariable("storeId") Long storeId, Store store);
}In the @FeignClient annotation the String value ("stores" above) is
an arbitrary client name, which is used to create a Ribbon load
balancer (see below for details of Ribbon
support). You can also specify a URL using the url attribute
(absolute value or just a hostname). The name of the bean in the application context is the fully qualified name of the interface. An alias is also created which is the 'name' attribute plus 'FeignClient'. For the example above, @Qualifier("storesFeignClient") could be used to reference the bean.
The Ribbon client above will want to discover the physical addresses for the "stores" service. If your application is a Eureka client then it will resolve the service in the Eureka service registry. If you don’t want to use Eureka, you can simply configure a list of servers in your external configuration (see above for example).
Overriding Feign Defaults
A central concept in Spring Cloud’s Feign support is that of the named client. Each feign client is part of an ensemble of components that work together to contact a remote server on demand, and the ensemble has a name that you give it as an application developer using the @FeignClient annotation. Spring Cloud creates a new ensemble as an
ApplicationContext on demand for each named client using FeignClientsConfiguration. This contains (amongst other things) an feign.Decoder, a feign.Encoder, and a feign.Contract.
Spring Cloud lets you take full control of the feign client by declaring additional configuration (on top of the FeignClientsConfiguration) using @FeignClient. Example:
@FeignClient(name = "stores", configuration = FooConfiguration.class)
public interface StoreClient {
    //..
}
In this case the client is composed from the components already in FeignClientsConfiguration together with any in FooConfiguration (where the latter will override the former).
|
Warning
|
The FooConfiguration has to be @Configuration but take care that it is not in a @ComponentScan for the main application context, otherwise it will be used for every @FeignClient. If you use @ComponentScan (or @SpringBootApplication) you need to take steps to avoid it being included (for instance put it in a separate, non-overlapping package, or specify the packages to scan explicitly in the @ComponentScan).
|
|
Note
|
The serviceId attribute is now deprecated in favor of the name attribute.
|
|
Warning
|
Previously, using the url attribute, did not require the name attribute. Using name is now required.
|
Placeholders are supported in the name and url attributes.
@FeignClient(name = "${feign.name}", url = "${feign.url}")
public interface StoreClient {
    //..
}
Spring Cloud Netflix provides the following beans by default for feign (BeanType beanName: ClassName):
-
DecoderfeignDecoder:ResponseEntityDecoder(which wraps aSpringDecoder) -
EncoderfeignEncoder:SpringEncoder -
LoggerfeignLogger:Slf4jLogger -
ContractfeignContract:SpringMvcContract -
Feign.BuilderfeignBuilder:HystrixFeign.Builder
Spring Cloud Netflix does not provide the following beans by default for feign, but still looks up beans of these types from the application context to create the feign client:
-
Logger.Level -
Retryer -
ErrorDecoder -
Request.Options -
Collection<RequestInterceptor>
Creating a bean of one of those type and placing it in a @FeignClient configuration (such as FooConfiguration above) allows you to override each one of the beans described. Example:
@Configuration
public class FooConfiguration {
    @Bean
    public Contract feignContract() {
        return new feign.Contract.Default();
    }

    @Bean
    public BasicAuthRequestInterceptor basicAuthRequestInterceptor() {
        return new BasicAuthRequestInterceptor("user", "password");
    }
}
This replaces the SpringMvcContract with feign.Contract.Default and adds a RequestInterceptor to the collection of RequestInterceptor.
Default configurations can be specified in the @EnableFeignClients attribute defaultConfiguration in a similar manner as described above. The difference is that this configuration will apply to all feign clients.
Feign Hystrix Support
If Hystrix is on the classpath, by default Feign will wrap all methods with a circuit breaker. Returning a com.netflix.hystrix.HystrixCommand is also available. This lets you use reactive patterns (with a call to .toObservable() or .observe() or asynchronous use (with a call to .queue()).
To disable Hystrix support for Feign, set feign.hystrix.enabled=false.
To disable Hystrix support on a per-client basis create a vanilla Feign.Builder with the "prototype" scope, e.g.:
@Configuration
public class FooConfiguration {
    @Bean
	@Scope("prototype")
	public Feign.Builder feignBuilder() {
		return Feign.builder();
	}
}
Feign Hystrix Fallbacks
Hystrix supports the notion of a fallback: a default code path that is executed when they circuit is open or there is an error. To enable fallbacks for a given @FeignClient set the fallback attribute to the class name that implements the fallback.
@FeignClient(name = "hello", fallback = HystrixClientFallback.class)
protected interface HystrixClient {
    @RequestMapping(method = RequestMethod.GET, value = "/hello")
    Hello iFailSometimes();
}

static class HystrixClientFallback implements HystrixClient {
    @Override
    public Hello iFailSometimes() {
        return new Hello("fallback");
    }
}|
Warning
|
There is a limitation with the implementation of fallbacks in Feign and how Hystrix fallbacks work. Fallbacks are currently not supported for methods that return com.netflix.hystrix.HystrixCommand and rx.Observable.
|
Feign Inheritance Support
Feign supports boilerplate apis via single-inheritance interfaces. This allows grouping common operations into convenient base interfaces.
public interface UserService {

    @RequestMapping(method = RequestMethod.GET, value ="/users/{id}")
    User getUser(@PathVariable("id") long id);
}@RestController
public class UserResource implements UserService {
}package project.user;
@FeignClient("users")
public interface UserClient extends UserService {
}|
Note
|
It is generally not advisable to share an interface between a server and a client. It introduces tight coupling, and also actually doesn’t work with Spring MVC in its current form (method parameter mapping is not inherited). |
Feign request/response compression
You may consider enabling the request or response GZIP compression for your Feign requests. You can do this by enabling one of the properties:
feign.compression.request.enabled=true
feign.compression.response.enabled=true
Feign request compression gives you settings similar to what you may set for your web server:
feign.compression.request.enabled=true
feign.compression.request.mime-types=text/xml,application/xml,application/json
feign.compression.request.min-request-size=2048
These properties allow you to be selective about the compressed media types and minimum request threshold length.
Feign logging
A logger is created for each Feign client created. By default the name of the logger is the full class name of the interface used to create the Feign client. Feign logging only responds to the DEBUG level.
logging.level.project.user.UserClient: DEBUGThe Logger.Level object that you may configure per client, tells Feign how much to log. Choices are:
-
NONE, No logging (DEFAULT). -
BASIC, Log only the request method and URL and the response status code and execution time. -
HEADERS, Log the basic information along with request and response headers. -
FULL, Log the headers, body, and metadata for both requests and responses.
For example, the following would set the Logger.Level to FULL:
@Configuration
public class FooConfiguration {
    @Bean
    Logger.Level feignLoggerLevel() {
        return Logger.Level.FULL;
    }
}
External Configuration: Archaius
Archaius is the Netflix client side configuration library. It is the library used by all of the Netflix OSS components for configuration. Archaius is an extension of the Apache Commons Configuration project. It allows updates to configuration by either polling a source for changes or for a source to push changes to the client. Archaius uses Dynamic<Type>Property classes as handles to properties.
class ArchaiusTest {
    DynamicStringProperty myprop = DynamicPropertyFactory
            .getInstance()
            .getStringProperty("my.prop");

    void doSomething() {
        OtherClass.someMethod(myprop.get());
    }
}
Archaius has its own set of configuration files and loading priorities. Spring applications should generally not use Archaius directly, but the need to configure the Netflix tools natively remains. Spring Cloud has a Spring Environment Bridge so Archaius can read properties from the Spring Environment. This allows Spring Boot projects to use the normal configuration toolchain, while allowing them to configure the Netflix tools, for the most part, as documented.
Router and Filter: Zuul
Routing in an integral part of a microservice architecture. For example, / may be mapped to your web application, /api/users is mapped to the user service and /api/shop is mapped to the shop service. Zuul is a JVM based router and server side load balancer by Netflix.
Netflix uses Zuul for the following:
-
Authentication
-
Insights
-
Stress Testing
-
Canary Testing
-
Dynamic Routing
-
Service Migration
-
Load Shedding
-
Security
-
Static Response handling
-
Active/Active traffic management
Zuul’s rule engine allows rules and filters to be written in essentially any JVM language, with built in support for Java and Groovy.
|
Note
|
The configuration property zuul.max.host.connections has been replaced by two new properties, zuul.host.maxTotalConnections and zuul.host.maxPerRouteConnections which default to 200 and 20 respectively.
|
Embedded Zuul Reverse Proxy
Spring Cloud has created an embedded Zuul proxy to ease the development of a very common use case where a UI application wants to proxy calls to one or more back end services. This feature is useful for a user interface to proxy to the backend services it requires, avoiding the need to manage CORS and authentication concerns independently for all the backends.
To enable it, annotate a Spring Boot main class with
@EnableZuulProxy, and this forwards local calls to the appropriate
service. By convention, a service with the Eureka ID "users", will
receive requests from the proxy located at /users (with the prefix
stripped). The proxy uses Ribbon to locate an instance to forward to
via Eureka, and all requests are executed in a hystrix command, so
failures will show up in Hystrix metrics, and once the circuit is open
the proxy will not try to contact the service.
To skip having a service automatically added, set
zuul.ignored-services to a list of service id patterns. If a service
matches a pattern that is ignored, but also included in the explicitly
configured routes map, then it will be unignored. Example:
 zuul:
  ignoredServices: '*'
  routes:
    users: /myusers/**
In this example, all services are ignored except "users".
To augment or change the proxy routes, you can add external configuration like the following:
 zuul:
  routes:
    users: /myusers/**
This means that http calls to "/myusers" get forwarded to the "users" service (for example "/myusers/101" is forwarded to "/101").
To get more fine-grained control over a route you can specify the path and the serviceId independently:
 zuul:
  routes:
    users:
      path: /myusers/**
      serviceId: users_service
This means that http calls to "/myusers" get forwarded to the "users_service" service. The route has to have a "path" which can be specified as an ant-style pattern, so "/myusers/*" only matches one level, but "/myusers/**" matches hierarchically.
The location of the backend can be specified as either a "serviceId" (for a Eureka service) or a "url" (for a physical location), e.g.
 zuul:
  routes:
    users:
      path: /myusers/**
      url: http://example.com/users_service
These simple url-routes doesn’t get executed as HystrixCommand nor can you loadbalance multiple url with Ribbon. To achieve this specify a service-route and configure a Ribbon client for the serviceId (this currently requires disabling Eureka support in Ribbon: see above for more information), e.g.
zuul:
  routes:
    users:
      path: /myusers/**
      serviceId: users

ribbon:
  eureka:
    enabled: false

users:
  ribbon:
    listOfServers: example.com,google.com
You can provide convention between serviceId and routes using regexmapper. It uses regular expression named group to extract variables from serviceId and inject them into a route pattern.
@Bean
public PatternServiceRouteMapper serviceRouteMapper() {
    return new PatternServiceRouteMapper(
        "(?<name>^.+)-(?<version>v.+$)",
        "${version}/${name}");
}
This means that a serviceId "myusers-v1" will be mapped to route "/v1/myusers/**". Any regular expression is accepted but all named group must be present in both servicePattern and routePattern. If servicePattern do not match a serviceId, the default behavior is used. In exemple above, a serviceId "myusers" will be mapped to route "/myusers/**" (no version detected) These feature is disable by default and is only applied to discovered services.
To add a prefix to all mappings, set zuul.prefix to a value, such as
/api. The proxy prefix is stripped from the request before the
request is forwarded by default (switch this behaviour off with
zuul.stripPrefix=false). You can also switch off the stripping of
the service-specific prefix from individual routes, e.g.
 zuul:
  routes:
    users:
      path: /myusers/**
      stripPrefix: false
In this example requests to "/myusers/101" will be forwarded to "/myusers/101" on the "users" service.
The zuul.routes entries actually bind to an object of type ZuulProperties. If you
look at the properties of that object you will see that it also has a "retryable" flag.
Set that flag to "true" to have the Ribbon client automatically retry failed requests
(and if you need to you can modify the parameters of the retry operations using
the Ribbon client configuration).
The X-Forwarded-Host header is added to the forwarded requests by
default. To turn it off set zuul.addProxyHeaders = false. The
prefix path is stripped by default, and the request to the backend
picks up a header "X-Forwarded-Prefix" ("/myusers" in the examples
above).
An application with the @EnableZuulProxy could act as a standalone
server if you set a default route ("/"), for example zuul.route.home:
/ would route all traffic (i.e. "/**") to the "home" service.
If more fine-grained ignoring is needed, you can specify specific patterns to ignore. These patterns are being evaluated at the start of the route location process, which means prefixes should be included in the pattern to warrant a match. Ignored patterns span all services and supersede any other route specification.
 zuul:
  ignoredPatterns: /**/admin/**
  routes:
    users: /myusers/**
This means that all calls such as "/myusers/101" will be forwarded to "/101" on the "users" service. But calls including "/admin/" will not resolve.
Cookies and Sensitive Headers
It’s OK to share headers between services in the same system, but you probably don’t want sensitive headers leaking downstream into external servers. You can specify a list of ignored headers as part of the route configuration. Cookies play a special role because they have well-defined semantics in browsers, and they are always to be treated as sensitive. If the consumer of your proxy is a browser, then cookies for downstream services also cause problems for the user because they all get jumbled up (all downstream services look like they come from the same place).
If you are careful with the design of your services, for example if only one of the downstream services sets cookies, then you might be able to let them flow from the backend all the way up to the caller. Also, if your proxy sets cookies and all your back end services are part of the same system, it can be natural to simply share them (and for instance us Spring Session to link them up to some shared state). Other than that, any cookies that get set by downstream services are likely to be not very useful to the caller, so it is recommended that you make (at least) "Set-Cookie" and "Cookie" into sensitive headers for routes that are not part of your domain. Even for routes that are part of your domain, try to think carefully about what it means before allowing cookies to flow between them and the proxy.
The sensitive headers can be configured as a comma-separate list per route, e.g.
 zuul:
  routes:
    users:
      path: /myusers/**
      sensitiveHeaders: Cookie,Set-Cookie,Authorization
url: https://dowstream|
Note
|
this is the default value for sensitiveHeaders, so you don’t
need to set it unless you want it to be different. N.B. this is new in
Spring Cloud Netflix 1.1 (in 1.0 the user had no control over headers
and all cookies flow in both directions).
|
In addition to the per-route sensitive headers, you can set a global
value for zuul.ignoredHeaders for values that should be discarded
(both request and response) during interactions with downstream
services. By default these are empty, if Spring Security is not on the
classpath, and otherwise they are initialized to a set of well-known
"security" headers (e.g. involving caching) as specified by Spring
Security. The assumption in this case is that the downstream services
might add these headers too, and we want the values from the proxy.
Strangulation Patterns and Local Forwards
A common pattern when migrating an existing application or API is to "strangle" old endpoints, slowly replacing them with different implementations. The Zuul proxy is a useful tool for this because you can use it to handle all traffic from clients of the old endpoints, but redirect some of the requests to new ones.
Example configuration:
 zuul:
  routes:
    first:
      path: /first/**
      url: http://first.example.com
    second:
      path: /second/**
      url: forward:/second
    third:
      path: /third/**
      url: forward:/3rd
    legacy:
      path: /**
      url: http://legacy.example.com
In this example we are strangling the "legacy" app which is mapped to
all requests that do not match one of the other patterns. Paths in
/first/** have been extracted into a new service with an external
URL. And paths in /second/** are forwared so they can be handled
locally, e.g. with a normal Spring @RequestMapping. Paths in
/third/** are also forwarded, but with a different prefix
(i.e. /third/foo is forwarded to /3rd/foo).
|
Note
|
The ignored pattterns aren’t completely ignored, they just aren’t handled by the proxy (so they are also effectively forwarded locally). |
Uploading Files through Zuul
If you @EnableZuulProxy you can use the proxy paths to
upload files and it should just work as long as the files
are small. For large files there is an alternative path
which bypasses the Spring DispatcherServlet (to
avoid multipart processing) in "/zuul/*". I.e. if
zuul.routes.customers=/customers/** then you can
POST large files to "/zuul/customers/*". The servlet
path is externalized via zuul.servletPath. Extremely
large files will also require elevated timeout settings
if the proxy route takes you through a Ribbon load
balancer, e.g.
hystrix.command.default.execution.isolation.thread.timeoutInMilliseconds: 60000
ribbon:
  ConnectTimeout: 3000
  ReadTimeout: 60000
Note that for streaming to work with large files, you need to use chunked encoding in the request (which some browsers do not do by default). E.g. on the command line:
$ curl -v -H "Transfer-Encoding: chunked" \
    -F "file=@mylarge.iso" localhost:9999/zuul/simple/file
Plain Embedded Zuul
You can also run a Zuul server without the proxying, or switch on parts of the proxying platform selectively, if you
use @EnableZuulServer (instead of @EnableZuulProxy). Any beans that you add to the application of type ZuulFilter
will be installed automatically, as they are with @EnableZuulProxy, but without any of the proxy filters being added
automatically.
In this case the routes into the Zuul server are still specified by configuring "zuul.routes.*", but there is no service discovery and no proxying, so the "serviceId" and "url" settings are ignored. For example:
 zuul:
  routes:
    api: /api/**
maps all paths in "/api/**" to the Zuul filter chain.
Disable Zuul Filters
Zuul for Spring Cloud comes with a number of ZuulFilter beans enabled by default
in both proxy and server mode. See the zuul filters package for the
possible filters that are enabled. If you want to disable one, simply set
zuul.<SimpleClassName>.<filterType>.disable=true. By convention, the package after
filters is the Zuul filter type. For example to disable
org.springframework.cloud.netflix.zuul.filters.post.SendResponseFilter set
zuul.SendResponseFilter.post.disable=true.
Polyglot support with Sidecar
Do you have non-jvm languages you want to take advantage of Eureka, Ribbon and Config Server? The Spring Cloud Netflix Sidecar was inspired by Netflix Prana. It includes a simple http api to get all of the instances (ie host and port) for a given service. You can also proxy service calls through an embedded Zuul proxy which gets its route entries from Eureka. The Spring Cloud Config Server can be accessed directly via host lookup or through the Zuul Proxy. The non-jvm app should implement a health check so the Sidecar can report to eureka if the app is up or down.
To enable the Sidecar, create a Spring Boot application with @EnableSidecar.
This annotation includes @EnableCircuitBreaker, @EnableDiscoveryClient,
and @EnableZuulProxy. Run the resulting application on the same host as the
non-jvm application.
To configure the side car add sidecar.port and sidecar.health-uri to application.yml.
The sidecar.port property is the port the non-jvm app is listening on. This
is so the Sidecar can properly register the app with Eureka. The sidecar.health-uri
is a uri accessible on the non-jvm app that mimicks a Spring Boot health
indicator. It should return a json document like the following:
{
  "status":"UP"
}
Here is an example application.yml for a Sidecar application:
server:
  port: 5678
spring:
  application:
    name: sidecar

sidecar:
  port: 8000
  health-uri: http://localhost:8000/health.json
The api for the DiscoveryClient.getInstances() method is /hosts/{serviceId}.
Here is an example response for /hosts/customers that returns two instances on
different hosts. This api is accessible to the non-jvm app (if the sidecar is
on port 5678) at http://localhost:5678/hosts/{serviceId}.
[
    {
        "host": "myhost",
        "port": 9000,
        "uri": "http://myhost:9000",
        "serviceId": "CUSTOMERS",
        "secure": false
    },
    {
        "host": "myhost2",
        "port": 9000,
        "uri": "http://myhost2:9000",
        "serviceId": "CUSTOMERS",
        "secure": false
    }
]
The Zuul proxy automatically adds routes for each service known in eureka to
/<serviceId>, so the customers service is available at /customers. The
Non-jvm app can access the customer service via http://localhost:5678/customers
(assuming the sidecar is listening on port 5678).
If the Config Server is registered with Eureka, non-jvm application can access
it via the Zuul proxy. If the serviceId of the ConfigServer is configserver
and the Sidecar is on port 5678, then it can be accessed at
http://localhost:5678/configserver
Non-jvm app can take advantage of the Config Server’s ability to return YAML documents. For example, a call to http://sidecar.local.spring.io:5678/configserver/default-master.yml might result in a YAML document like the following
eureka:
  client:
    serviceUrl:
      defaultZone: http://localhost:8761/eureka/
  password: password
info:
  description: Spring Cloud Samples
  url: https://github.com/spring-cloud-samples
RxJava with Spring MVC
Spring Cloud Netflix includes the RxJava.
RxJava is a Java VM implementation of Reactive Extensions: a library for composing asynchronous and event-based programs by using observable sequences.
Spring Cloud Netflix provides support for returning rx.Single objects from Spring MVC Controllers. It also supports using rx.Observable objects for Server-sent events (SSE). This can be very convenient if your internal APIs are already built using RxJava (see Feign Hystrix Support for examples).
Here are some examples of using rx.Single:
@RequestMapping(method = RequestMethod.GET, value = "/single")
public Single<String> single() {
    return Single.just("single value");
}

@RequestMapping(method = RequestMethod.GET, value = "/singleWithResponse")
public ResponseEntity<Single<String>> singleWithResponse() {
    return new ResponseEntity<>(Single.just("single value"), HttpStatus.NOT_FOUND);
}

@RequestMapping(method = RequestMethod.GET, value = "/throw")
public Single<Object> error() {
    return Single.error(new RuntimeException("Unexpected"));
}
If you have an Observable, rather than a single, you can use .toSingle() or .toList().toSingle(). Here are some examples:
@RequestMapping(method = RequestMethod.GET, value = "/single")
public Single<String> single() {
    return Observable.just("single value").toSingle();
}

@RequestMapping(method = RequestMethod.GET, value = "/multiple")
public Single<List<String>> multiple() {
    return Observable.just("multiple", "values").toList().toSingle();
}

@RequestMapping(method = RequestMethod.GET, value = "/responseWithObservable")
public ResponseEntity<Single<String>> responseWithObservable() {

    Observable<String> observable = Observable.just("single value");
    HttpHeaders headers = new HttpHeaders();
    headers.setContentType(APPLICATION_JSON_UTF8);
    return new ResponseEntity<>(observable.toSingle(), headers, HttpStatus.CREATED);
}

@RequestMapping(method = RequestMethod.GET, value = "/timeout")
public Observable<String> timeout() {
    return Observable.timer(1, TimeUnit.MINUTES).map(new Func1<Long, String>() {
        @Override
        public String call(Long aLong) {
            return "single value";
        }
    });
}
If you have a streaming endpoint and client, SSE could be an option. To convert rx.Observable to a Spring SseEmitter use RxResponse.sse(). Here are some examples:
@RequestMapping(method = RequestMethod.GET, value = "/sse")
public SseEmitter single() {
    return RxResponse.sse(Observable.just("single value"));
}

@RequestMapping(method = RequestMethod.GET, value = "/messages")
public SseEmitter messages() {
    return RxResponse.sse(Observable.just("message 1", "message 2", "message 3"));
}

@RequestMapping(method = RequestMethod.GET, value = "/events")
public SseEmitter event() {
    return RxResponse.sse(APPLICATION_JSON_UTF8, Observable.just(
            new EventDto("Spring io", getDate(2016, 5, 19)),
            new EventDto("SpringOnePlatform", getDate(2016, 8, 1))
    ));
}
Metrics: Spectator, Servo, and Atlas
When used together, Spectator/Servo and Atlas provide a near real-time operational insight platform.
Spectator and Servo are Netflix’s metrics collection libraries. Atlas is a Netflix metrics backend to manage dimensional time series data.
Servo served Netflix for several years and is still usable, but is gradually being phased out in favor of Spectator, which is only designed to work with Java 8. Spring Cloud Netflix provides support for both, but Java 8 based applications are encouraged to use Spectator.
Dimensional vs. Hierarchical Metrics
Spring Boot Actuator metrics are hierarchical and metrics are separated only by name. These names often follow a naming convention that embeds key/value attribute pairs (dimensions) into the name separated by periods. Consider the following metrics for two endpoints, root and star-star:
{
    "counter.status.200.root": 20,
    "counter.status.400.root": 3,
    "counter.status.200.star-star": 5,
}
The first metric gives us a normalized count of successful requests against the root endpoint per unit of time. But what if the system had 20 endpoints and you want to get a count of successful requests against all the endpoints? Some hierarchical metrics backends would allow you to specify a wild card such as counter.status.200. that would read all 20 metrics and aggregate the results. Alternatively, you could provide a HandlerInterceptorAdapter that intercepts and records a metric like counter.status.200.all for all successful requests irrespective of the endpoint, but now you must write 20+1 different metrics. Similarly if you want to know the total number of successful requests for all endpoints in the service, you could specify a wild card such as counter.status.2.*.
Even in the presence of wildcarding support on a hierarchical metrics backend, naming consistency can be difficult. Specifically the position of these tags in the name string can slip with time, breaking queries. For example, suppose we add an additional dimension to the hierarchical metrics above for HTTP method. Then counter.status.200.root becomes counter.status.200.method.get.root, etc. Our counter.status.200.* suddenly no longer has the same semantic meaning. Furthermore, if the new dimension is not applied uniformly across the codebase, certain queries may become impossible. This can quickly get out of hand.
Netflix metrics are tagged (a.k.a. dimensional). Each metric has a name, but this single named metric can contain multiple statistics and 'tag' key/value pairs that allows more querying flexibility. In fact, the statistics themselves are recorded in a special tag.
Recorded with Netflix Servo or Spectator, a timer for the root endpoint described above contains 4 statistics per status code, where the count statistic is identical to Spring Boot Actuator’s counter. In the event that we have encountered an HTTP 200 and 400 thus far, there will be 8 available data points:
{
    "root(status=200,stastic=count)": 20,
    "root(status=200,stastic=max)": 0.7265630630000001,
    "root(status=200,stastic=totalOfSquares)": 0.04759702862580789,
    "root(status=200,stastic=totalTime)": 0.2093076914666667,
    "root(status=400,stastic=count)": 1,
    "root(status=400,stastic=max)": 0,
    "root(status=400,stastic=totalOfSquares)": 0,
    "root(status=400,stastic=totalTime)": 0,
}
Default Metrics Collection
Without any additional dependencies or configuration, a Spring Cloud based service will autoconfigure a Servo MonitorRegistry and begin collecting metrics on every Spring MVC request. By default, a Servo timer with the name rest will be recorded for each MVC request which is tagged with:
-
HTTP method
-
HTTP status (e.g. 200, 400, 500)
-
URI (or "root" if the URI is empty), sanitized for Atlas
-
The exception class name, if the request handler threw an exception
-
The caller, if a request header with a key matching
netflix.metrics.rest.callerHeaderis set on the request. There is no default key fornetflix.metrics.rest.callerHeader. You must add it to your application properties if you wish to collect caller information.
Set the netflix.metrics.rest.metricName property to change the name of the metric from rest to a name you provide.
If Spring AOP is enabled and org.aspectj:aspectjweaver is present on your runtime classpath, Spring Cloud will also collect metrics on every client call made with RestTemplate. A Servo timer with the name of restclient will be recorded for each MVC request which is tagged with:
-
HTTP method
-
HTTP status (e.g. 200, 400, 500), "CLIENT_ERROR" if the response returned null, or "IO_ERROR" if an
IOExceptionoccurred during the execution of theRestTemplatemethod -
URI, sanitized for Atlas
-
Client name
Metrics Collection: Spectator
To enable Spectator metrics, include a dependency on spring-boot-starter-spectator:
    <dependency>
        <groupId>org.springframework.cloud</groupId>
        <artifactId>spring-cloud-starter-spectator</artifactId>
    </dependency>
In Spectator parlance, a meter is a named, typed, and tagged configuration and a metric represents the value of a given meter at a point in time. Spectator meters are created and controlled by a registry, which currently has several different implementations. Spectator provides 4 meter types: counter, timer, gauge, and distribution summary.
Spring Cloud Spectator integration configures an injectable com.netflix.spectator.api.Registry instance for you. Specifically, it configures a ServoRegistry instance in order to unify the collection of REST metrics and the exporting of metrics to the Atlas backend under a single Servo API. Practically, this means that your code may use a mixture of Servo monitors and Spectator meters and both will be scooped up by Spring Boot Actuator MetricReader instances and both will be shipped to the Atlas backend.
Spectator Counter
A counter is used to measure the rate at which some event is occurring.
// create a counter with a name and a set of tags
Counter counter = registry.counter("counterName", "tagKey1", "tagValue1", ...);
counter.increment(); // increment when an event occurs
counter.increment(10); // increment by a discrete amount
The counter records a single time-normalized statistic.
Spectator Timer
A timer is used to measure how long some event is taking. Spring Cloud automatically records timers for Spring MVC requests and conditionally RestTemplate requests, which can later be used to create dashboards for request related metrics like latency:
image::RequestLatency.png []
// create a timer with a name and a set of tags
Timer timer = registry.timer("timerName", "tagKey1", "tagValue1", ...);

// execute an operation and time it at the same time
T result = timer.record(() -> fooReturnsT());

// alternatively, if you must manually record the time
Long start = System.nanoTime();
T result = fooReturnsT();
timer.record(System.nanoTime() - start, TimeUnit.NANOSECONDS);
The timer simultaneously records 4 statistics: count, max, totalOfSquares, and totalTime. The count statistic will always match the single normalized value provided by a counter if you had called increment() once on the counter for each time you recorded a timing, so it is rarely necessary to count and time separately for a single operation.
For long running operations, Spectator provides a special LongTaskTimer.
Spectator Gauge
Gauges are used to determine some current value like the size of a queue or number of threads in a running state. Since gauges are sampled, they provide no information about how these values fluctuate between samples.
The normal use of a gauge involves registering the gauge once in initialization with an id, a reference to the object to be sampled, and a function to get or compute a numeric value based on the object. The reference to the object is passed in separately and the Spectator registry will keep a weak reference to the object. If the object is garbage collected, then Spectator will automatically drop the registration. See the note in Spectator’s documentation about potential memory leaks if this API is misused.
// the registry will automatically sample this gauge periodically
registry.gauge("gaugeName", pool, Pool::numberOfRunningThreads);

// manually sample a value in code at periodic intervals -- last resort!
registry.gauge("gaugeName", Arrays.asList("tagKey1", "tagValue1", ...), 1000);
Spectator Distribution Summaries
A distribution summary is used to track the distribution of events. It is similar to a timer, but more general in that the size does not have to be a period of time. For example, a distribution summary could be used to measure the payload sizes of requests hitting a server.
// the registry will automatically sample this gauge periodically
DistributionSummary ds = registry.distributionSummary("dsName", "tagKey1", "tagValue1", ...);
ds.record(request.sizeInBytes());
Metrics Collection: Servo
|
Warning
|
If your code is compiled on Java 8, please use Spectator instead of Servo as Spectator is destined to replace Servo entirely in the long term. |
In Servo parlance, a monitor is a named, typed, and tagged configuration and a metric represents the value of a given monitor at a point in time. Servo monitors are logically equivalent to Spectator meters. Servo monitors are created and controlled by a MonitorRegistry. In spite of the above warning, Servo does have a wider array of monitor options than Spectator has meters.
Spring Cloud integration configures an injectable com.netflix.servo.MonitorRegistry instance for you. Once you have created the appropriate Monitor type in Servo, the process of recording data is wholly similar to Spectator.
Creating Servo Monitors
If you are using the Servo MonitorRegistry instance provided by Spring Cloud (specifically, an instance of DefaultMonitorRegistry), Servo provides convenience classes for retrieving counters and timers. These convenience classes ensure that only one Monitor is registered for each unique combination of name and tags.
To manually create a Monitor type in Servo, especially for the more exotic monitor types for which convenience methods are not provided, instantiate the appropriate type by providing a MonitorConfig instance:
MonitorConfig config = MonitorConfig.builder("timerName").withTag("tagKey1", "tagValue1").build();

// somewhere we should cache this Monitor by MonitorConfig
Timer timer = new BasicTimer(config);
monitorRegistry.register(timer);
Metrics Backend: Atlas
Atlas was developed by Netflix to manage dimensional time series data for near real-time operational insight. Atlas features in-memory data storage, allowing it to gather and report very large numbers of metrics, very quickly.
Atlas captures operational intelligence. Whereas business intelligence is data gathered for analyzing trends over time, operational intelligence provides a picture of what is currently happening within a system.
Spring Cloud provides a spring-cloud-starter-atlas that has all the dependencies you need. Then just annotate your Spring Boot application with @EnableAtlas and provide a location for your running Atlas server with the netflix.atlas.uri property.
Global tags
Spring Cloud enables you to add tags to every metric sent to the Atlas backend. Global tags can be used to separate metrics by application name, environment, region, etc.
Each bean implementing AtlasTagProvider will contribute to the global tag list:
@Bean
AtlasTagProvider atlasCommonTags(
    @Value("${spring.application.name}") String appName) {
  return () -> Collections.singletonMap("app", appName);
}
Using Atlas
To bootstrap a in-memory standalone Atlas instance:
$ curl -LO https://github.com/Netflix/atlas/releases/download/v1.4.2/atlas-1.4.2-standalone.jar
$ java -jar atlas-1.4.2-standalone.jar|
Tip
|
An Atlas standalone node running on an r3.2xlarge (61GB RAM) can handle roughly 2 million metrics per minute for a given 6 hour window. |
Once running and you have collected a handful of metrics, verify that your setup is correct by listing tags on the Atlas server:
$ curl http://ATLAS/api/v1/tags|
Tip
|
After executing several requests against your service, you can gather some very basic information on the request latency of every request by pasting the following url in your browser: http://ATLAS/api/v1/graph?q=name,rest,:eq,:avg
|
The Atlas wiki contains a compilation of sample queries for various scenarios.
Make sure to check out the alerting philosophy and docs on using double exponential smoothing to generate dynamic alert thresholds.
Spring Cloud Stream
Spring Cloud Stream Reference Manual
This section goes into more detail about how you can work with Spring Cloud Stream. It covers topics such as creating and running stream applications.
Introducing Spring Cloud Stream
Spring Cloud Stream is a framework for building message-driven microservices. Spring Cloud Stream builds upon Spring Boot to create DevOps friendly microservice applications and Spring Integration to provide connectivity to message brokers. Spring Cloud Stream provides an opinionated configuration of message brokers, introducing the concepts of persistent pub/sub semantics, consumer groups and partitions across several middleware vendors. This opinionated configuration provides the basis to create stream processing applications.
By adding @EnableBinding to your main application, you get immediate connectivity to a message broker and by adding @StreamListener to a method, you will receive events for stream processing.
Here’s a sample sink application for receiving external messages:
@SpringBootApplication
public class StreamApplication {

  public static void main(String[] args) {
    SpringApplication.run(StreamApplication.class, args);
  }
}

@EnableBinding(Sink.class)
public class TimerSource {

  ...

  @StreamListener(Sink.INPUT)
  public void processVote(Vote vote) {
      votingService.recordVote(vote);
  }
}
@EnableBinding is parameterized by one or more interfaces (in this case a single Sink interface), which declares input and/or output channels.
The interfaces Source, Sink and Processor are provided but you can define others.
Here’s the definition of Source:
public interface Sink {
  String INPUT = "input";

  @Input(Sink.INPUT)
  SubscribableChannel input();
}
The @Input annotation is used to identify input channels (messages entering the app), and @Output is used to identify output channels (messages leaving the app).
These annotations are optionally parameterized by a channel name. If the name is not provided then the method name is used instead.
An implementation of the interface is created for you and can be used in the application context by autowiring it, e.g. into a test case:
@RunWith(SpringJUnit4ClassRunner.class)
@SpringApplicationConfiguration(classes = StreamApplication.class)
@WebAppConfiguration
@DirtiesContext
public class StreamApplicationTests {

  @Autowired
  private Sink sink;

  @Test
  public void contextLoads() {
    assertNotNull(this.sink.input());
  }
}
Spring Cloud Stream Main Concepts
Spring Cloud Stream provides a number of abstractions and primitives that simplify writing message-driven microservices. In this section we will provide an overview of:
-
Spring Cloud Stream application model together with the Binder abstraction
-
Persistent publish-subscribe and consumer group support
-
Partitioning
-
Pluggable Binder API
Application structure
A Spring Cloud Stream application consists of a middleware-neutral core that communicates with the outside world through input and output channels.
The channels are managed and injected into it by the framework, and a Binder connects them to the external brokers.
Different Binder implementations exist for different types of middleware, such as Kafka, Rabbit MQ, Redis or Gemfire, and an extensible API allows you to write your own Binder. There is also TestSupportBinder that leaves the channel as-is so a test author can interact with the channels directly and easily assert on what is received.

Spring Cloud Stream uses Spring Boot for configuration, and the Binder makes it possible for Spring Cloud Stream applications to be flexible in terms of how it connects to the middleware.
For example, deployers can dynamically choose the destinations that these channels connect to at runtime (e.g. Kafka topics or Rabbit MQ exchanges).
This can be done through external configuration properties in any form that is supported by Spring Boot (application arguments, environment variables, application.yml files, etc).
Taking the sink example from the previous section, providing the spring.cloud.stream.bindings.input.destination=raw-sensor-data property to the application will cause it to read from the raw-sensor-data Kafka topic, or from a queue bound to the raw-sensor-data exchange in Rabbit MQ. See Binding properties for more information on the available binder properties you can configure. You are also able to configure middleware specific properties, see [binder-spe cific-configuration] for more information.
Spring Cloud Stream will automatically detect and use a binder that is found on the classpath, so you can easily use different types of middleware with the same code, just by including a different binder at build time. For more complex use cases, Spring Cloud Stream also provides the ability of packaging multiple binders within the same application and choosing what type of binder should be used at runtime, and even if multiple binders should be used at runtime for different channels.
Fat JAR
Spring Cloud Stream applications can be run in standalone mode from your IDE for testing. To run in production you can create an executable (or "fat") JAR using the standard Spring Boot tooling provided for Maven or Gradle.
Persistent publish subscribe and consumer groups
Communication between different applications follows a publish-subscribe pattern, with data being broadcast through shared topics. This can be seen in the following picture, which shows a typical deployment for a set of interacting Spring Cloud Stream applications.
Data reported by sensors to an HTTP endpoint is sent to a common destination named raw-sensor-data, from where it is independently processed by a microservice that computes time windowed averages, as well as by a microservice that ingests the raw data into HDFS.
In order to do so, both applications will declare the topic as their input at runtime.
The publish-subscribe communication model reduces the complexity of both the producer and the consumer, and allows adding new applications to the topology without disrupting the existing flow.
For example, downstream from the average calculator we can have a component that calculates the highest temperature values in order to display and monitor them.
Later on, we can add an application that interprets the very same flow of averages for fault detection.
The fact that all the communication is done through shared topics rather than point to point queues reduces the coupling between microservices.
While the concept of publish-subscribe messaging is not new, Spring Cloud Stream takes the extra step of making it an opinionated choice for its application model. It also makes it easy for users to work with it across different platform by using the native support of the middleware.
Consumer Groups
While the publish subscribe model ensures that it is easy to connect multiple application by sharing a topic, it is equally important to be able to scale up by creating multiple instances of a given application.
When doing so, the different instances would find themselves in a competing consumer relationship with each other: only one of the instances is expected to handle the message.
Spring Cloud Stream models this behavior through the concept of a consumer group, which is similar to (and inspired by) the notion of consumer groups in Kafka.
Each consumer binding can specify a group name such as spring.cloud.stream.bindings.input.group=hdfsWrite or spring.cloud.stream.bindings.input.group=average, as shown in the picture.
All groups that subscribe to a given destination will receive a copy of the published data, but only one member of the group will receive a given message from that destination.
By default, when a group is not specified, Spring Cloud Stream assigns the application to an anonymous, independent, single-member consumer group that will be in a publish-subscribe relationship with all the other consumer groups.

Durability
Consistent with the opinionated application model of Spring Cloud Stream, consumer group subscriptions are durable. This is to say that the binder implementation will ensure that group subscriptions are persistent and, once at least one subscription for a group has been created, that group will receive messages, even if they are sent while all the applications of the group were stopped. Anonymous subscriptions are non-durable by nature. For some binder implementations (e.g. Rabbit) it is possible to have non-durable group subscriptions.
In general, it is preferable to always specify a consumer group when binding an application to a given destination. When scaling up a Spring Cloud Stream application, a consumer group must be specified for each of its input bindings, in order to prevent its instances from receiving duplicate messages (unless that behavior is desired, which is a less common use case).
Partitioning
Spring Cloud Stream provides support for partitioning data between multiple instances of a given application. In a partitioned scenario, one or more producer application instances will send data to multiple consumer application instances, ensuring that data with common characteristics is processed by the same consumer instance. The physical communication medium (e.g. the broker topic) is viewed as structured into multiple partitions. This happens regardless of whether the broker type is naturally partitioned (e.g. Kafka) or not (e.g. Rabbit), Spring Cloud Stream provides a common abstraction for implementing partitioned processing use cases in a uniform fashion.

Partitioning is a critical concept in stateful processing, where ensuring that all the related data is processed together is critical for either performance or consistency. For example, in the time-windowed average calculation example, it is important that measurements from the same sensor land in the same application instance.
Setting up a partitioned processing scenario requires configuring both the data producing and the data consuming end.
Programming model
This section will describe the programming model of Spring Cloud Stream, which consists from a number of predefined annotations that can be used to declare bound inputs and output channels, as well as how to listen to them.
Declaring and binding channels
Triggering binding via @EnableBinding
A Spring application becomes a Spring Cloud Stream application when the @EnableBinding annotation is applied to one of its configuration classes. @EnableBinding itself is meta-annotated with @Configuration, and triggers the configuration of Spring Cloud Stream infrastructure as follows:
...
@Import(...)
@Configuration
@EnableIntegration
public @interface EnableBinding {
    ...
    Class<?>[] value() default {};
}
@EnableBinding can be parameterized with one or more interface classes, containing methods that represent bindable components (typically message channels).
|
Note
|
As of version 1.0, the only supported bindable component is the Spring Messaging MessageChannel and its extensions SubscribableChannel and PollableChannel.
It is intended for future versions to extend support to other types of components, using the same mechanism. In this documentation, we will continue to refer to channels.
|
@Input and @Output
A Spring Cloud Stream application can have an arbitrary number of input and output channels defined as @Input and @Output methods in an interface, as follows:
public interface Barista {

    @Input
    SubscribableChannel orders();

    @Output
    MessageChannel hotDrinks();

    @Output
    MessageChannel coldDrinks();
}
Using this interface as a parameter to @EnableBinding, as in the following example, will trigger the creation of three bound channels named orders, hotDrinks and coldDrinks respectively.
@EnableBinding(Barista.class)
public class CafeConfiguration {

   ...
}
Customizing channel names
Both @Input and @Output allow specifying a customized name for the channel, as follows:
public interface Barista {
    ...
    @Input("inboundOrders")
    SubscribableChannel orders();
}
In this case, the name of the bound channel being created will be inboundOrders.
Source, Sink, and Processor
For ease of addressing the most common use cases that involve either an input or an output channel, or both, out of the box Spring Cloud Stream provides three predefined interfaces.
Source can be used for applications that have a single outbound channel.
public interface Source {

	String OUTPUT = "output";

	@Output(Source.OUTPUT)
	MessageChannel output();

}
Sink can be used for applications that have a single inbound channel.
public interface Sink {

	String INPUT = "input";

	@Input(Sink.INPUT)
	SubscribableChannel input();

}
Processor can be used for applications that have both an inbound and an outbound channel.
public interface Processor extends Source, Sink {
}
There is no special handling for either of these interfaces in Spring Cloud Stream, besides of the fact that they are provided out of the box.
Accessing bound channels
Injecting the bound interfaces
For each of the bound interfaces, Spring Cloud Stream will generate a bean that implements it, and for which invoking an @Input or @Output annotated method will return the bound channel.
For example, the bean in the following example will send a message on the output channel every time its hello method is invoked, using the injected Source bean, and invoking output() to retrieve the target channel.
@Component
public class SendingBean {

    private Source source;

    @Autowired
    public SendingBean(Source source) {
        this.source = source;
    }

    public void sayHello(String name) {
		     source.output().send(MessageBuilder.withPayload(body).build());
	  }
}
Injecting channels directly
Bound channels can be also injected directly. For example:
@Component
public class SendingBean {

    private MessageChannel output;

    @Autowired
    public SendingBean(MessageChannel output) {
        this.output = output;
    }

    public void sayHello(String name) {
		     output.send(MessageBuilder.withPayload(body).build());
	  }
}
Note that if the name of the channel is customized on the declaring annotation, that name should be used instead of the method name. Considering this declaration:
public interface CustomSource {
    ...
    @Output("customOutput")
    MessageChannel output();
}
The channel will be injected as follows:
@Component
public class SendingBean {

    @Autowired
    private MessageChannel output;

    @Autowired @Qualifier("customOutput")
    public SendingBean(MessageChannel output) {
        this.output = output;
    }

    public void sayHello(String name) {
		     customOutput.send(MessageBuilder.withPayload(body).build());
	  }
}
Programming model
Spring Cloud Stream allows you to write applications by either using Spring Integration annotations or Spring Cloud Stream’s @StreamListener annotation which is modeled after other Spring Messaging annotations (e.g. @MessageMapping, @JmsListener, @RabbitListener, etc.) but add content type management and type coercion features.
Native Spring Integration support
Due to the fact that Spring Cloud Stream is Spring Integration based, it completely inherits its foundation and infrastructure, as well as the component. For example, the output channel of a Source can be attached to a MessageSource, as follows:
@EnableBinding(Source.class)
public class TimerSource {

  @Value("${format}")
  private String format;

  @Bean
  @InboundChannelAdapter(value = Source.OUTPUT, poller = @Poller(fixedDelay = "${fixedDelay}", maxMessagesPerPoll = "1"))
  public MessageSource<String> timerMessageSource() {
    return () -> new GenericMessage<>(new SimpleDateFormat(format).format(new Date()));
  }
}
Or, the channels of a processor can be used in a transformer, as follows:
@EnableBinding(Processor.class)
public class TransformProcessor {
	@Transformer(inputChannel = Processor.INPUT, outputChannel = Processor.OUTPUT)
	public Object transform(String message) {
		return message.toUpper();
	}
}
@StreamListener for automatic content type handling
Complementary to the Spring Integration support, Spring Cloud Stream provides a @StreamListener annotation of its own modeled by the other similar Spring Messaging annotations (e.g. @MessageMapping, @JmsListener, @RabbitListener, etc.).
It provides a simpler model for handling inbound messages, especially for dealing with use cases that involve content type management and type coercion.
Spring Cloud Stream provides an extensible MessageConverter mechanism for handling data conversion by bound channels and, in this case, for dispatching to @StreamListener annotated methods.
For example, an application that processes external Vote events can be declared as follows:
@EnableBinding(Sink.class)
public class VoteHandler {

  @Autowired
  VotingService votingService;

  @StreamListener(Sink.INPUT)
	public void handle(Vote vote) {
		votingService.record(vote);
	}
}
The distinction between this approach and a Spring Integration @ServiceActivator becomes relevant if one considers an inbound Message with a String payload and a contentType header of application/json.
For @StreamListener, the MessageConverter mechanism will use the contentType header to parse the String into a Vote object.
Just as with the other Spring Messaging methods, method arguments can be annotated with @Payload, @Headers and @Header.
For methods that return data, @SendTo must be used for specifying the output binding destination for data returned by the methods as follows:
@EnableBinding(Processor.class)
public class TransformProcessor {

  @Autowired
  VotingService votingService;

  @StreamListener(Processor.INPUT)
  @SendTo(Processor.OUTPUT)
	public VoteResult handle(Vote vote) {
		return votingService.record(vote);
	}
}|
Note
|
Content type headers can be set by external applications in the case of Rabbit MQ, and they are supported as part of an extended internal protocol by Spring Cloud Stream for any type of transport (even the ones that do not support headers normally, like Kafka). |
Binder SPI
As described above, Spring Cloud Stream provides a binder abstraction for connecting to physical destinations. This section will provide more information about the main concepts behind the Binder SPI, its main components, as well as details specific to different implementations.
Producers and Consumers

A producer is any component that sends messages to a channel. That channel can be bound to an external message broker
via a Binder implementation for that broker. When invoking the bindProducer method, the first parameter is the name
of the destination within that broker. The second parameter is the local channel instance to which the producer will be
sending messages, and the third parameter contains properties to be used within the adapter that is created for that
channel, such as a partition key expression.
A consumer is any component that receives messages from a channel. As with the producer, the consumer’s channel can be
bound to an external message broker, and the first parameter for the bindConsumer method is the destination name.
However, on the consumer side, a second parameter provides the name of a logical group of consumers. Each group
represented by consumer bindings for a given destination will receive a copy of each message that a producer sends to
that destination (i.e. pub/sub semantics). If there are multiple consumer instances bound using the same group name,
then messages will be load balanced across those consumer instances so that each message sent by a producer would only
be consumed by a single consumer instance within each group (i.e. queue semantics).
Kafka Binder

The Kafka Binder implementation maps the destination to a Kafka topic, and the consumer group maps directly to the same Kafka concept. Spring Cloud Stream does not use the high level consumer, but implements a similar concept for the simple consumer.
RabbitMQ Binder

The RabbitMQ Binder implementation maps the destination to a TopicExchange, and for each consumer group, a Queue
will be bound to that TopicExchange. Each consumer instance that binds will trigger creation of a corresponding
RabbitMQ Consumer instance for its group’s Queue.
Configuration options
Spring Cloud Stream supports general configuration options, as well as configuration for bindings and binders. Some binders allow additional properties for the bindings, supporting middleware-specific features.
All configuration options can be provided to Spring Cloud Stream applications via all the mechanisms supported by Spring Boot: application arguments, environment variables, YML files etc.
Spring Cloud Stream Properties
- spring.cloud.stream.instanceCount
-
The number of deployed instances of the same application. Must be set for partitioning and with Kafka. Default value is
1. - spring.cloud.stream.instanceIndex
-
The instance index of the application, a number from
0toinstanceCount-1. Used for partitioning and with Kafka. Automatically set in Cloud Foundry to match the instance index of the application. - spring.cloud.stream.dynamicDestinations
-
A list of destinations that can be bound dynamically, for example in a dynamic routing scenario. Only listed destinations can be bound if set. Default empty, allowing any destination to be bound.
- spring.cloud.stream.defaultBinder
-
The default binder to use, if there are multiple binders configured. See multiple binders.
Binding properties
Binding properties are supplied using the format spring.cloud.stream.bindings.<channelName>.<property>=<value>.<channelName> represents the name of the channel being configured, e.g. output for a Source.
In what follows, we will indicate where the spring.cloud.stream.bindings.<channelName>. prefix is omitted and focus just on the property name, with the understanding that the prefix will be included at runtime.
Properties for the use of Spring Cloud Stream
The following binding properties are available for both input and output bindings and
must be prefixed with spring.cloud.stream.bindings.<channelName>. .
- destination
-
The target destination of channel on the bound middleware, e.g. Rabbit MQ exchange or Kafka topic. If not set, the channel name will be used instead.
- group
-
The consumer group of the channel. This property applies only to inbound bindings. By default it is null, and indicates an anonymous consumer. See consumer groups.
- contentType
-
The content type of the channel. By default it is
nulland no type coercion is performed. See [content type management]. - binder
-
The binder used by this binding. By default, it is set to
nulland will use the default binder, if one exists. See Multiple Binders on the Classpath for details.
Consumer properties
The following binding properties are available for input bindings only and must be prefixed with spring.cloud.stream.bindings.<channelName>.consumer:
- concurrency
-
The concurrency of the inbound consumer. By default, set to
1. - partitioned
-
Must be set to
trueif the consumer is receiving data from a partitioned producer. By default it is set tofalse. - maxAttempts
-
The number of attempts of re-processing an inbound message. Default '3'. (Ignored by Kafka, currently).
- backOffInitialInterval
-
The backoff initial interval on retry. Default
1000.(Ignored by Kafka, currently). - backOffMaxInterval
-
The maximum backoff interval. Default
10000.(Ignored by Kafka, currently). - backOffMultiplier
-
The backoff multiplier. Default
2.0.
Producer properties
The following binding properties are available for output bindings only and must be prefixed with spring.cloud.stream.bindings.<channelName>.producer:
- partitionKeyExpression
-
A SpEL expression for partitioning outbound data. Default:
null. If either this property is set orpartitionKeyExtractorClassis present, outbound data on this channel will be partitioned, andpartitionCountmust be set to a value larger than 1 to be effective. The two options are mutually exclusive. See Partitioning. - partitionKeyExtractorClass
-
A
PartitionKeyExtractorStrategyimplementation. Default:null. If either this property is set orpartitionKeyExpressionis present, outbound data on this channel will be partitioned, andpartitionCountmust be set to a value larger than 1 to be effective. The two options are mutually exclusive. See Partitioning. - partitionSelectorClass
-
A
PartitionSelectorStrategyimplementation. Defaultnull. Mutually exclusive withpartitionSelectorExpression. If none is set, the partition will be selected as thehashCode(key) % partitionCount, wherekeyis computed via eitherpartitionKeyExpressionorpartitionKeyExtractorClass. - partitionSelectorExpression
-
A SpEL expression for customizing partition selection. Default
null. Mutually exclusive withpartitionSelectorClass. If none is set, the partition will be selected as thehashCode(key) % partitionCount, wherekeyis computed via eitherpartitionKeyExpressionorpartitionKeyExtractorClass. - partitionCount
-
The number of target partitions for the data, if partitioning is enabled. Default
1. Must be set to a value higher than1if the producer is partitioned. On Kafka it is interpreted as a hint, and the larger of this and the partition count of the target topic will be used instead. - requiredGroups
-
A comma separated list of groups that the producer must ensure message delivery even if they start after it has been created (e.g. by pre-creating durable queues in Rabbit MQ).
Binder-specific configuration
This captures the binder, consumer and producer properties that are specific for several binder implementations.
Rabbit-specific settings
Rabbit MQ Binder properties
The binder supports the all Spring Boot properties for Rabbit MQ configuration.
In addition to that, it also supports the following properties:
- spring.cloud.stream.rabbit.binder.addresses
-
A comma-separated list of RabbitMQ server addresses (used only for clustering and in conjunction with
nodes). Default empty. spring.cloud.stream.rabbit.binder.adminAddresses. Default empty. A comma-separated list of RabbitMQ management plugin URLs - only used when nodes contains more than one entry. Entries in this list must correspond to the corresponding entry in addresses. Default empty. - spring.cloud.stream.rabbit.binder.nodes
-
A comma-separated list of RabbitMQ node names; when more than one entry, used to locate the server address where a queue is located. Entries in this list must correspond to the corresponding entry in addresses. Default empty.
- spring.cloud.stream.rabbit.rabbit.username
-
The user name. Default
null. - spring.cloud.stream.rabbit.binder.password
-
The password. Default
null. - spring.cloud.stream.rabbit.binder.vhost
-
The virtual host. Default
null. - spring.cloud.stream.rabbit.binder.useSSL
-
True if Rabbit MQ should use SSL.
- spring.cloud.stream.rabbit.binder.sslPropertiesLocation
-
The location of the SSL properties file, when certificate exchange is used.
- spring.cloud.stream.rabbit.binder.compressionLevel
-
Compression level for compressed bindings. Defaults to
1(BEST_LEVEL). Seejava.util.zip.Deflater.
Rabbit MQ Consumer Properties
The following properties are available for Rabbit consumers only and
must be prefixed with spring.cloud.stream.rabbit.bindings.<channelName>.consumer .
- acknowledgeMode
-
The acknowledge mode. Default
AUTO. - autoBindDlq
-
Whether to automatically declare the DLQ and bind it to the binder DLX. Default
false. - durableSubscription
-
Whether subscription should be durable. Only effective if
groupis also set. Defaulttrue. maxConcurrency: Default1. prefetch: Prefetch count. Default1. - prefix
-
A prefix to be added to the name of the
destinationand queues. Default "". - requeueRejected
-
Whether delivery failures should be requeued. Default
true. - requestHeaderPatterns
-
The request headers to be transported. Default
[STANDARD_REQUEST_HEADERS,'*']. - replyHeaderPatterns
-
The reply headers to be transported. Default
[STANDARD_REQUEST_HEADERS,'*'] - republishToDlq
-
By default, failed messages after retries are exhausted are rejected. If a dead-letter queue (DLQ) is configured, rabbitmq will route the failed message (unchanged) to the DLQ. Setting this property to true instructs the bus to republish failed messages to the DLQ, with additional headers, including the exception message and stack trace from the cause of the final failure.
- transacted
-
Whether to use transacted channels. Default
false. - txSize
-
The number of deliveries between acks. Default
1.
Rabbit Producer Properties
The following properties are available for Rabbit producers only and
must be prefixed with spring.cloud.stream.rabbit.bindings.<channelName>.producer .
- autoBindDlq
-
Whether to automatically declare the DLQ and bind it to the binder DLX. Default
false. - batchingEnabled
-
True to enable message batching by producers. Default
false. - batchSize
-
The number of message to buffer when batching is enabled. Default
100. - batchBufferLimit
-
Default
10000. - batchTimeout
-
Default
5000. - compress
-
Whether data should be compressed when sent. Default
false. - deliveryMode
-
Delivery mode. Default
PERSISTENT. - prefix
-
A prefix to be added to the name of the
destinationexchange. Default "". - requestHeaderPatterns
-
The request headers to be transported. Default
[STANDARD_REQUEST_HEADERS,'*']. - replyHeaderPatterns
-
The reply headers to be transported. Default
[STANDARD_REQUEST_HEADERS,'*']
Kafka-specific settings
Kafka binder properties
- spring.cloud.stream.kafka.binder.brokers
-
A list of brokers that the Kafka binder will connect to. Default
localhost. - spring.cloud.stream.kafka.binder.defaultBrokerPort
-
The list of brokers allows to specify hosts with or without port information, i.e.
host1,host2:port2. This configuration sets the default port when no port is configured in the broker list. Default9092. - spring.cloud.stream.kafka.binder.zkNodes
-
A list of Zookeeper nodes for the Kafka binder to connect to. Default
localhost. - spring.cloud.stream.kafka.binder.defaultZkPort
-
The list of Zookeeper nodes allows to specify hosts with or without port information, i.e.
host1,host2:port2. This configuration sets the default port when no port is configured in the node list. Default2181. - spring.cloud.stream.kafka.binder.headers
-
The list of custom that will be transported by the binder. Default empty.
- spring.cloud.stream.kafka.binder.offsetUpdateTimeWindow
-
The frequency in milliseconds with which offsets are saved. Ignored if
0. Default10000. - spring.cloud.stream.kafka.binder.offsetUpdateCount
-
The frequency in number of updates, which which consumed offsets are persisted. Ignored if
0. Default0. Mutually exclusive withoffsetUpdateTimeWindow. - spring.cloud.stream.kafka.binder.requiredAcks
-
The number of required acks on the broker.
Kafka Consumer Properties
The following properties are available for Kafka consumers only and
must be prefixed with spring.cloud.stream.kafka.bindings.<channelName>.consumer .
- autoCommitOffset
-
True to autocommit offsets when a message has been processed. If set to false, an
Acknowledgmentheader will be available in the message headers for late acknowledgment. Defaulttrue. - mode
-
When set to
raw, will disable header parsing on input. Useful when inbound data is coming from outside Spring Cloud Stream applications. DefaultembeddedHeaders. - resetOffsets
-
True to reset offsets on the consumer to the value provided by
startOffset. Defaultfalse. - startOffset
-
The starting offset for new groups or when
resetOffsetsistrue. Allowed values:earliest,latest. Defaults to null (equivalent to earliest). - minPartitionCount
-
The minimum number of partitions expected by the consumer if it creates the consumed topic automatically. Defaults to
1.
Kafka Producer Properties
The following properties are available for Kafka producers only and
must be prefixed with spring.cloud.stream.kafka.bindings.<channelName>.producer .
- bufferSize
-
This is an upper limit of how much data the Kafka Producer will attempt to batch before sending – specified in bytes. Default
16384. - sync
-
Whether the producer is synchronous. Defaults to
false. - batchTimeout
-
How long will the producer wait before sending in order to allow more messages to get accumulated in the same batch. Normally the producer will not wait at all, and simply send all the messages that accumulated while the previous send was in progress. A non-zero value may increase throughput at the expense of latency. Default
0. - mode
-
When set to
raw, disable header propagation on output. Useful when producing data for non-Spring Cloud Stream applications. DefaultembeddedHeaders.
Binder detection
Spring Cloud Stream relies on implementations of the Binder SPI to perform the task of connecting channels to message brokers. Each Binder implementation typically connects to one type of messaging system. Spring Cloud Stream provides out of the box binders for Kafka, RabbitMQ and Redis.
Classpath Detection
By default, Spring Cloud Stream relies on Spring Boot’s auto-configuration to configure the binding process. If a single binder implementation is found on the classpath, Spring Cloud Stream will use it automatically. So, for example, a Spring Cloud Stream project that aims to bind only to RabbitMQ can simply add the following dependency:
<dependency>
  <groupId>org.springframework.cloud</groupId>
  <artifactId>spring-cloud-stream-binder-rabbit</artifactId>
</dependency>
Multiple Binders on the Classpath
When multiple binders are present on the classpath, the application must indicate which binder is to be used for each channel binding. Each binder configuration contains a META-INF/spring.binders, which is a simple properties file:
rabbit:\
org.springframework.cloud.stream.binder.rabbit.config.RabbitServiceAutoConfiguration
Similar files exist for the other binder implementations (e.g. Kafka), and it is expected that custom binder
implementations will provide them, too. The key represents an identifying name for the binder implementation, whereas
the value is a comma-separated list of configuration classes that contain one and only one bean definition of the type
org.springframework.cloud.stream.binder.Binder.
Selecting the binder can be done globally by either using the spring.cloud.stream.defaultBinder property, e.g.
spring.cloud.stream.defaultBinder=rabbit, or by individually configuring them on each channel binding.
For instance, a processor app that reads from Kafka and writes to Rabbit can specify the following configuration:
spring.cloud.stream.bindings.input.binder=kafka,spring.cloud.stream.bindings.output.binder=rabbit.
Connecting to Multiple Systems
By default, binders share the Spring Boot auto-configuration of the application and create one instance of each binder found on the classpath. In scenarios where an application should connect to more than one broker of the same type, Spring Cloud Stream allows you to specify multiple binder configurations, with different environment settings. Please note that turning on explicit binder configuration will disable the default binder configuration process altogether, so all the binders in use must be included in the configuration.
For example, this is the typical configuration for a processor that connects to two RabbitMQ broker instances:
spring:
  cloud:
    stream:
      bindings:
        input:
          destination: foo
          binder: rabbit1
        output:
          destination: bar
          binder: rabbit2
      binders:
        rabbit1:
          type: rabbit
          environment:
            spring:
              rabbitmq:
                host: <host1>
        rabbit2:
          type: rabbit
          environment:
            spring:
              rabbitmq:
                host: <host2>
Content Type and Transformation
Spring Cloud Stream allows to propagate information about the content type of the messages it produces by attaching by default a contentType header to outbound messages.
For middleware that does not directly support headers, Spring Cloud Stream provides its own mechanism of wrapping outbound messages in an envelope of its own, automatically.
For middleware that does support headers, Spring Cloud Stream applications may receive messages with a given content type from non-Spring Cloud Stream applications.
Spring Cloud Stream can handle messages based on this information in two ways:
-
through its
contentTypesettings on inbound and outbound channels; -
through its argument mapping done for
@StreamListener-annotated methods.
Type converting message channels
@StreamListener and conversion
Inter-app Communication
Connecting multiple application instances
While Spring Cloud Stream makes it easy for individual boot apps to connect to messaging systems, the typical scenario for Spring Cloud Stream is the creation of multi-app pipelines, where microservice apps are sending data to each other. This can be achieved by correlating the input and output destinations of adjacent apps, as in the following example.
Supposing that the design calls for the time-source app to send data to the log-sink app, we will use a
common destination named ticktock for bindings within both apps. time-source will set
spring.cloud.stream.bindings.output.destination=ticktock, and log-sink will set
spring.cloud.stream.bindings.input.destination=ticktock.
Instance Index and Instance Count
When scaling up Spring Cloud Stream applications, each instance can receive information about how many other instances
of the same application exist and what its own instance index is. This is done through the
spring.cloud.stream.instanceCount and spring.cloud.stream.instanceIndex properties. For example, if there are 3
instances of the HDFS sink application, all three will have spring.cloud.stream.instanceCount set to 3, and the
applications will have spring.cloud.stream.instanceIndex set to 0, 1 and 2, respectively. When Spring Cloud Stream
applications are deployed via Spring Cloud Data Flow, these properties are configured automatically, but when Spring
Cloud Stream applications are launched independently, these properties must be set correctly. By default
spring.cloud.stream.instanceCount is 1, and spring.cloud.stream.instanceIndex is 0.
Setting up the two properties correctly on scale up scenarios is important for addressing partitioning behavior in general (see below), and they are always required by certain types of binders (e.g. the Kafka binder) in order to ensure that data is split correctly across multiple consumer instances.
Partitioning
Configuring Output Bindings for Partitioning
An output binding is configured to send partitioned data, by setting one and only one of its partitionKeyExpression
or partitionKeyExtractorClass properties, as well as its partitionCount property. For example, setting
spring.cloud.stream.bindings.output.partitionKeyExpression=payload.id,spring.cloud.stream.bindings.output.partitionCount=5
is a valid and typical configuration.
Based on this configuration, the data will be sent to the target partition using the following logic. A partition key’s
value is calculated for each message sent to a partitioned output channel based on the partitionKeyExpression. The
partitionKeyExpression is a SpEL expression that is evaluated against the outbound message for extracting the
partitioning key. If a SpEL expression is not sufficient for your needs, you can instead calculate the partition key
value by setting the property partitionKeyExtractorClass. This class must implement the interface
org.springframework.cloud.stream.binder.PartitionKeyExtractorStrategy. While, in general, the SpEL expression should
suffice, more complex cases may use the custom implementation strategy.
Once the message key is calculated, the partition selection process will determine the target partition as a value
between 0 and partitionCount - 1. The default calculation, applicable in most scenarios is based on the formula
key.hashCode() % partitionCount. This can be customized on the binding, either by setting a SpEL expression to be
evaluated against the key via the partitionSelectorExpression property, or by setting a
org.springframework.cloud.stream.binder.PartitionSelectorStrategy implementation via the partitionSelectorClass
property.
Additional properties can be configured for more advanced scenarios, as described in the following section.
Configuring Input Bindings for Partitioning
An input binding is configured to receive partitioned data by setting its partitioned property, as well as the
instance index and instance count properties on the app itself, as follows:
spring.cloud.stream.bindings.input.partitioned=true,spring.cloud.stream.instanceIndex=3,spring.cloud.stream.instanceCount=5.
The instance count value represents the total number of app instances between which the data needs to be partitioned,
whereas instance index must be a unique value across the multiple instances, between 0 and instanceCount - 1. The
instance index helps each app instance to identify the unique partition (or in the case of Kafka, the partition set)
from which it receives data. It is important that both values are set correctly in order to ensure that all the data is
consumed, and that the app instances receive mutually exclusive datasets.
While setting up multiple instances for partitioned data processing may be complex in the standalone case, Spring Cloud Data Flow can simplify the process significantly, by populating both the input and output values correctly, as well as relying on the runtime infrastructure to provide information about the instance index and instance count.
Health Indicator
Spring Cloud Stream provides a health indicator for the binders, registered under the name of binders. It can be
enabled or disabled using the management.health.binders.enabled property.
Samples
For Spring Cloud Stream samples, please refer: https://github.com/spring-cloud/spring-cloud-stream-samples
Getting Started
To get started creating Spring Cloud Stream applications, head over to https://start.spring.io and create a new project named GreetingSource.
Select the Spring Boot Version to be 1.3.4 (SNAPSHOT as of the time of this release) and tick the checkbox for Stream Kafka as we will be using Kafka for messaging.
Next create a new class GreetingSource in the same package as the class GreetingSourceApplication with the following code:
import org.springframework.cloud.stream.annotation.EnableBinding;
import org.springframework.cloud.stream.messaging.Source;
import org.springframework.integration.annotation.InboundChannelAdapter;

@EnableBinding(Source.class)
public class GreetingSource {

    @InboundChannelAdapter(Source.OUTPUT)
    public String greet() {
        return "hello world " + System.currentTimeMillis();
    }
}
The annotation @EnableBinding is what triggers the creation of Spring Integration infrastructure components.
Specifically, it will create a Kafka Connection Factory, Kafka Outbound Channel Adapter, and the Message Channel defined inside the Source interface.
public interface Source {

  String OUTPUT = "output";

  @Output(Source.OUTPUT)
  MessageChannel output();

}
Furthermore, the auto configuration creates a default poller so that the greet method will be invoked once a second. The standard Spring Integration InboundChannelAdapter annotation sends a message to the source’s output channel using the return value as the payload of the message.
To test drive this setup run a Kafka Message Broker. An easy way to do this is using a docker image.
# on mac
docker run -p 2181:2181 -p 9092:9092 --env ADVERTISED_HOST=`docker-machine ip \`docker-machine active\`` --env ADVERTISED_PORT=9092 spotify/kafka

# on linux
docker run -p 2181:2181 -p 9092:9092 --env ADVERTISED_HOST=localhost --env ADVERTISED_PORT=9092 spotify/kafka
Build the application using ./mvnw clean package
The consumer application is coded in a similar manner, go back to https://start.spring.io and create a new project named LoggerSink. Then create a new class LoggingSink in the same package as the class LoggingSinkApplication with the following code
import org.springframework.cloud.stream.annotation.EnableBinding;
import org.springframework.cloud.stream.annotation.StreamListener;
import org.springframework.cloud.stream.messaging.Sink;

@EnableBinding(Sink.class)
public class LoggingSink {

    @StreamListener(Sink.INPUT)
    public void log(String message) {
        System.out.println(message);
    }
}
Build the application using ./mvnw clean package
To connect the Source application to the Sink application, each application needs to share the same destination name. Starting up both applications as shown below you will see the consumer application printing ‘hello world’ and the timestamp to the console.
cd GreetingSource
java -jar target/GreetingSource-0.0.1-SNAPSHOT.jar --spring.cloud.stream.bindings.output.destination=mydest

cd LoggingSink
java -jar target/LoggingSink-0.0.1-SNAPSHOT.jar --server.port=8090 --spring.cloud.stream.bindings.input.destination=mydest
The different server port is avoid collisions of the http port used to service the boot actuator endpoints.
The output of the logging sink will look something like
[           main] s.b.c.e.t.TomcatEmbeddedServletContainer : Tomcat started on port(s): 8090 (http)
[           main] com.example.LoggingSinkApplication       : Started LoggingSinkApplication in 6.828 seconds (JVM running for 7.371)
hello world 1458595076731
hello world 1458595077732
hello world 1458595078733
hello world 1458595079734
hello world 1458595080735
Spring Cloud Bus
Quick Start
Spring Cloud Bus works by adding Spring Boot autconfiguration if it detects itself on the classpath. All you need to do to enable the bus is to add spring-cloud-starter-bus-amqp to your dependency management and Spring Cloud takes care of the rest. Make sure RabbitMQ is available and configured to provide a ConnectionFactory: running on localhost you shouldn’t have to do anything, but if you are running remotely use Spring Cloud Connectors, or Spring Boot conventions to define the broker credentials, e.g.
spring:
  rabbitmq:
    host: mybroker.com
    port: 5672
    username: user
    password: secret
The bus currently supports sending messages to all nodes listening or all nodes for a particular service (as defined by Eureka). More selector criteria will be added in the future (ie. only service X nodes in data center Y, etc…). The http endpoints are under the /bus/* actuator namespace. There are currently two implemented. The first, /bus/env, sends key/values pairs to update each nodes Spring Environment. The second, /bus/refresh, will reload each application’s configuration, just as if they had all been pinged on their /refresh endpoint.
Addressing an Instance
The HTTP endpoints accept a "destination" parameter, e.g. "/bus/refresh?destination=customers:9000", where the destination is an ApplicationContext ID. If the ID is owned by an instance on the Bus then it will process the message and all other instances will ignore it. Spring Boot sets the ID for you in the ContextIdApplicationContextInitializer to a combination of the spring.application.name, active profiles and server.port by default.
Addressing all instances of a service
The "destination" parameter is used in a Spring PathMatcher (with the path separator as a colon :) to determine if an instance will process the message. Using the example from above, "/bus/refresh?destination=customers:**" will target all instances of the "customers" service regardless of the profiles and ports set as the ApplicationContext ID.
Application Context ID must be unique
The bus tries to eliminate processing an event twice, once from the original ApplicationEvent and once from the queue. To do this, it checks the sending application context id againts the current application context id. If multiple instances of a service have the same application context id, events will not be processed. Running on a local machine, each service will be on a different port and that will be part of the application context id. Cloud Foundry supplies an index to differentiate. To ensure that the application context id is the unique, set spring.application.index to something unique for each instance of a service. For example, in lattice, set spring.application.index=${INSTANCE_INDEX} in application.properties (or bootstrap.properties if using configserver).
Customizing the Message Broker
Spring Cloud Bus uses
Spring Cloud Stream to
broadcast the messages so to get messages to flow you only need to
include the binder implementation of your choice in the
classpath. There are convenient starters specifically for the bus with
AMQP (RabbitMQ) and Kafka
(spring-cloud-starter-bus-[amqp,kafka]). Generally speaking
Spring Cloud Stream relies on Spring Boot autoconfiguration
conventions for configuring middleware, so for instance the AMQP
broker address can be changed with spring.rabbitmq.*
configuration properties. Spring Cloud Bus has a handful of native
configuration properties in spring.cloud.bus.*
(e.g. spring.cloud.bus.destination is the name of the topic to use
the the externall middleware). Normally the defaults will suffice.
To lean more about how to customize the message broker settings consult the Spring Cloud Stream documentation.
Tracing Bus Events
Bus events (subclasses of RemoteApplicationEvent) can be traced by
setting spring.cloud.bus.trace.enabled=true. If you do this then the
Spring Boot TraceRepository (if it is present) will show each event
sent and all the acks from each service instance. Example (from the
/trace endpoint):
{
  "timestamp": "2015-11-26T10:24:44.411+0000",
  "info": {
    "signal": "spring.cloud.bus.ack",
    "type": "RefreshRemoteApplicationEvent",
    "id": "c4d374b7-58ea-4928-a312-31984def293b",
    "origin": "stores:8081",
    "destination": "*:**"
  }
  },
  {
  "timestamp": "2015-11-26T10:24:41.864+0000",
  "info": {
    "signal": "spring.cloud.bus.sent",
    "type": "RefreshRemoteApplicationEvent",
    "id": "c4d374b7-58ea-4928-a312-31984def293b",
    "origin": "customers:9000",
    "destination": "*:**"
  }
  },
  {
  "timestamp": "2015-11-26T10:24:41.862+0000",
  "info": {
    "signal": "spring.cloud.bus.ack",
    "type": "RefreshRemoteApplicationEvent",
    "id": "c4d374b7-58ea-4928-a312-31984def293b",
    "origin": "customers:9000",
    "destination": "*:**"
  }
}
This trace shows that a RefreshRemoteApplicationEvent was sent from
customers:9000, broadcast to all services, and it was received
(acked) by customers:9000 and stores:8081.
To handle the ack signals yourself you could add an @EventListener
for the AckRemoteApplicationEvent and SentApplicationEvent types
to your app (and enable tracing). Or you could tap into the
TraceRepository and mine the data from there.
|
Note
|
Any Bus application can trace acks, but sometimes it will be useful to do this in a central service that can do more complex queries on the data. Or forward it to a specialized tracing service. |
Broadcasting Your Own Events
The Bus can carry any event of type RemoteApplicationEvent, but the
default transport is JSON and the deserializer needs to know which
types are going to be used ahead of time. To register a new type you
can use @JsonTypeName on your custom class.
Spring Cloud Sleuth
Adrian Cole, Spencer Gibb, Marcin Grzejszczak, Dave Syer :doctype: book
Spring Cloud Sleuth implements a distributed tracing solution for Spring Cloud.
Terminology
Spring Cloud Sleuth borrows Dapper’s terminology.
Span: The basic unit of work. For example, sending an RPC is a new span, as is sending a response to an RPC. Span’s are identified by a unique 64-bit ID for the span and another 64-bit ID for the trace the span is a part of. Spans also have other data, such as descriptions, timestamped events, key-value annotations (tags), the ID of the span that caused them, and process ID’s (normally IP address).
Spans are started and stopped, and they keep track of their timing information. Once you create a span, you must stop it at some point in the future.
Trace: A set of spans forming a tree-like structure. For example, if you are running a distributed big-data store, a trace might be formed by a put request.
Annotation: is used to record existence of an event in time. Some of the core annotations used to define the start and stop of a request are:
-
cs - Client Sent - The client has made a request. This annotation depicts the start of the span.
-
sr - Server Received - The server side got the request and will start processing it. If one subtracts the cs timestamp from this timestamp one will receive the network latency.
-
ss - Server Sent - Annotated upon completion of request processing (when the response got sent back to the client). If one subtracts the sr timestamp from this timestamp one will receive the time needed by the server side to process the request.
-
cr - Client Received - Signifies the end of the span. The client has successfully received the response from the server side. If one subtracts the cs timestamp from this timestamp one will receive the whole time needed by the client to receive the response from the server.
Visualization of what Span and Trace will look in a system together with the Zipkin annotations:

Each color of a note signifies a span (7 spans - from A to G). If you have such information in the note:
Trace Id = X
Span Id = D
Client Sent
That means that the current span has Trace-Id set to X, Span-Id set to D. It also has emitted Client Sent event.
This is how the visualization of the parent / child relationship of spans would look like:

Purpose
In the following sections the example from the image above will be taken into consideration.
Distributed tracing with Zipkin
Altogether there are 10 spans . If you go to traces in Zipkin you will see this number:

However if you pick a particular trace then you will see 7 spans:

|
Note
|
When picking a particular trace you will see merged spans. That means that if there were 2 spans sent to Zipkin with Server Received and Server Sent / Client Received and Client Sent annotations then they will presented as a single span. |
In the image depicting the visualization of what Span and Trace is you can see 20 colorful labels. How does it happen that in Zipkin 10 spans are received?
-
2 span A labels signify span started and closed. Upon closing a single span is sent to Zipkin.
-
4 span B labels are in fact are single span with 4 annotations. However this span is composed of two separate instances. One sent from service 1 and one from service 2. So in fact two span instances will be sent to Zipkin and merged there.
-
2 span C labels signify span started and closed. Upon closing a single span is sent to Zipkin.
-
4 span B labels are in fact are single span with 4 annotations. However this span is composed of two separate instances. One sent from service 2 and one from service 3. So in fact two span instances will be sent to Zipkin and merged there.
-
2 span E labels signify span started and closed. Upon closing a single span is sent to Zipkin.
-
4 span B labels are in fact are single span with 4 annotations. However this span is composed of two separate instances. One sent from service 2 and one from service 4. So in fact two span instances will be sent to Zipkin and merged there.
-
2 span G labels signify span started and closed. Upon closing a single span is sent to Zipkin.
So 1 span from A, 2 spans from B, 1 span from C, 2 spans from D, 1 span from E, 2 spans from F and 1 from G. Altogether 10 spans.
Log correlation
When grepping the logs of those four applications by trace id equal to e.g. 2485ec27856c56f4 one would get the following:
service1.log:2016-02-26 11:15:47.561  INFO [service1,2485ec27856c56f4,2485ec27856c56f4,true] 68058 --- [nio-8081-exec-1] i.s.c.sleuth.docs.service1.Application   : Hello from service1. Calling service2
service2.log:2016-02-26 11:15:47.710  INFO [service2,2485ec27856c56f4,9aa10ee6fbde75fa,true] 68059 --- [nio-8082-exec-1] i.s.c.sleuth.docs.service2.Application   : Hello from service2. Calling service3 and then service4
service3.log:2016-02-26 11:15:47.895  INFO [service3,2485ec27856c56f4,1210be13194bfe5,true] 68060 --- [nio-8083-exec-1] i.s.c.sleuth.docs.service3.Application   : Hello from service3
service2.log:2016-02-26 11:15:47.924  INFO [service2,2485ec27856c56f4,9aa10ee6fbde75fa,true] 68059 --- [nio-8082-exec-1] i.s.c.sleuth.docs.service2.Application   : Got response from service3 [Hello from service3]
service4.log:2016-02-26 11:15:48.134  INFO [service4,2485ec27856c56f4,1b1845262ffba49d,true] 68061 --- [nio-8084-exec-1] i.s.c.sleuth.docs.service4.Application   : Hello from service4
service2.log:2016-02-26 11:15:48.156  INFO [service2,2485ec27856c56f4,9aa10ee6fbde75fa,true] 68059 --- [nio-8082-exec-1] i.s.c.sleuth.docs.service2.Application   : Got response from service4 [Hello from service4]
service1.log:2016-02-26 11:15:48.182  INFO [service1,2485ec27856c56f4,2485ec27856c56f4,true] 68058 --- [nio-8081-exec-1] i.s.c.sleuth.docs.service1.Application   : Got response from service2 [Hello from service2, response from service3 [Hello from service3] and from service4 [Hello from service4]]
If you’re using a log aggregating tool like Kibana, Splunk etc. you can order the events that took place. An example of Kibana would look like this:
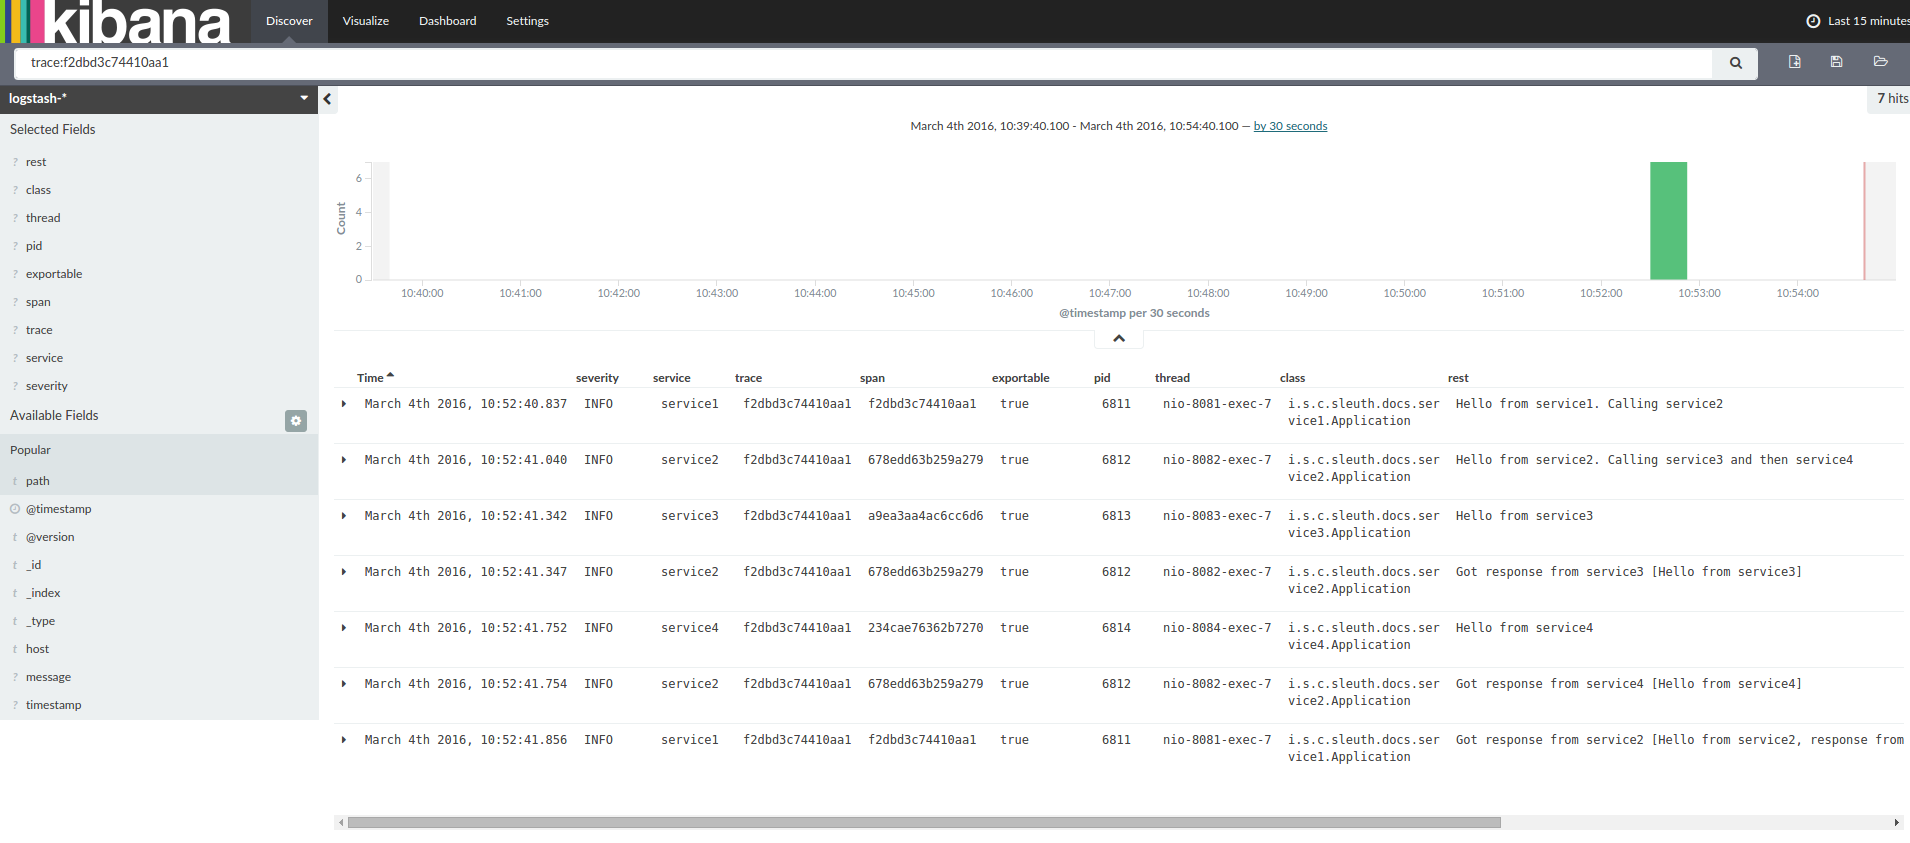
If you want to use Logstash here is the Grok pattern for Logstash:
filter {
       # pattern matching logback pattern
       grok {
              match => { "message" => "%{TIMESTAMP_ISO8601:timestamp}\s+%{LOGLEVEL:severity}\s+\[%{DATA:service},%{DATA:trace},%{DATA:span},%{DATA:exportable}\]\s+%{DATA:pid}---\s+\[%{DATA:thread}\]\s+%{DATA:class}\s+:\s+%{GREEDYDATA:rest}" }
       }
}|
Note
|
If you want to use Grok together with the logs from Cloud Foundry you have to use this pattern: |
filter {
       # pattern matching logback pattern
       grok {
              match => { "message" => "(?m)OUT\s+%{TIMESTAMP_ISO8601:timestamp}\s+%{LOGLEVEL:severity}\s+\[%{DATA:service},%{DATA:trace},%{DATA:span},%{DATA:exportable}\]\s+%{DATA:pid}---\s+\[%{DATA:thread}\]\s+%{DATA:class}\s+:\s+%{GREEDYDATA:rest}" }
       }
}
Adding to the project
In general if you want to profit only from Spring Cloud Sleuth without the Zipkin integration just add the spring-cloud-starter-sleuth module to your project.
If you want both Sleuth and Zipkin just add the spring-cloud-starter-zipkin dependency.
Features
-
Adds trace and span ids to the Slf4J MDC, so you can extract all the logs from a given trace or span in a log aggregator. Example logs:
2016-02-02 15:30:57.902  INFO [bar,6bfd228dc00d216b,6bfd228dc00d216b,false] 23030 --- [nio-8081-exec-3] ...
2016-02-02 15:30:58.372 ERROR [bar,6bfd228dc00d216b,6bfd228dc00d216b,false] 23030 --- [nio-8081-exec-3] ...
2016-02-02 15:31:01.936  INFO [bar,46ab0d418373cbc9,46ab0d418373cbc9,false] 23030 --- [nio-8081-exec-4] ...
notice the
[appname,traceId,spanId,exportable]entries from the MDC:-
spanId - the id of a specific operation that took place
-
appname - the name of the application that logged the span
-
traceId - the id of the latency graph that contains the span
-
exportable - whether the log should be exported to Zipkin or not. When would you like the span not to be exportable? In the case in which you want to wrap some operation in a Span and have it written to the logs only.
-
-
Provides an abstraction over common distributed tracing data models: traces, spans (forming a DAG), annotations, key-value annotations. Loosely based on HTrace, but Zipkin (Dapper) compatible.
-
Sleuth records timing information to aid in latency analysis. Using sleuth, you can pinpoint causes of latency in your applications. Sleuth is written to not log too much, and to not cause your production application to crash.
-
propagates structural data about your call-graph in-band, and the rest out-of-band.
-
includes opinionated instrumentation of layers such as HTTP
-
includes sampling policy to manage volume
-
can report to a Zipkin system for query and visualization
-
-
Instruments common ingress and egress points from Spring applications (servlet filter, async endpoints, rest template, scheduled actions, message channels, zuul filters, feign client).
-
Sleuth includes default logic to join a trace across http or messaging boundaries. For example, http propagation works via Zipkin-compatible request headers. This propagation logic is defined and customized via
SpanInjectorandSpanExtractorimplementations. -
Provides simple metrics of accepted / dropped spans.
-
If
spring-cloud-sleuth-zipkinthen the app will generate and collect Zipkin-compatible traces. By default it sends them via HTTP to a Zipkin server on localhost (port 9411). Configure the location of the service usingspring.zipkin.baseUrl. -
If
spring-cloud-sleuth-streamthen the app will generate and collect traces via Spring Cloud Stream. Your app automatically becomes a producer of tracer messages that are sent over your broker of choice (e.g. RabbitMQ, Apache Kafka, Redis).
|
Important
|
If using Zipkin or Stream, configure the percentage of spans exported using spring.sleuth.sampler.percentage
(default 0.1, i.e. 10%). Otherwise you might think that Sleuth is not working cause it’s omitting some spans.
|
|
Note
|
the SLF4J MDC is always set and logback users will immediately see the trace and span ids in logs per the example
above. Other logging systems have to configure their own formatter to get the same result. The default is
logging.pattern.level set to %clr(%5p) %clr([${spring.application.name:},%X{X-B3-TraceId:-},%X{X-B3-SpanId:-},%X{X-Span-Export:-}]){yellow}
(this is a Spring Boot feature for logback users).
This means that if you’re not using SLF4J this pattern WILL NOT be automatically applied.
|
Sampling
In distributed tracing the data volumes can be very high so sampling
can be important (you usually don’t need to export all spans to get a
good picture of what is happening). Spring Cloud Sleuth has a
Sampler strategy that you can implement to take control of the
sampling algorithm. Samplers do not stop span (correlation) ids from
being generated, but they do prevent the tags and events being
attached and exported. By default you get a strategy that continues to
trace if a span is already active, but new ones are always marked as
non-exportable. If all your apps run with this sampler you will see
traces in logs, but not in any remote store. For testing the default
is often enough, and it probably is all you need if you are only using
the logs (e.g. with an ELK aggregator). If you are exporting span data
to Zipkin or Spring Cloud Stream, there is also an AlwaysSampler
that exports everything and a PercentageBasedSampler that samples a
fixed fraction of spans.
|
Note
|
the PercentageBasedSampler is the default if you are using
spring-cloud-sleuth-zipkin or spring-cloud-sleuth-stream. You can
configure the exports using spring.sleuth.sampler.percentage.
|
A sampler can be installed just by creating a bean definition, e.g:
@Bean
public Sampler defaultSampler() {
    return new AlwaysSampler();
}
Instrumentation
Spring Cloud Sleuth instruments all your Spring application
automatically, so you shouldn’t have to do anything to activate
it. The instrumentation is added using a variety of technologies
according to the stack that is available, e.g. for a servlet web
application we use a Filter, and for Spring Integration we use
ChannelInterceptors.
You can customize the keys used in span tags. To limit the volume of
span data, by default an HTTP request will be tagged only with a
handful of metadata like the status code, host and URL. You can add
request headers by configuring spring.sleuth.keys.http.headers (a
list of header names).
|
Note
|
Remember that tags are only collected and exported if there is a
Sampler that allows it (by default there is not, so there is no
danger of accidentally collecting too much data without configuring
something).
|
|
Note
|
Currently the instrumentation in Spring Cloud Sleuth is eager - it means that we’re actively trying to pass the tracing context between threads. Also timing events are captured even when sleuth isn’t exporting data to a tracing system. This approach may change in the future towards being lazy on this matter. |
Span lifecycle
You can do the following operations on the Span by means of Tracer interface:
-
start - when you start a span its name is assigned and start timestamp is recorded.
-
close - the span gets finished (the end time of the span is recorded) and if the span is exportable then it will be eligible for collection to Zipkin. The span is also removed from the current thread.
-
continue - a new instance of span will be created whereas it will be a copy of the one that it continues.
-
detach - the span doesn’t get stopped or closed. It only gets removed from the current thread.
-
create with explicit parent - you can create a new span and set an explicit parent to it
Creating and closing spans
You can manually create spans by using the Tracer interface.
// Start a span. If there was a span present in this thread it will become
// the `newSpan`'s parent.
Span newSpan = this.tracer.createSpan("calculateTax");
try {
    // ...
    // You can tag a span
    this.tracer.addTag("taxValue", taxValue);
    // ...
    // You can log an event on a span
    newSpan.logEvent("taxCalculated");
} finally {
    // Once done remember to close the span. This will allow collecting
    // the span to send it to Zipkin
    this.tracer.close(newSpan);
}
In this example we could see how to create a new instance of span. Assuming that there already was a span present in this thread then it would become the parent of that span.
|
Important
|
Always clean after you create a span! Don’t forget to close a span if you want to send it to Zipkin. |
Continuing spans
Sometimes you don’t want to create a new span but you want to continue one. Example of such a situation might be (of course it all depends on the use-case):
-
AOP - If there was already a span created before an aspect was reached then you might not want to create a new span.
-
Hystrix - executing a Hystrix command is most likely a logical part of the current processing. It’s in fact only a technical implementation detail that you wouldn’t necessarily want to reflect in tracing as a separate being.
The continued instance of span is equal to the one that it continues:
Span continuedSpan = this.tracer.continueSpan(spanToContinue);
assertThat(continuedSpan).isEqualTo(spanToContinue);
To continue a span you can use the Tracer interface.
// let's assume that we're in a thread Y and we've received
// the `initialSpan` from thread X
Span continuedSpan = this.tracer.continueSpan(initialSpan);
try {
    // ...
    // You can tag a span
    this.tracer.addTag("taxValue", taxValue);
    // ...
    // You can log an event on a span
    continuedSpan.logEvent("taxCalculated");
} finally {
    // Once done remember to detach the span. That way you'll
    // safely remove it from the current thread without closing it
    this.tracer.detach(continuedSpan);
}|
Important
|
Always clean after you create a span! Don’t forget to detach a span if some work was done started in one thread (e.g. thread X) and it’s waiting for other threads (e.g. Y, Z) to finish. Then the spans in the threads Y, Z should be detached at the end of their work. When the results are collected the span in thread X should be closed. |
Creating spans with an explicit parent
There is a possibility that you want to start a new span and provide an explicit parent of that span.
Let’s assume that the parent of a span is in one thread and you want to start a new span in another thread. The
startSpan method of the Tracer interface is the method you are looking for.
// let's assume that we're in a thread Y and we've received
// the `initialSpan` from thread X. `initialSpan` will be the parent
// of the `newSpan`
Span newSpan = this.tracer.createSpan("calculateCommission", initialSpan);
try {
    // ...
    // You can tag a span
    this.tracer.addTag("commissionValue", commissionValue);
    // ...
    // You can log an event on a span
    newSpan.logEvent("commissionCalculated");
} finally {
    // Once done remember to close the span. This will allow collecting
    // the span to send it to Zipkin. The tags and events set on the
    // newSpan will not be present on the parent
    this.tracer.close(newSpan);
}|
Important
|
After having created such a span remember to close it. Otherwise you will see a lot of warnings in your logs related to the fact that you have a span present in the current thread other than the one you’re trying to close. What’s worse your spans won’t get closed properly thus will not get collected to Zipkin. |
Naming spans
Picking a span name is not a trivial task. Span name should depict an operation name. The name should be low cardinality (e.g. not include identifiers).
Since there is a lot of instrumentation going on some of the span names will be artificial like:
-
http:pathwhen received an http request on a given path -
asyncfor asynchronous operations done via wrappedCallableandRunnable. -
@Scheduledannotated methods will return the simple name of the class.
Fortunately, for the asynchronous processing you can provide explicit naming.
@SpanName annotation
You can do name the span explicitly via the @SpanName annotation.
@SpanName("calculateTax")
class TaxCountingRunnable implements Runnable {

    @Override public void run() {
        // perform logic
    }
}
In this case, when processed in the following manner:
Runnable runnable = new TraceRunnable(tracer, spanNamer, new TaxCountingRunnable());
Future<?> future = executorService.submit(runnable);
// ... some additional logic ...
future.get();
The span will be named calculateTax.
toString() method
It’s pretty rare to create separate classes for Runnable or Callable. Typically one creates an anonymous
instance of those classes. You can’t annotate such classes thus to override that, if there is no @SpanName annotation present,
we’re checking if the class has a custom implementation of the toString() method.
So executing such code:
Runnable runnable = new TraceRunnable(tracer, spanNamer, new Runnable() {
    @Override public void run() {
        // perform logic
    }

    @Override public String toString() {
        return "calculateTax";
    }
});
Future<?> future = executorService.submit(runnable);
// ... some additional logic ...
future.get();
will lead in creating a span named calculateTax.
Customizations
Thanks to the SpanInjector and SpanExtractor you can customize the way spans
are created and propagated.
There are currently two built-in ways to pass tracing information between processes:
-
via Spring Integration
-
via HTTP
Span ids are extracted from Zipkin-compatible (B3) headers (either Message
or HTTP headers), to start or join an existing trace. Trace information is
injected into any outbound requests so the next hop can extract them.
Spring Integration
For Spring Integration these are the beans responsible for creation of a Span from a Message
and filling in the MessageBuilder with tracing information.
@Bean
public SpanExtractor<Message> messagingSpanExtractor() {
    ...
}

@Bean
public SpanInjector<MessageBuilder> messagingSpanInjector() {
    ...
}
You can override them by providing your own implementation and by adding a @Primary annotation
to your bean definition.
HTTP
For HTTP these are the beans responsible for creation of a Span from a HttpServletRequest
and filling in the HttpServletResponse with tracing information.
@Bean
public SpanExtractor<HttpServletRequest> httpServletRequestSpanExtractor() {
    ...
}

@Bean
public SpanInjector<HttpServletResponse> httpServletResponseSpanInjector() {
    ...
}
You can override them by providing your own implementation and by adding a @Primary annotation
to your bean definition.
Example
Let’s assume that instead of the standard Zipkin compatible tracing HTTP header names you have
-
for trace id -
correlationId -
for span id -
mySpanId
This is a an example of a SpanExtractor
static class CustomHttpServletRequestSpanExtractor
        implements SpanExtractor<HttpServletRequest> {

    @Override
    public Span joinTrace(HttpServletRequest carrier) {
        long traceId = Span.hexToId(carrier.getHeader("correlationId"));
        long spanId = Span.hexToId(carrier.getHeader("mySpanId"));
        // extract all necessary headers
        Span.SpanBuilder builder = Span.builder().traceId(traceId).spanId(spanId);
        // build rest of the Span
        return builder.build();
    }
}
The following SpanInjector could be created
static class CustomHttpServletResponseSpanInjector
        implements SpanInjector<HttpServletResponse> {

    @Override
    public void inject(Span span, HttpServletResponse carrier) {
        carrier.addHeader("correlationId", Span.idToHex(span.getTraceId()));
        carrier.addHeader("mySpanId", Span.idToHex(span.getSpanId()));
        // inject the rest of Span values to the header
    }
}
And you could register them like this:
@Bean
@Primary
SpanExtractor<HttpServletRequest> customHttpServletRequestSpanExtractor() {
    return new CustomHttpServletRequestSpanExtractor();
}

@Bean
@Primary
SpanInjector<HttpServletResponse> customHttpServletResponseSpanInjector() {
    return new CustomHttpServletResponseSpanInjector();
}
Span Data as Messages
You can accumulate and send span data over
Spring Cloud Stream by
including the spring-cloud-sleuth-stream jar as a dependency, and
adding a Channel Binder implementation
(e.g. spring-cloud-starter-stream-rabbit for RabbitMQ or
spring-cloud-starter-stream-kafka for Kafka). This will
automatically turn your app into a producer of messages with payload
type Spans.
Zipkin Consumer
There is a special convenience annotation for setting up a message consumer
for the Span data and pushing it into a Zipkin SpanStore. This application
@SpringBootApplication
@EnableZipkinStreamServer
public class Consumer {
	public static void main(String[] args) {
		SpringApplication.run(Consumer.class, args);
	}
}
will listen for the Span data on whatever transport you provide via a
Spring Cloud Stream Binder (e.g. include
spring-cloud-starter-stream-rabbit for RabbitMQ, and similar
starters exist for Redis and Kafka). The app will also be a
Zipkin server, which hosts
the UI and api on port 9411.
The default SpanStore is in-memory (good for demos and getting
started quickly). For a more robust solution you can add MySQL and
spring-boot-starter-jdbc to your classpath and enable the JDBC
SpanStore via configuration, e.g.:
spring:
  rabbitmq:
    host: ${RABBIT_HOST:localhost}
  datasource:
    schema: classpath:/mysql.sql
    url: jdbc:mysql://${MYSQL_HOST:localhost}/test
    username: root
    password: root
# Switch this on to create the schema on startup:
    initialize: true
    continueOnError: true
  sleuth:
    enabled: false
zipkin:
  store:
type: mysql|
Note
|
The @EnableZipkinStreamServer is also annotated with
@EnableZipkinServer so the process will also expose the standard
Zipkin server endpoints for collecting spans over HTTP, and for
querying in the Zipkin Web UI.
|
Custom Consumer
A custom consumer can also easily be implemented using
spring-cloud-sleuth-stream and binding to the SleuthSink. Example:
@EnableBinding(SleuthSink.class)
@SpringBootApplication(exclude = SleuthStreamAutoConfiguration.class)
@MessageEndpoint
public class Consumer {

    @ServiceActivator(inputChannel = SleuthSink.INPUT)
    public void sink(Spans input) throws Exception {
        // ... process spans
    }
}|
Note
|
the sample consumer application above explicitly excludes
SleuthStreamAutoConfiguration so it doesn’t send messages to itself,
but this is optional (you might actually want to trace requests into
the consumer app).
|
Metrics
Currently Spring Cloud Sleuth registers very simple metrics related to spans. It’s using the Spring Boot’s metrics support to calculate the number of accepted and dropped spans. Each time a span gets sent to Zipkin the number of accepted spans will increase. If there’s an error then the number of dropped spans will get increased.
Integrations
Runnable and Callable
If you’re wrapping your logic in Runnable or Callable it’s enough to wrap those classes in their Sleuth representative.
Example for Runnable:
Runnable runnable = new Runnable() {
    @Override
    public void run() {
        // do some work
    }

    @Override
    public String toString() {
        return "spanNameFromToStringMethod";
    }
};
// Manual `TraceRunnable` creation with explicit "calculateTax" Span name
Runnable traceRunnable = new TraceRunnable(tracer, spanNamer, runnable, "calculateTax");
// Wrapping `Runnable` with `Tracer`. The Span name will be taken either from the
// `@SpanName` annotation or from `toString` method
Runnable traceRunnableFromTracer = tracer.wrap(runnable);
Example for Callable:
Callable<String> callable = new Callable<String>() {
    @Override
    public String call() throws Exception {
        return someLogic();
    }

    @Override
    public String toString() {
        return "spanNameFromToStringMethod";
    }
};
// Manual `TraceCallable` creation with explicit "calculateTax" Span name
Callable<String> traceCallable = new TraceCallable<>(tracer, spanNamer, callable, "calculateTax");
// Wrapping `Callable` with `Tracer`. The Span name will be taken either from the
// `@SpanName` annotation or from `toString` method
Callable<String> traceCallableFromTracer = tracer.wrap(callable);
That way you will ensure that a new Span is created and closed for each execution.
Hystrix
Custom Concurrency Strategy
We’re registering a custom HystrixConcurrencyStrategy
that wraps all Callable instances into their Sleuth representative -
the TraceCallable. The strategy either starts or continues a span depending on the fact whether tracing was already going
on before the Hystrix command was called. To disable the custom Hystrix Concurrency Strategy set the spring.sleuth.hystrix.strategy.enabled to false.
Manual Command setting
Assuming that you have the following HystrixCommand:
HystrixCommand<String> hystrixCommand = new HystrixCommand<String>(setter) {
    @Override
    protected String run() throws Exception {
        return someLogic();
    }
};
In order to pass the tracing information you have to wrap the same logic in the Sleuth version of the HystrixCommand which is the
TraceCommand:
TraceCommand<String> traceCommand = new TraceCommand<String>(tracer, traceKeys, setter) {
    @Override
    public String doRun() throws Exception {
        return someLogic();
    }
};
HTTP integration
Features from this section can be disabled by providing the spring.sleuth.web.enabled property with value equal to false.
HTTP Filter
Via the TraceFilter all sampled incoming requests result in creation of a Span. That Span’s name is http: + the path to which
the request was sent. E.g. if the request was sent to /foo/bar then the name will be http:/foo/bar. You can configure which URIs you would
like to skip via the spring.sleuth.web.skipPattern property. If you have ManagementServerProperties on classpath then
its value of contextPath gets appended to the provided skip pattern.
Async Servlet support
If your controller returns a Callable or a WebAsyncTask Spring Cloud Sleuth will continue the existing span instead of creating a new one.
HTTP client integration
Synchronous Rest Template
We’re injecting a RestTemplate interceptor that ensures that all the tracing information is passed to the requests. Each time a
call is made a new Span is created. It gets closed upon receiving the response. In order to block the synchronous RestTemplate features
just set spring.sleuth.web.client.enabled to false.
Asynchronous Rest Template
Custom instrumentation is set to create and close Spans upon sending and receiving requests. To block the AsyncRestTemplate
features set spring.sleuth.web.async.client.enabled to false.
Feign
By default Spring Cloud Sleuth provides integration with feign via the TraceFeignClientAutoConfiguration. You can disable it entirely
by setting spring.sleuth.feign.enabled to false. If you do so then no Feign related instrumentation will take place.
Part of Feign instrumentation is done via a FeignBeanPostProcessor. You can disable it by providing the spring.sleuth.feign.processor.enabled equal to false.
If you set it like this then Spring Cloud Sleuth will not instrument any of your custom Feign components. All the default instrumentation
however will be still there.
Asynchronous communication
@Async annotated methods
In Spring Cloud Sleuth we’re instrumenting async related components so that the tracing information is passed between threads. You can disable this behaviour
by setting the value of spring.sleuth.async.enabled to false.
If you annotate your method with @Async then we’ll automatically create a new Span with the following characteristics:
-
the Span name will be the annotated method name
-
the Span will be tagged with that method’s class name and the method name too
@Scheduled annotated methods
In Spring Cloud Sleuth we’re instrumenting scheduled method execution so that the tracing information is passed between threads. You can disable this behaviour
by setting the value of spring.sleuth.scheduled.enabled to false.
If you annotate your method with @Scheduled then we’ll automatically create a new Span with the following characteristics:
-
the Span name will be the annotated method name
-
the Span will be tagged with that method’s class name and the method name too
If you want to skip Span creation for some @Scheduled annotated classes you can set the
spring.sleuth.scheduled.skipPattern with a regular expression that will match the fully qualified name of the
@Scheduled annotated class.
Executor, ExecutorService and ScheduledExecutorService
We’re providing LazyTraceExecutor, TraceableExecutorService and TraceableScheduledExecutorService. Those implementations
are creating Spans each time a new task is submitted, invoked or scheduled.
Messaging
Spring Cloud Sleuth integrates with Spring Integration. It creates spans for publish and
subscribe events. To disable Spring Integration instrumentation, set spring.sleuth.integration.enabled to false.
Zuul
We’re registering Zuul filters to propagate the tracing information (the request header is enriched with tracing data).
To disable Zuul support set the spring.sleuth.zuul.enabled property to false.
Spring Cloud Consul
Install Consul
Please see the installation documentation for instructions on how to install Consul.
Consul Agent
A Consul Agent client must be available to all Spring Cloud Consul applications. By default, the Agent client is expected to be at localhost:8500. See the Agent documentation for specifics on how to start an Agent client and how to connect to a cluster of Consul Agent Servers. For development, after you have installed consul, you may start a Consul Agent using the following command:
./src/main/bash/local_run_consul.sh
This will start an agent in server mode on port 8500, with the ui available at http://localhost:8500
Service Discovery with Consul
Service Discovery is one of the key tenets of a microservice based architecture. Trying to hand configure each client or some form of convention can be very difficult to do and can be very brittle. Consul provides Service Discovery services via an HTTP API and DNS. Spring Cloud Consul leverages the HTTP API for service registration and discovery. This does not prevent non-Spring Cloud applications from leveraging the DNS interface. Consul Agents servers are run in a cluster that communicates via a gossip protocol and uses the Raft consensus protocol.
Registering with Consul
When a client registers with Consul, it provides meta-data about itself such as host and port, id, name and tags. An HTTP Check is created by default that Consul hits the /health endpoint every 10 seconds. If the health check fails, the service instance is marked as critical.
Example Consul client:
@SpringBootApplication
@EnableDiscoveryClient
@RestController
public class Application {

    @RequestMapping("/")
    public String home() {
        return "Hello world";
    }

    public static void main(String[] args) {
        new SpringApplicationBuilder(Application.class).web(true).run(args);
    }

}
(i.e. utterly normal Spring Boot app). If the Consul client is located somewhere other than localhost:8500, the configuration is required to locate the client. Example:
spring:
  cloud:
    consul:
      host: localhost
      port: 8500
|
Caution
|
If you use Spring Cloud Consul Config, the above values will need to be placed in bootstrap.yml instead of application.yml.
|
The default service name, instance id and port, taken from the Environment, are ${spring.application.name}, the Spring Context ID and ${server.port} respectively.
@EnableDiscoveryClient make the app into both a Consul "service" (i.e. it registers itself) and a "client" (i.e. it can query Consul to locate other services).
HTTP Health Check
The health check for a Consul instance defaults to "/health", which is the default locations of a useful endpoint in a Spring Boot Actuator application. You need to change these, even for an Actuator application if you use a non-default context path or servlet path (e.g. server.servletPath=/foo) or management endpoint path (e.g. management.contextPath=/admin). The interval that Consul uses to check the health endpoint may also be configured. "10s" and "1m" represent 10 seconds and 1 minute respectively. Example:
spring:
  cloud:
    consul:
      discovery:
        healthCheckPath: ${management.contextPath}/health
        healthCheckInterval: 15s
Making the Consul Instance ID Unique
By default a consul instance is registered with an ID that is equal to its Spring Application Context ID. By default, the Spring Application Context ID is ${spring.application.name}:comma,separated,profiles:${server.port}. For most cases, this will allow multiple instances of one service to run on one machine. If further uniqueness is required, Using Spring Cloud you can override this by providing a unique identifier in spring.cloud.consul.discovery.instanceId. For example:
spring:
  cloud:
    consul:
      discovery:
        instanceId: ${spring.application.name}:${spring.application.instance_id:${random.value}}
With this metadata, and multiple service instances deployed on localhost, the random value will kick in there to make the instance unique. In Cloudfoundry the spring.application.instance_id will be populated automatically in a Spring Boot Actuator application, so the random value will not be needed.
Using the DiscoveryClient
Spring Cloud has support for Feign (a REST client builder) and also Spring RestTemplate using the logical service names instead of physical URLs.
You can also use the org.springframework.cloud.client.discovery.DiscoveryClient which provides a simple API for discovery clients that is not specific to Netflix, e.g.
@Autowired
private DiscoveryClient discoveryClient;

public String serviceUrl() {
    List<ServiceInstance> list = client.getInstances("STORES");
    if (list != null && list.size() > 0 ) {
        return list.get(0).getUri();
    }
    return null;
}
Distributed Configuration with Consul
Consul provides a Key/Value Store for storing configuration and other metadata. Spring Cloud Consul Config is an alternative to the Config Server and Client. Configuration is loaded into the Spring Environment during the special "bootstrap" phase. Configuration is stored in the /config folder by default. Multiple PropertySource instances are created based on the application’s name and the active profiles that mimicks the Spring Cloud Config order of resolving properties. For example, an application with the name "testApp" and with the "dev" profile will have the following property sources created:
config/testApp,dev/
config/testApp/
config/application,dev/
config/application/
The most specific property source is at the top, with the least specific at the bottom. Properties is the config/application folder are applicable to all applications using consul for configuration. Properties in the config/testApp folder are only available to the instances of the service named "testApp".
Configuration is currently read on startup of the application. Sending a HTTP POST to /refresh will cause the configuration to be reloaded. Watching the key value store (which Consul supports) is not currently possible, but will be a future addition to this project.
How to activate
Including a dependency on org.springframework.cloud:spring-cloud-consul-config will enable auto-configuration that will setup Spring Cloud Consul Config.
Customizing
Consul Config may be customized using the following properties:
spring:
  cloud:
    consul:
      config:
        enabled: true
        prefix: configuration
        defaultContext: apps
        profileSeparator: '::'
-
enabledsetting this value to "false" disables Consul Config -
prefixsets the base folder for configuration values -
defaultContextsets the folder name used by all applications -
profileSeparatorsets the value of the separator used to separate the profile name in property sources with profiles
YAML or Properties with Config
It may be more convenient to store a blob of properties in YAML or Properties format as opposed to individual key/value pairs. Set the spring.cloud.consul.config.format property to YAML or PROPERTIES. For example to use YAML:
spring:
  cloud:
    consul:
      config:
        format: YAML
YAML must be set in the appropriate data key in consul. Using the defaults above the keys would look like:
config/testApp,dev/data
config/testApp/data
config/application,dev/data
config/application/data
You could store a YAML document in any of the keys listed above.
You can change the data key using spring.cloud.consul.config.data-key.
git2consul with Config
git2consul is a Consul community project that loads files from a git repository to individual keys into Consul. By default the names of the keys are names of the files. YAML and Properties files are supported with file extensions of .yml and .properties respectively. Set the spring.cloud.consul.config.format property to FILES. For example:
spring:
  cloud:
    consul:
      config:
        format: FILES
Given the following keys in /config, the development profile and an application name of foo:
.gitignore
application.yml
bar.properties
foo-development.properties
foo-production.yml
foo.properties
master.ref
the following property sources would be created:
config/foo-development.properties
config/foo.properties
config/application.yml
The value of each key needs to be a properly formatted YAML or Properties file.
Fail Fast
It may be convenient in certain circumstances (like local development or certain test scenarios) to not fail if consul isn’t available for configuration. Setting spring.cloud.consul.config.failFast=false in bootstrap.yml will cause the configuration module to log a warning rather than throw an exception. This will allow the application to continue startup normally.
Consul Retry
If you expect that the consul agent may occasionally be unavailable when
your app starts, you can ask it to keep trying after a failure. You need to add
spring-retry and spring-boot-starter-aop to your classpath. The default
behaviour is to retry 6 times with an initial backoff interval of 1000ms and an
exponential multiplier of 1.1 for subsequent backoffs. You can configure these
properties (and others) using spring.cloud.consul.retry.* configuration properties.
This works with both Spring Cloud Consul Config and Discovery registration.
|
Tip
|
To take full control of the retry add a @Bean of type
RetryOperationsInterceptor with id "consulRetryInterceptor". Spring
Retry has a RetryInterceptorBuilder that makes it easy to create one.
|
Spring Cloud Bus with Consul
Coming in a later release.
Circuit Breaker with Hystrix
Applications can use the Hystrix Circuit Breaker provided by the Spring Cloud Netflix project by including this starter in the projects pom.xml: spring-cloud-starter-hystrix. Hystrix doesn’t depend on the Netflix Discovery Client. The @EnableHystrix annotation should be placed on a configuration class (usually the main class). Then methods can be annotated with @HystrixCommand to be protected by a circuit breaker. See the documentation for more details.
Hystrix metrics aggregation with Turbine and Consul
Turbine (provided by the Spring Cloud Netflix project), aggregates multiple instances Hystrix metrics streams, so the dashboard can display an aggregate view. Turbine uses the DiscoveryClient interface to lookup relevant instances. To use Turbine with Spring Cloud Consul, configure the Turbine application in a manner similar to the following examples:
<dependency>
    <groupId>org.springframework.cloud</groupId>
    <artifactId>spring-cloud-netflix-turbine</artifactId>
</dependency>
<dependency>
    <groupId>org.springframework.cloud</groupId>
    <artifactId>spring-cloud-starter-consul-discovery</artifactId>
</dependency>
Notice that the Turbine dependency is not a starter. The turbine starter includes support for Netflix Eureka.
spring.application.name: turbine
applications: consulhystrixclient
turbine:
  aggregator:
    clusterConfig: ${applications}
  appConfig: ${applications}
The clusterConfig and appConfig sections must match, so it’s useful to put the comma-separated list of service ID’s into a separate configuration property.
@EnableTurbine
@EnableDiscoveryClient
@SpringBootApplication
public class Turbine {
    public static void main(String[] args) {
        SpringApplication.run(DemoturbinecommonsApplication.class, args);
    }
}
Spring Cloud Zookeeper
Install Zookeeper
Please see the installation documentation for instructions on how to install Zookeeper.
Service Discovery with Zookeeper
Service Discovery is one of the key tenets of a microservice based architecture. Trying to hand configure each client or some form of convention can be very difficult to do and can be very brittle. Curator(A java library for Zookeeper) provides Service Discovery services via Service Discovery Extension. Spring Cloud Zookeeper leverages this extension for service registration and discovery.
How to activate
Including a dependency on org.springframework.cloud:spring-cloud-starter-zookeeper-discovery will enable auto-configuration that will setup Spring Cloud Zookeeper Discovery.
Registering with Zookeeper
When a client registers with Zookeeper, it provides meta-data about itself such as host and port, id and name.
Example Zookeeper client:
@SpringBootApplication
@EnableDiscoveryClient
@RestController
public class Application {

    @RequestMapping("/")
    public String home() {
        return "Hello world";
    }

    public static void main(String[] args) {
        new SpringApplicationBuilder(Application.class).web(true).run(args);
    }

}
(i.e. utterly normal Spring Boot app). If Zookeeper is located somewhere other than localhost:2181, the configuration is required to locate the server. Example:
spring:
  cloud:
    zookeeper:
      connect-string: localhost:2181
|
Caution
|
If you use Spring Cloud Zookeeper Config, the above values will need to be placed in bootstrap.yml instead of application.yml.
|
The default service name, instance id and port, taken from the Environment, are ${spring.application.name}, the Spring Context ID and ${server.port} respectively.
@EnableDiscoveryClient makes the app into both a Zookeeper "service" (i.e. it registers itself) and a "client" (i.e. it can query Zookeeper to locate other services).
Using the DiscoveryClient
Spring Cloud has support for Feign (a REST client builder) and also Spring RestTemplate using the logical service names instead of physical URLs.
You can also use the org.springframework.cloud.client.discovery.DiscoveryClient which provides a simple API for discovery clients that is not specific to Netflix, e.g.
@Autowired
private DiscoveryClient discoveryClient;

public String serviceUrl() {
    List<ServiceInstance> list = discoveryClient.getInstances("STORES");
    if (list != null && list.size() > 0 ) {
        return list.get(0).getUri().toString();
    }
    return null;
}
Zookeeper Dependencies
Using the Zookeeper Dependencies
Spring Cloud Zookeeper gives you a possibility to provide dependencies of your application as properties. As dependencies you can understand other applications that are registered
in Zookeeper and which you would like to call via Feign (a REST client builder)
and also Spring RestTemplate.
You can also benefit from the Zookeeper Dependency Watchers functionality that lets you control and monitor what is the state of your dependencies and decide what to do with that.
How to activate Zookeeper Dependencies
-
Including a dependency on
org.springframework.cloud:spring-cloud-starter-zookeeper-discoverywill enable auto-configuration that will setup Spring Cloud Zookeeper Dependencies. -
In addition to that you have to set the property
spring.cloud.zookeeper.dependencies.enabledto true (defaults totrueif not set explicitly). -
You have to have the
spring.cloud.zookeeper.dependenciessection properly set up - check the subsequent section for more details.
Setting up Zookeeper Dependencies
Let’s take a closer look at an example of dependencies representation:
spring.application.name: yourServiceName
spring.cloud.zookeeper:
  dependencies:
    newsletter:
      path: /path/where/newsletter/has/registered/in/zookeeper
      loadBalancerType: ROUND_ROBIN
      contentTypeTemplate: application/vnd.newsletter.$version+json
      version: v1
      headers:
        header1:
            - value1
        header2:
            - value2
      required: false
      stubs: org.springframework:foo:stubs
    mailing:
      path: /path/where/mailing/has/registered/in/zookeeper
      loadBalancerType: ROUND_ROBIN
      contentTypeTemplate: application/vnd.mailing.$version+json
      version: v1
      required: true
Let’s now go through each part of the dependency one by one. The root property name is spring.cloud.zookeeper.dependencies.
Aliases
Below the root property you have to represent each dependency has by an alias due to the constraints of Ribbon (the application id has to be placed in the URL
thus you can’t pass any complex path like /foo/bar/name). The alias will be the name that you will use instead of serviceId for DiscoveryClient, Feign or RestTemplate.
In the aforementioned examples the aliases are newsletter and mailing. Example of Feign usage with newsletter would be:
@FeignClient("newsletter")
public interface NewsletterService {
        @RequestMapping(method = RequestMethod.GET, value = "/newsletter")
        String getNewsletters();
}
Path
Represented by path yaml property.
Path is the path under which the dependency is registered under Zookeeper. Like presented before Ribbon operates on URLs thus this path is not compliant with its requirement. That is why Spring Cloud Zookeeper maps the alias to the proper path.
Load balancer type
Represented by loadBalancerType yaml property.
If you know what kind of load balancing strategy has to be applied when calling this particular dependency then you can provide it in the yaml file and it will be automatically applied. You can choose one of the following load balancing strategies
-
STICKY - once chosen the instance will always be called
-
RANDOM - picks an instance randomly
-
ROUND_ROBIN - iterates over instances over and over again
Content-Type template and version
Represented by contentTypeTemplate and version yaml property.
If you version your api via the Content-Type header then you don’t want to add this header to each of your requests. Also if you want to call a new version of the API you don’t want to
roam around your code to bump up the API version. That’s why you can provide a contentTypeTemplate with a special $version placeholder. That placeholder will be filled by the value of the
version yaml property. Let’s take a look at an example.
Having the following contentTypeTemplate:
application/vnd.newsletter.$version+json
and the following version:
v1
Will result in setting up of a Content-Type header for each request:
application/vnd.newsletter.v1+json
Default headers
Represented by headers map in yaml
Sometimes each call to a dependency requires setting up of some default headers. In order not to do that in code you can set them up in the yaml file.
Having the following headers section:
headers:
    Accept:
        - text/html
        - application/xhtml+xml
    Cache-Control:
        - no-cache
Results in adding the Accept and Cache-Control headers with appropriate list of values in your HTTP request.
Obligatory dependencies
Represented by required property in yaml
If one of your dependencies is required to be up and running when your application is booting then it’s enough to set up the required: true property in the yaml file.
If your application can’t localize the required dependency during boot time it will throw an exception and the Spring Context will fail to set up. In other words your application won’t be able to start if the required dependency is not registered in Zookeeper.
You can read more about Spring Cloud Zookeeper Presence Checker in the following sections.
Stubs
You can provide a colon separated path to the JAR containing stubs of the dependency. Example
stubs: org.springframework:foo:stubsmeans that for a particular dependencies can be found under:
-
groupId:
org.springframework -
artifactId:
foo -
classifier:
stubs- this is the default value
This is actually equal to
stubs: org.springframework:foosince stubs is the default classifier.
Configuring Spring Cloud Zookeeper Dependencies
There is a bunch of properties that you can set to enable / disable parts of Zookeeper Dependencies functionalities.
-
spring.cloud.zookeeper.dependencies- if you don’t set this property you won’t benefit from Zookeeper Dependencies -
spring.cloud.zookeeper.dependencies.ribbon.enabled(enabled by default) - Ribbon requires explicit global configuration or a particular one for a dependency. By turning on this property runtime load balancing strategy resolution is possible and you can profit from theloadBalancerTypesection of the Zookeeper Dependencies. The configuration that needs this property has an implementation ofLoadBalancerClientthat delegates to theILoadBalancerpresented in the next bullet -
spring.cloud.zookeeper.dependencies.ribbon.loadbalancer(enabled by default) - thanks to this property the customILoadBalancerknows that the part of the URI passed to Ribbon might actually be the alias that has to be resolved to a proper path in Zookeeper. Without this property you won’t be able to register applications under nested paths. -
spring.cloud.zookeeper.dependencies.headers.enabled(enabled by default) - this property registers such aRibbonClientthat automatically will append appropriate headers and content types with version as presented in the Dependency configuration. Without this setting of those two parameters will not be operational. -
spring.cloud.zookeeper.dependencies.resttemplate.enabled(enabled by default) - when enabled will modify the request headers of@LoadBalancedannotatedRestTemplateso that it passes headers and content type with version set in Dependency configuration. Wihtout this setting of those two parameters will not be operational.
Spring Cloud Zookeeper Dependency Watcher
The Dependency Watcher mechanism allows you to register listeners to your dependencies. The functionality is in fact an implementation of the Observator pattern. When a dependency changes
its state (UP or DOWN) then some custom logic can be applied.
How to activate
Spring Cloud Zookeeper Dependencies functionality needs to be enabled to profit from Dependency Watcher mechanism.
Registering a listener
In order to register a listener you have to implement an interface org.springframework.cloud.zookeeper.discovery.watcher.DependencyWatcherListener and register it as a bean.
The interface gives you one method:
void stateChanged(String dependencyName, DependencyState newState);
If you want to register a listener for a particular dependency then the dependencyName would be the discriminator for your concrete implementation. newState will provide you with information
whether your dependency has changed to CONNECTED or DISCONNECTED.
Presence Checker
Bound with Dependency Watcher is the functionality called Presence Checker. It allows you to provide custom behaviour upon booting of your application to react accordingly to the state of your dependencies.
The default implementation of the abstract org.springframework.cloud.zookeeper.discovery.watcher.presence.DependencyPresenceOnStartupVerifier class is the
org.springframework.cloud.zookeeper.discovery.watcher.presence.DefaultDependencyPresenceOnStartupVerifier which works in the following way.
-
If the dependency is marked us
requiredand it’s not in Zookeeper then upon booting your application will throw an exception and shutdown -
If dependency is not
requiredtheorg.springframework.cloud.zookeeper.discovery.watcher.presence.LogMissingDependencyCheckerwill log that application is missing atWARNlevel
The functionality can be overriden since the DefaultDependencyPresenceOnStartupVerifier is registered only when there is no bean of DependencyPresenceOnStartupVerifier.
Distributed Configuration with Zookeeper
Zookeeper provides a hierarchical namespace that allows clients to store arbitrary data, such as configuration data. Spring Cloud Zookeeper Config is an alternative to the Config Server and Client. Configuration is loaded into the Spring Environment during the special "bootstrap" phase. Configuration is stored in the /config namespace by default. Multiple PropertySource instances are created based on the application’s name and the active profiles that mimicks the Spring Cloud Config order of resolving properties. For example, an application with the name "testApp" and with the "dev" profile will have the following property sources created:
config/testApp,dev
config/testApp
config/application,dev
config/application
The most specific property source is at the top, with the least specific at the bottom. Properties is the config/application namespace are applicable to all applications using zookeeper for configuration. Properties in the config/testApp namespace are only available to the instances of the service named "testApp".
Configuration is currently read on startup of the application. Sending a HTTP POST to /refresh will cause the configuration to be reloaded. Watching the configuration namespace (which Zookeeper supports) is not currently implemented, but will be a future addition to this project.
How to activate
Including a dependency on org.springframework.cloud:spring-cloud-starter-zookeeper-config will enable auto-configuration that will setup Spring Cloud Zookeeper Config.
Customizing
Zookeeper Config may be customized using the following properties:
spring:
  cloud:
    zookeeper:
      config:
        enabled: true
        root: configuration
        defaultContext: apps
        profileSeparator: '::'
-
enabledsetting this value to "false" disables Zookeeper Config -
rootsets the base namespace for configuration values -
defaultContextsets the name used by all applications -
profileSeparatorsets the value of the separator used to separate the profile name in property sources with profiles
Spring Boot Cloud CLI
@EnableEurekaServer). You can also easily do things like encryption and decryption to support Spring Cloud
Config clients with secret configuration values.
Installation
To install, make sure you have Spring Boot CLI (1.3.0 or better):
$ spring version
Spring CLI v1.3.2.RELEASE
E.g. for SDKMan users
$ sdk install springboot 1.3.2.RELEASE
$ sdk use springboot 1.3.2.RELEASE
and install the Spring Cloud plugin:
$ mvn install
$ spring install org.springframework.cloud:spring-cloud-cli:1.1.0.RC1|
Important
|
Prerequisites: to use the encryption and decryption features you need the full-strength JCE installed in your JVM (it’s not there by default). You can download the "Java Cryptography Extension (JCE) Unlimited Strength Jurisdiction Policy Files" from Oracle, and follow instructions for installation (essentially replace the 2 policy files in the JRE lib/security directory with the ones that you downloaded). |
Writing Groovy Scripts and Running Applications
Spring Cloud CLI has support for most of the Spring Cloud declarative
features, such as the @Enable* class of annotations. For example,
here is a fully functional Eureka server
@EnableEurekaServer
class Eureka {}
which you can run from the command line like this
$ spring run app.groovy
To include additional dependencies, often it suffices just to add the
appropriate feature-enabling annotation, e.g. @EnableConfigServer,
@EnableOAuth2Sso or @EnableEurekaClient. To manually include a
dependency you can use a @Grab with the special "Spring Boot" short
style artifact co-ordinates, i.e. with just the artifact ID (no need
for group or version information), e.g. to set up a client app to
listen on AMQP for management events from the Spring CLoud Bus:
@Grab('spring-cloud-starter-bus-amqp')
@RestController
class Service {
  @RequestMapping('/')
  def home() { [message: 'Hello'] }
}
Encryption and Decryption
The Spring Cloud CLI comes with an "encrypt" and a "decrypt" command. Both accept arguments in the same form with a key specified as a mandatory "--key", e.g.
$ spring encrypt mysecret --key foo
682bc583f4641835fa2db009355293665d2647dade3375c0ee201de2a49f7bda
$ spring decrypt --key foo 682bc583f4641835fa2db009355293665d2647dade3375c0ee201de2a49f7bda
mysecret
To use a key in a file (e.g. an RSA public key for encyption) prepend the key value with "@" and provide the file path, e.g.
$ spring encrypt mysecret --key @${HOME}/.ssh/id_rsa.pub
AQAjPgt3eFZQXwt8tsHAVv/QHiY5sI2dRcR+...
Spring Cloud Security
Quickstart
OAuth2 Single Sign On
Here’s a Spring Cloud "Hello World" app with HTTP Basic authentication and a single user account:
@Grab('spring-boot-starter-security')
@Controller
class Application {
@RequestMapping('/')
String home() {
'Hello World'
}
}You can run it with spring run app.groovy and watch the logs for the password (username is "user"). So far this is just the default for a Spring Boot app.
Here’s a Spring Cloud app with OAuth2 SSO:
@Controller
@EnableOAuth2Sso
class Application {
@RequestMapping('/')
String home() {
'Hello World'
}
}Spot the difference? This app will actually behave exactly the same as the previous one, because it doesn’t know it’s OAuth2 credentals yet.
You can register an app in github quite easily, so try that if you want a production app on your own domain. If you are happy to test on localhost:8080, then set up these properties in your application configuration:
spring:
oauth2:
client:
clientId: bd1c0a783ccdd1c9b9e4
clientSecret: 1a9030fbca47a5b2c28e92f19050bb77824b5ad1
accessTokenUri: https://github.com/login/oauth/access_token
userAuthorizationUri: https://github.com/login/oauth/authorize
clientAuthenticationScheme: form
resource:
userInfoUri: https://api.github.com/user
preferTokenInfo: falserun the app above and it will redirect to github for authorization. If you are already signed into github you won’t even notice that it has authenticated. These credentials will only work if your app is running on port 8080.
To limit the scope that the client asks for when it obtains an access token
you can set spring.oauth2.client.scope (comma separated or an array in YAML). By
default the scope is empty and it is up to to Authorization Server to
decide what the defaults should be, usually depending on the settings in
the client registration that it holds.
|
Note
|
The examples above are all Groovy scripts. If you want to write the same code in Java (or Groovy) you need to add Spring Security OAuth2 to the classpath (e.g. see the sample here). |
OAuth2 Protected Resource
You want to protect an API resource with an OAuth2 token? Here’s a simple example (paired with the client above):
@Grab('spring-cloud-starter-security')
@RestController
@EnableResourceServer
class Application {
@RequestMapping('/')
def home() {
[message: 'Hello World']
}
}and
spring:
oauth2:
resource:
userInfoUri: https://api.github.com/user
preferTokenInfo: falseMore Detail
Single Sign On
|
Note
|
All of the OAuth2 SSO and resource server features moved to Spring Boot in version 1.3. You can find documentation in the Spring Boot user guide. |
Token Relay
A Token Relay is where an OAuth2 consumer acts as a Client and forwards the incoming token to outgoing resource requests. The consumer can be a pure Client (like an SSO application) or a Resource Server.
Client Token Relay
If your app has a
Spring
Cloud Zuul embedded reverse proxy (using @EnableZuulProxy) then you
can ask it to forward OAuth2 access tokens downstream to the services
it is proxying. Thus the SSO app above can be enhanced simply like this:
@Controller
@EnableOAuth2Sso
@EnableZuulProxy
class Application {
}and it will (in addition to loggin the user in and grabbing a token)
pass the authentication token downstream to the /proxy/*
services. If those services are implemented with
@EnableOAuth2Resource then they will get a valid token in the
correct header.
How does it work? The @EnableOAuth2Sso annotation pulls in
spring-cloud-starter-security (which you could do manually in a
traditional app), and that in turn triggers some autoconfiguration for
a ZuulFilter, which itself is activated because Zuul is on the
classpath (via @EnableZuulProxy). The
filter
just extracts an access token from the currently authenticated user,
and puts it in a request header for the downstream requests.
Resource Server Token Relay
If your app has @EnableOAuth2Resource and also is a Client (i.e. it
has a spring.oauth2.client.clientId, even if it doesn’t use it),
then the OAuth2RestOperations that is provided for @Autowired
users by Spring Cloud (it is declared as @Primary) will also forward
tokens. If you don’t want to forward tokens (and that is a valid
choice, since you might want to act as yourself, rather than the
client that sent you the token), then you only need to create your own
OAuth2RestOperations instead of autowiring the default one. Here’s
a basic example showing the use of the autowired rest template ("foo.com"
is a Resource Server accepting the same tokens as the surrounding app):
@Autowired
private OAuth2RestOperations restTemplate;
@RequestMapping("/relay")
public String relay() {
ResponseEntity<String> response =
restTemplate.getForEntity("https://foo.com/bar", String.class);
return "Success! (" + response.getBody() + ")";
}Configuring Authentication Downstream of a Zuul Proxy
You can control the authorization behaviour downstream of an
@EnableZuulProxy through the proxy.auth.* settings. Example:
proxy:
auth:
routes:
customers: oauth2
stores: passthru
recommendations: noneIn this example the "customers" service gets an OAuth2 token relay, the "stores" service gets a passthrough (the authorization header is just passed downstream), and the "recommendations" service has its authorization header removed. The default behaviour is to do a token relay if there is a token available, and passthru otherwise.
See ProxyAuthenticationProperties for full details.
Spring Cloud for Cloud Foundry
Spring Cloud for Cloudfoundry makes it easy to run Spring Cloud apps in Cloud Foundry (the Platform as a Service). Cloud Foundry has the notion of a "service", which is middlware that you "bind" to an app, essentially providing it with an environment variable containing credentials (e.g. the location and username to use for the service).
The spring-cloud-cloudfoundry-web project provides basic support for
some enhanced features of webapps in Cloud Foundry: binding
automatically to single-sign-on services and optionally enabling
sticky routing for discovery.
The spring-cloud-cloudfoundry-discovery project provides an
implementation of Spring Cloud Commons DiscoveryClient so you can
@EnableDiscoveryClient and provide your credentials as
spring.cloud.cloudfoundry.discovery.[email,password] and then you
can use the DiscoveryClient directly or via a LoadBalancerClient
(also *.url if you are not connecting to [Pivotal Web
Services](https://run.pivotal.io)).
The first time you use it the discovery client might be slow owing to the fact that it has to get an access token from Cloud Foundry.
Quickstart
Here’s a Spring Cloud app with Cloud Foundry discovery:
@Grab('org.springframework.cloud:spring-cloud-cloudfoundry')
@RestController
@EnableDiscoveryClient
class Application {
@Autowired
DiscoveryClient client
@RequestMapping('/')
String home() {
'Hello from ' + client.getLocalServiceInstance()
}
}If you run it without any service bindings:
$ spring jar app.jar app.groovy $ cf push -p app.jar
It will show its app name in the home page.
Single Sign On
|
Note
|
All of the OAuth2 SSO and resource server features moved to Spring Boot in version 1.3. You can find documentation in the Spring Boot user guide. |
This project provides automatic binding from CloudFoundry service
credentials to the Spring Boot features. If you have a CloudFoundry
service called "sso", for instance, with credentials containing
"client_id", "client_secret" and "auth_domain", it will bind
automatically to the Spring OAuth2 client that you enable with
@EnableOAuth2Sso (from Spring Boot). The name of the service can be
parameterized using spring.oauth2.sso.serviceId.
Spring Cloud Cluster
Leader Election
Leader election allows application to work together with other
applications to coordinate a cluster leadership via a third party system.
Currently we provide integrations with zookeeper, hazelcast and etcd.
From user perspective election is working via interfaces
org.springframework.cloud.cluster.leader.Candidate and
org.springframework.cloud.cluster.leader.Context. Candidate
contains access to leadership’s role and id and also have methods
onGranted and onRevoked. These callback methods are useful if
default Candidate implementation is changed.
Leader election is auto-configured if spring-cloud-cluster-autoconfigure
and either spring-cloud-cluster-hazelcast, spring-cloud-cluster-zookeeper
or spring-cloud-cluster-etcd jars are found from a classpath. In
case where both jars are found leader election is created using both
systems. See sections Zookeeper,
Hazelcast and
Etcd for more
information about a created beans.
Default Candidate created from auto-configuration is
org.springframework.cloud.cluster.leader.DefaultCandidate which
currently only logs granted and revoked events.
If there’s a need for disable all leader related auto-configuration,
a spring.cloud.cluster.leader.enabled can be set to false which
then allows to do manual configuration even if the jars an on a
classpath. Properties spring.cloud.cluster.leader.id and
spring.cloud.cluster.leader.role can be used to set default
identifier and role.
If you are interested to simple get notification of granted and
revoked events one option is to attach event listener into spring
application context. Events OnGrantedEvent and OnRevokedEvent are
sent as spring event objects.
Simply create your own event listener class:
class MyEventListener implements ApplicationListener<AbstractLeaderEvent> {
@Override
public void onApplicationEvent(AbstractLeaderEvent event) {
// do something with OnGrantedEvent or OnRevokedEvent
}
}and then create it as a bean.
@Configuration
static class Config {
@Bean
public MyEventListener myEventListener() {
return new MyEventListener();
}
}For simply log events you can also use a utility class
LoggingListener which allows easy configuration.
import org.springframework.cloud.cluster.leader.event.LoggingListener;
@Configuration
static class Config {
@Bean
public LoggingListener loggingListener() {
return new LoggingListener("info");
}
}Zookeeper
Candidate implementation for zookeeper is created with a bean name
zookeeperLeaderCandidate which can be used to override the one
created during auto-configuration.
Zookeeper based election can be explicitly disabled using property
spring.cloud.cluster.zookeeper.leader.enabled.
Other properties spring.cloud.cluster.zookeeper.namespace and
spring.cloud.cluster.zookeeper.connect can be used to set the
zookeeper base namespace path and connect string.
Hazelcast
Candidate implementation for hazelcast is created with a bean name
hazelcastLeaderCandidate which can be used to override the one
created during auto-configuration.
Hazelcast based election can be explicitly disabled using property
spring.cloud.cluster.hazelcast.leader.enabled. If you want to provide xml
based configuration for Hazelcast instance use property
spring.cloud.cluster.hazelcast.config-location to tell location of a
Hazelcast xml configuration file. config-location is a normal spring
Resource.
Etcd
Candidate implementation for etcd is created with a bean name
etcdLeaderCandidate which can be used to override the one
created during auto-configuration.
Etcd based election can be explicitly disabled using property
spring.cloud.cluster.etcd.leader.enabled.
Multiple etcd cluster uris can be specified using property
spring.cloud.cluster.etcd.connect
Appendix: Compendium of Configuration Properties
| Name | Default | Description |
|---|---|---|
encrypt.fail-on-error |
true |
Flag to say that a process should fail if there is an encryption or decryption error. |
encrypt.key |
A symmetric key. As a stronger alternative consider using a keystore. |
|
encrypt.key-store.alias |
Alias for a key in the store. |
|
encrypt.key-store.location |
Location of the key store file, e.g. classpath:/keystore.jks. |
|
encrypt.key-store.password |
Password that locks the keystore. |
|
encrypt.key-store.secret |
Secret protecting the key (defaults to the same as the password). |
|
encrypt.rsa.algorithm |
The RSA algorithm to use (DEFAULT or OEAP). Once it is set do not change it (or existing ciphers will not a decryptable). |
|
encrypt.rsa.salt |
deadbeef |
Salt for the random secret used to encrypt cipher text. Once it is set do not change it (or existing ciphers will not a decryptable). |
encrypt.rsa.strong |
false |
Flag to indicate that "strong" AES encryption should be used internally. If true then the GCM algorithm is applied to the AES encrypted bytes. Default is false (in which case "standard" CBC is used instead). Once it is set do not change it (or existing ciphers will not a decryptable). |
endpoints.bus.enabled |
||
endpoints.bus.id |
||
endpoints.bus.sensitive |
||
endpoints.consul.enabled |
||
endpoints.consul.id |
||
endpoints.consul.sensitive |
||
endpoints.features.enabled |
||
endpoints.features.id |
||
endpoints.features.sensitive |
||
endpoints.pause.enabled |
||
endpoints.pause.id |
||
endpoints.pause.sensitive |
||
endpoints.refresh.enabled |
||
endpoints.refresh.id |
||
endpoints.refresh.sensitive |
||
endpoints.restart.enabled |
||
endpoints.restart.id |
||
endpoints.restart.pause-endpoint.enabled |
||
endpoints.restart.pause-endpoint.id |
||
endpoints.restart.pause-endpoint.sensitive |
||
endpoints.restart.resume-endpoint.enabled |
||
endpoints.restart.resume-endpoint.id |
||
endpoints.restart.resume-endpoint.sensitive |
||
endpoints.restart.sensitive |
||
endpoints.restart.timeout |
0 |
|
endpoints.resume.enabled |
||
endpoints.resume.id |
||
endpoints.resume.sensitive |
||
eureka.client.allow-redirects |
false |
Indicates whether server can redirect a client request to a backup server/cluster. If set to false, the server will handle the request directly, If set to true, it may send HTTP redirect to the client, with a new server location. |
eureka.client.availability-zones |
Gets the list of availability zones (used in AWS data centers) for the region in which this instance resides. The changes are effective at runtime at the next registry fetch cycle as specified by registryFetchIntervalSeconds. |
|
eureka.client.backup-registry-impl |
Gets the name of the implementation which implements BackupRegistry to fetch the registry information as a fall back option for only the first time when the eureka client starts. This may be needed for applications which needs additional resiliency for registry information without which it cannot operate. |
|
eureka.client.cache-refresh-executor-exponential-back-off-bound |
10 |
Cache refresh executor exponential back off related property. It is a maximum multiplier value for retry delay, in case where a sequence of timeouts occurred. |
eureka.client.cache-refresh-executor-thread-pool-size |
2 |
The thread pool size for the cacheRefreshExecutor to initialise with |
eureka.client.client-data-accept |
EurekaAccept name for client data accept |
|
eureka.client.decoder-name |
This is a transient config and once the latest codecs are stable, can be removed (as there will only be one) |
|
eureka.client.disable-delta |
false |
Indicates whether the eureka client should disable fetching of delta and should rather resort to getting the full registry information. Note that the delta fetches can reduce the traffic tremendously, because the rate of change with the eureka server is normally much lower than the rate of fetches. The changes are effective at runtime at the next registry fetch cycle as specified by registryFetchIntervalSeconds |
eureka.client.dollar-replacement |
_- |
Get a replacement string for Dollar sign <code>$</code> during serializing/deserializing information in eureka server. |
eureka.client.enabled |
true |
Flag to indicate that the Eureka client is enabled. |
eureka.client.encoder-name |
This is a transient config and once the latest codecs are stable, can be removed (as there will only be one) |
|
eureka.client.escape-char-replacement |
__ |
Get a replacement string for underscore sign <code>_</code> during serializing/deserializing information in eureka server. |
eureka.client.eureka-connection-idle-timeout-seconds |
30 |
Indicates how much time (in seconds) that the HTTP connections to eureka server can stay idle before it can be closed. In the AWS environment, it is recommended that the values is 30 seconds or less, since the firewall cleans up the connection information after a few mins leaving the connection hanging in limbo |
eureka.client.eureka-server-connect-timeout-seconds |
5 |
Indicates how long to wait (in seconds) before a connection to eureka server needs to timeout. Note that the connections in the client are pooled by org.apache.http.client.HttpClient and this setting affects the actual connection creation and also the wait time to get the connection from the pool. |
eureka.client.eureka-server-dnsname |
Gets the DNS name to be queried to get the list of eureka servers.This information is not required if the contract returns the service urls by implementing serviceUrls. The DNS mechanism is used when useDnsForFetchingServiceUrls is set to true and the eureka client expects the DNS to configured a certain way so that it can fetch changing eureka servers dynamically. The changes are effective at runtime. |
|
eureka.client.eureka-server-port |
Gets the port to be used to construct the service url to contact eureka server when the list of eureka servers come from the DNS.This information is not required if the contract returns the service urls eurekaServerServiceUrls(String). The DNS mechanism is used when useDnsForFetchingServiceUrls is set to true and the eureka client expects the DNS to configured a certain way so that it can fetch changing eureka servers dynamically. The changes are effective at runtime. |
|
eureka.client.eureka-server-read-timeout-seconds |
8 |
Indicates how long to wait (in seconds) before a read from eureka server needs to timeout. |
eureka.client.eureka-server-total-connections |
200 |
Gets the total number of connections that is allowed from eureka client to all eureka servers. |
eureka.client.eureka-server-total-connections-per-host |
50 |
Gets the total number of connections that is allowed from eureka client to a eureka server host. |
eureka.client.eureka-server-urlcontext |
Gets the URL context to be used to construct the service url to contact eureka server when the list of eureka servers come from the DNS. This information is not required if the contract returns the service urls from eurekaServerServiceUrls. The DNS mechanism is used when useDnsForFetchingServiceUrls is set to true and the eureka client expects the DNS to configured a certain way so that it can fetch changing eureka servers dynamically. The changes are effective at runtime. |
|
eureka.client.eureka-service-url-poll-interval-seconds |
0 |
Indicates how often(in seconds) to poll for changes to eureka server information. Eureka servers could be added or removed and this setting controls how soon the eureka clients should know about it. |
eureka.client.fetch-registry |
true |
Indicates whether this client should fetch eureka registry information from eureka server. |
eureka.client.fetch-remote-regions-registry |
Comma separated list of regions for which the eureka registry information will be fetched. It is mandatory to define the availability zones for each of these regions as returned by availabilityZones. Failing to do so, will result in failure of discovery client startup. |
|
eureka.client.filter-only-up-instances |
true |
Indicates whether to get the applications after filtering the applications for instances with only InstanceStatus UP states. |
eureka.client.g-zip-content |
true |
Indicates whether the content fetched from eureka server has to be compressed whenever it is supported by the server. The registry information from the eureka server is compressed for optimum network traffic. |
eureka.client.heartbeat-executor-exponential-back-off-bound |
10 |
Heartbeat executor exponential back off related property. It is a maximum multiplier value for retry delay, in case where a sequence of timeouts occurred. |
eureka.client.heartbeat-executor-thread-pool-size |
2 |
The thread pool size for the heartbeatExecutor to initialise with |
eureka.client.initial-instance-info-replication-interval-seconds |
40 |
Indicates how long initially (in seconds) to replicate instance info to the eureka server |
eureka.client.instance-info-replication-interval-seconds |
30 |
Indicates how often(in seconds) to replicate instance changes to be replicated to the eureka server. |
eureka.client.log-delta-diff |
false |
Indicates whether to log differences between the eureka server and the eureka client in terms of registry information. Eureka client tries to retrieve only delta changes from eureka server to minimize network traffic. After receiving the deltas, eureka client reconciles the information from the server to verify it has not missed out some information. Reconciliation failures could happen when the client has had network issues communicating to server.If the reconciliation fails, eureka client gets the full registry information. While getting the full registry information, the eureka client can log the differences between the client and the server and this setting controls that. The changes are effective at runtime at the next registry fetch cycle as specified by registryFetchIntervalSecondsr |
eureka.client.on-demand-update-status-change |
true |
If set to true, local status updates via ApplicationInfoManager will trigger on-demand (but rate limited) register/updates to remote eureka servers |
eureka.client.prefer-same-zone-eureka |
true |
Indicates whether or not this instance should try to use the eureka server in the same zone for latency and/or other reason. Ideally eureka clients are configured to talk to servers in the same zone The changes are effective at runtime at the next registry fetch cycle as specified by registryFetchIntervalSeconds |
eureka.client.property-resolver |
||
eureka.client.proxy-host |
Gets the proxy host to eureka server if any. |
|
eureka.client.proxy-password |
Gets the proxy password if any. |
|
eureka.client.proxy-port |
Gets the proxy port to eureka server if any. |
|
eureka.client.proxy-user-name |
Gets the proxy user name if any. |
|
eureka.client.region |
us-east-1 |
Gets the region (used in AWS datacenters) where this instance resides. |
eureka.client.register-with-eureka |
true |
Indicates whether or not this instance should register its information with eureka server for discovery by others. In some cases, you do not want your instances to be discovered whereas you just want do discover other instances. |
eureka.client.registry-fetch-interval-seconds |
30 |
Indicates how often(in seconds) to fetch the registry information from the eureka server. |
eureka.client.registry-refresh-single-vip-address |
Indicates whether the client is only interested in the registry information for a single VIP. |
|
eureka.client.service-url |
Map of availability zone to list of fully qualified URLs to communicate with eureka server. Each value can be a single URL or a comma separated list of alternative locations. Typically the eureka server URLs carry protocol,host,port,context and version information if any. Example: http://ec2-256-156-243-129.compute-1.amazonaws.com:7001/eureka/ The changes are effective at runtime at the next service url refresh cycle as specified by eurekaServiceUrlPollIntervalSeconds. |
|
eureka.client.transport |
||
eureka.client.use-dns-for-fetching-service-urls |
false |
Indicates whether the eureka client should use the DNS mechanism to fetch a list of eureka servers to talk to. When the DNS name is updated to have additional servers, that information is used immediately after the eureka client polls for that information as specified in eurekaServiceUrlPollIntervalSeconds. Alternatively, the service urls can be returned serviceUrls, but the users should implement their own mechanism to return the updated list in case of changes. The changes are effective at runtime. |
eureka.dashboard.enabled |
true |
Flag to enable the Eureka dashboard. Default true. |
eureka.dashboard.path |
/ |
The path to the Eureka dashboard (relative to the servlet path). Defaults to "/". |
eureka.instance.a-sgname |
Gets the AWS autoscaling group name associated with this instance. This information is specifically used in an AWS environment to automatically put an instance out of service after the instance is launched and it has been disabled for traffic.. |
|
eureka.instance.app-group-name |
Get the name of the application group to be registered with eureka. |
|
eureka.instance.appname |
unknown |
Get the name of the application to be registered with eureka. |
eureka.instance.data-center-info |
Returns the data center this instance is deployed. This information is used to get some AWS specific instance information if the instance is deployed in AWS. |
|
eureka.instance.default-address-resolution-order |
[] |
|
eureka.instance.health-check-url |
Gets the absolute health check page URL for this instance. The users can provide the healthCheckUrlPath if the health check page resides in the same instance talking to eureka, else in the cases where the instance is a proxy for some other server, users can provide the full URL. If the full URL is provided it takes precedence. <p> It is normally used for making educated decisions based on the health of the instance - for example, it can be used to determine whether to proceed deployments to an entire farm or stop the deployments without causing further damage. The full URL should follow the format http://${eureka.hostname}:7001/ where the value ${eureka.hostname} is replaced at runtime. |
|
eureka.instance.health-check-url-path |
/health |
Gets the relative health check URL path for this instance. The health check page URL is then constructed out of the hostname and the type of communication - secure or unsecure as specified in securePort and nonSecurePort. It is normally used for making educated decisions based on the health of the instance - for example, it can be used to determine whether to proceed deployments to an entire farm or stop the deployments without causing further damage. |
eureka.instance.home-page-url |
Gets the absolute home page URL for this instance. The users can provide the homePageUrlPath if the home page resides in the same instance talking to eureka, else in the cases where the instance is a proxy for some other server, users can provide the full URL. If the full URL is provided it takes precedence. It is normally used for informational purposes for other services to use it as a landing page. The full URL should follow the format http://${eureka.hostname}:7001/ where the value ${eureka.hostname} is replaced at runtime. |
|
eureka.instance.home-page-url-path |
/ |
Gets the relative home page URL Path for this instance. The home page URL is then constructed out of the hostName and the type of communication - secure or unsecure. It is normally used for informational purposes for other services to use it as a landing page. |
eureka.instance.host-info |
||
eureka.instance.hostname |
The hostname if it can be determined at configuration time (otherwise it will be guessed from OS primitives). |
|
eureka.instance.inet-utils |
||
eureka.instance.initial-status |
Initial status to register with rmeote Eureka server. |
|
eureka.instance.instance-enabled-onit |
false |
Indicates whether the instance should be enabled for taking traffic as soon as it is registered with eureka. Sometimes the application might need to do some pre-processing before it is ready to take traffic. |
eureka.instance.instance-id |
Get the unique Id (within the scope of the appName) of this instance to be registered with eureka. |
|
eureka.instance.ip-address |
Get the IPAdress of the instance. This information is for academic purposes only as the communication from other instances primarily happen using the information supplied in {@link #getHostName(boolean)}. |
|
eureka.instance.lease-expiration-duration-in-seconds |
90 |
Indicates the time in seconds that the eureka server waits since it received the last heartbeat before it can remove this instance from its view and there by disallowing traffic to this instance. Setting this value too long could mean that the traffic could be routed to the instance even though the instance is not alive. Setting this value too small could mean, the instance may be taken out of traffic because of temporary network glitches.This value to be set to atleast higher than the value specified in leaseRenewalIntervalInSeconds. |
eureka.instance.lease-renewal-interval-in-seconds |
30 |
Indicates how often (in seconds) the eureka client needs to send heartbeats to eureka server to indicate that it is still alive. If the heartbeats are not received for the period specified in leaseExpirationDurationInSeconds, eureka server will remove the instance from its view, there by disallowing traffic to this instance. Note that the instance could still not take traffic if it implements HealthCheckCallback and then decides to make itself unavailable. |
eureka.instance.metadata-map |
Gets the metadata name/value pairs associated with this instance. This information is sent to eureka server and can be used by other instances. |
|
eureka.instance.namespace |
eureka |
Get the namespace used to find properties. Ignored in Spring Cloud. |
eureka.instance.non-secure-port |
80 |
Get the non-secure port on which the instance should receive traffic. |
eureka.instance.non-secure-port-enabled |
true |
Indicates whether the non-secure port should be enabled for traffic or not. |
eureka.instance.prefer-ip-address |
false |
Flag to say that, when guessing a hostname, the IP address of the server should be used in prference to the hostname reported by the OS. |
eureka.instance.secure-health-check-url |
Gets the absolute secure health check page URL for this instance. The users can provide the secureHealthCheckUrl if the health check page resides in the same instance talking to eureka, else in the cases where the instance is a proxy for some other server, users can provide the full URL. If the full URL is provided it takes precedence. <p> It is normally used for making educated decisions based on the health of the instance - for example, it can be used to determine whether to proceed deployments to an entire farm or stop the deployments without causing further damage. The full URL should follow the format http://${eureka.hostname}:7001/ where the value ${eureka.hostname} is replaced at runtime. |
|
eureka.instance.secure-port |
443 |
Get the Secure port on which the instance should receive traffic. |
eureka.instance.secure-port-enabled |
false |
Indicates whether the secure port should be enabled for traffic or not. |
eureka.instance.secure-virtual-host-name |
Gets the secure virtual host name defined for this instance. This is typically the way other instance would find this instance by using the secure virtual host name.Think of this as similar to the fully qualified domain name, that the users of your services will need to find this instance. |
|
eureka.instance.status-page-url |
Gets the absolute status page URL path for this instance. The users can provide the statusPageUrlPath if the status page resides in the same instance talking to eureka, else in the cases where the instance is a proxy for some other server, users can provide the full URL. If the full URL is provided it takes precedence. It is normally used for informational purposes for other services to find about the status of this instance. Users can provide a simple HTML indicating what is the current status of the instance. |
|
eureka.instance.status-page-url-path |
/info |
Gets the relative status page URL path for this instance. The status page URL is then constructed out of the hostName and the type of communication - secure or unsecure as specified in securePort and nonSecurePort. It is normally used for informational purposes for other services to find about the status of this instance. Users can provide a simple HTML indicating what is the current status of the instance. |
eureka.instance.virtual-host-name |
Gets the virtual host name defined for this instance. This is typically the way other instance would find this instance by using the virtual host name.Think of this as similar to the fully qualified domain name, that the users of your services will need to find this instance. |
|
eureka.server.a-sgcache-expiry-timeout-ms |
0 |
|
eureka.server.a-sgquery-timeout-ms |
300 |
|
eureka.server.a-sgupdate-interval-ms |
0 |
|
eureka.server.a-wsaccess-id |
||
eureka.server.a-wssecret-key |
||
eureka.server.batch-replication |
false |
|
eureka.server.binding-strategy |
||
eureka.server.delta-retention-timer-interval-in-ms |
0 |
|
eureka.server.disable-delta |
false |
|
eureka.server.disable-delta-for-remote-regions |
false |
|
eureka.server.disable-transparent-fallback-to-other-region |
false |
|
eureka.server.e-ipbind-rebind-retries |
3 |
|
eureka.server.e-ipbinding-retry-interval-ms |
0 |
|
eureka.server.e-ipbinding-retry-interval-ms-when-unbound |
0 |
|
eureka.server.enable-replicated-request-compression |
false |
|
eureka.server.enable-self-preservation |
true |
|
eureka.server.eviction-interval-timer-in-ms |
0 |
|
eureka.server.g-zip-content-from-remote-region |
true |
|
eureka.server.json-codec-name |
||
eureka.server.list-auto-scaling-groups-role-name |
ListAutoScalingGroups |
|
eureka.server.log-identity-headers |
true |
|
eureka.server.max-elements-in-peer-replication-pool |
10000 |
|
eureka.server.max-elements-in-status-replication-pool |
10000 |
|
eureka.server.max-idle-thread-age-in-minutes-for-peer-replication |
15 |
|
eureka.server.max-idle-thread-in-minutes-age-for-status-replication |
10 |
|
eureka.server.max-threads-for-peer-replication |
20 |
|
eureka.server.max-threads-for-status-replication |
1 |
|
eureka.server.max-time-for-replication |
30000 |
|
eureka.server.min-threads-for-peer-replication |
5 |
|
eureka.server.min-threads-for-status-replication |
1 |
|
eureka.server.number-of-replication-retries |
5 |
|
eureka.server.peer-eureka-nodes-update-interval-ms |
0 |
|
eureka.server.peer-eureka-status-refresh-time-interval-ms |
0 |
|
eureka.server.peer-node-connect-timeout-ms |
200 |
|
eureka.server.peer-node-connection-idle-timeout-seconds |
30 |
|
eureka.server.peer-node-read-timeout-ms |
200 |
|
eureka.server.peer-node-total-connections |
1000 |
|
eureka.server.peer-node-total-connections-per-host |
500 |
|
eureka.server.prime-aws-replica-connections |
true |
|
eureka.server.property-resolver |
||
eureka.server.rate-limiter-burst-size |
10 |
|
eureka.server.rate-limiter-enabled |
false |
|
eureka.server.rate-limiter-full-fetch-average-rate |
100 |
|
eureka.server.rate-limiter-privileged-clients |
||
eureka.server.rate-limiter-registry-fetch-average-rate |
500 |
|
eureka.server.rate-limiter-throttle-standard-clients |
false |
|
eureka.server.registry-sync-retries |
0 |
|
eureka.server.registry-sync-retry-wait-ms |
0 |
|
eureka.server.remote-region-app-whitelist |
||
eureka.server.remote-region-connect-timeout-ms |
1000 |
|
eureka.server.remote-region-connection-idle-timeout-seconds |
30 |
|
eureka.server.remote-region-fetch-thread-pool-size |
20 |
|
eureka.server.remote-region-read-timeout-ms |
1000 |
|
eureka.server.remote-region-registry-fetch-interval |
30 |
|
eureka.server.remote-region-total-connections |
1000 |
|
eureka.server.remote-region-total-connections-per-host |
500 |
|
eureka.server.remote-region-trust-store |
||
eureka.server.remote-region-trust-store-password |
changeit |
|
eureka.server.remote-region-urls |
||
eureka.server.remote-region-urls-with-name |
||
eureka.server.renewal-percent-threshold |
0.85 |
|
eureka.server.renewal-threshold-update-interval-ms |
0 |
|
eureka.server.response-cache-auto-expiration-in-seconds |
180 |
|
eureka.server.response-cache-update-interval-ms |
0 |
|
eureka.server.retention-time-in-msin-delta-queue |
0 |
|
eureka.server.route53-bind-rebind-retries |
3 |
|
eureka.server.route53-binding-retry-interval-ms |
0 |
|
eureka.server.route53-domain-ttl |
30 |
|
eureka.server.sync-when-timestamp-differs |
true |
|
eureka.server.use-read-only-response-cache |
true |
|
eureka.server.wait-time-in-ms-when-sync-empty |
0 |
|
eureka.server.xml-codec-name |
||
feign.compression.request.mime-types |
[text/xml, application/xml, application/json] |
The list of supported mime types. |
feign.compression.request.min-request-size |
2048 |
The minimum threshold content size. |
health.config.enabled |
false |
Flag to indicate that the config server health indicator should be installed. |
health.hystrix.enabled |
false |
Flag to inidicate that the hystrix health indicator should be installed. |
netflix.atlas.batch-size |
10000 |
|
netflix.atlas.enabled |
true |
|
netflix.atlas.uri |
||
proxy.auth.load-balanced |
false |
|
proxy.auth.routes |
Authentication strategy per route. |
|
spring.cloud.bus.ack.destination-service |
Service that wants to listen to acks. By default null (meaning all services). |
|
spring.cloud.bus.ack.enabled |
true |
Flag to switch off acks (default on). |
spring.cloud.bus.destination |
springCloudBus |
Name of Spring Cloud Stream destination for messages. |
spring.cloud.bus.enabled |
true |
Flag to indicate that the bus is enabled. |
spring.cloud.bus.env.enabled |
true |
Flag to switch off environment change events (default on). |
spring.cloud.bus.refresh.enabled |
true |
Flag to switch off refresh events (default on). |
spring.cloud.bus.trace.enabled |
false |
Flag to switch on tracing of acks (default off). |
spring.cloud.cloudfoundry.discovery.email |
Email address of user to authenticate. |
|
spring.cloud.cloudfoundry.discovery.enabled |
true |
Flag to indicate that discovery is enabled. |
spring.cloud.cloudfoundry.discovery.password |
Password for user to authenticate and obtain token. |
|
spring.cloud.cloudfoundry.discovery.url |
URL of Cloud Foundry API (Cloud Controller). |
|
spring.cloud.config.allow-override |
true |
Flag to indicate that {@link #isSystemPropertiesOverride() systemPropertiesOverride} can be used. Set to false to prevent users from changing the default accidentally. Default true. |
spring.cloud.config.discovery.enabled |
false |
Flag to indicate that config server discovery is enabled (config server URL will be looked up via discovery). |
spring.cloud.config.discovery.service-id |
CONFIGSERVER |
Service id to locate config server. |
spring.cloud.config.enabled |
true |
Flag to say that remote configuration is enabled. Default true; |
spring.cloud.config.fail-fast |
false |
Flag to indicate that failure to connect to the server is fatal (default false). |
spring.cloud.config.label |
The label name to use to pull remote configuration properties. The default is set on the server (generally "master" for a git based server). |
|
spring.cloud.config.name |
Name of application used to fetch remote properties. |
|
spring.cloud.config.override-none |
false |
Flag to indicate that when {@link #setAllowOverride(boolean) allowOverride} is true, external properties should take lowest priority, and not override any existing property sources (including local config files). Default false. |
spring.cloud.config.override-system-properties |
true |
Flag to indicate that the external properties should override system properties. Default true. |
spring.cloud.config.password |
The password to use (HTTP Basic) when contacting the remote server. |
|
spring.cloud.config.profile |
default |
The default profile to use when fetching remote configuration (comma-separated). Default is "default". |
spring.cloud.config.retry.initial-interval |
1000 |
Initial retry interval in milliseconds. |
spring.cloud.config.retry.max-attempts |
6 |
Maximum number of attempts. |
spring.cloud.config.retry.max-interval |
2000 |
Maximum interval for backoff. |
spring.cloud.config.retry.multiplier |
1.1 |
Multiplier for next interval. |
spring.cloud.config.uri |
The URI of the remote server (default http://localhost:8888). |
|
spring.cloud.config.username |
The username to use (HTTP Basic) when contacting the remote server. |
|
spring.cloud.consul.config.acl-token |
||
spring.cloud.consul.config.data-key |
data |
If format is Format.PROPERTIES or Format.YAML then the following field is used as key to look up consul for configuration. |
spring.cloud.consul.config.default-context |
application |
|
spring.cloud.consul.config.enabled |
true |
|
spring.cloud.consul.config.fail-fast |
true |
Throw exceptions during config lookup if true, otherwise, log warnings. |
spring.cloud.consul.config.format |
||
spring.cloud.consul.config.prefix |
config |
|
spring.cloud.consul.config.profile-separator |
, |
|
spring.cloud.consul.config.watch.delay |
10 |
|
spring.cloud.consul.config.watch.enabled |
true |
|
spring.cloud.consul.config.watch.wait-time |
2 |
|
spring.cloud.consul.discovery.acl-token |
||
spring.cloud.consul.discovery.catalog-services-watch-delay |
10 |
|
spring.cloud.consul.discovery.catalog-services-watch-timeout |
2 |
|
spring.cloud.consul.discovery.enabled |
true |
Is service discovery enabled? |
spring.cloud.consul.discovery.health-check-interval |
10s |
How often to perform the health check (e.g. 10s) |
spring.cloud.consul.discovery.health-check-path |
/health |
Alternate server path to invoke for health checking |
spring.cloud.consul.discovery.health-check-timeout |
Timeout for health check (e.g. 10s) |
|
spring.cloud.consul.discovery.health-check-url |
Custom health check url to override default |
|
spring.cloud.consul.discovery.heartbeat.enabled |
false |
|
spring.cloud.consul.discovery.heartbeat.heartbeat-interval |
||
spring.cloud.consul.discovery.heartbeat.interval-ratio |
||
spring.cloud.consul.discovery.heartbeat.ttl-unit |
s |
|
spring.cloud.consul.discovery.heartbeat.ttl-value |
30 |
|
spring.cloud.consul.discovery.host-info |
||
spring.cloud.consul.discovery.hostname |
Hostname to use when accessing server |
|
spring.cloud.consul.discovery.instance-id |
Unique service instance id |
|
spring.cloud.consul.discovery.ip-address |
IP address to use when accessing service (must also set preferIpAddress to use) |
|
spring.cloud.consul.discovery.lifecycle.enabled |
true |
|
spring.cloud.consul.discovery.management-suffix |
management |
Suffix to use when registering management service |
spring.cloud.consul.discovery.management-tags |
Tags to use when registering management service |
|
spring.cloud.consul.discovery.port |
Port to register the service under (defaults to listening port) |
|
spring.cloud.consul.discovery.prefer-agent-address |
false |
Source of how we will determine the address to use |
spring.cloud.consul.discovery.prefer-ip-address |
false |
Use ip address rather than hostname during registration |
spring.cloud.consul.discovery.query-passing |
false |
Add the 'passing` parameter to /v1/health/service/serviceName. This pushes health check passing to the server. |
spring.cloud.consul.discovery.register |
true |
Register as a service in consul. |
spring.cloud.consul.discovery.register-health-check |
true |
Register health check in consul. Useful during development of a service. |
spring.cloud.consul.discovery.scheme |
http |
Whether to register an http or https service |
spring.cloud.consul.discovery.server-list-query-tags |
Map of serviceId’s → tag to query for in server list. This allows filtering services by a single tag. |
|
spring.cloud.consul.discovery.service-name |
Service name |
|
spring.cloud.consul.discovery.tags |
Tags to use when registering service |
|
spring.cloud.consul.enabled |
true |
Is spring cloud consul enabled |
spring.cloud.consul.host |
localhost |
Consul agent hostname. Defaults to 'localhost'. |
spring.cloud.consul.port |
8500 |
Consul agent port. Defaults to '8500'. |
spring.cloud.consul.retry.initial-interval |
1000 |
Initial retry interval in milliseconds. |
spring.cloud.consul.retry.max-attempts |
6 |
Maximum number of attempts. |
spring.cloud.consul.retry.max-interval |
2000 |
Maximum interval for backoff. |
spring.cloud.consul.retry.multiplier |
1.1 |
Multiplier for next interval. |
spring.cloud.hypermedia.refresh.fixed-delay |
5000 |
|
spring.cloud.hypermedia.refresh.initial-delay |
10000 |
|
spring.cloud.inetutils.default-hostname |
localhost |
The default hostname. Used in case of errors. |
spring.cloud.inetutils.default-ip-address |
127.0.0.1 |
The default ipaddress. Used in case of errors. |
spring.cloud.inetutils.ignored-interfaces |
List of Java regex expressions for network interfaces that will be ignored. |
|
spring.cloud.inetutils.timeout-seconds |
1 |
Timeout in seconds for calculating hostname. |
spring.cloud.stream.binders |
||
spring.cloud.stream.bindings |
||
spring.cloud.stream.consumer-defaults |
||
spring.cloud.stream.default-binder |
||
spring.cloud.stream.dynamic-destinations |
[] |
|
spring.cloud.stream.ignore-unknown-properties |
true |
|
spring.cloud.stream.instance-count |
1 |
|
spring.cloud.stream.instance-index |
0 |
|
spring.cloud.stream.producer-defaults |
||
spring.cloud.stream.rabbit.binder.addresses |
[] |
|
spring.cloud.stream.rabbit.binder.admin-adresses |
[] |
|
spring.cloud.stream.rabbit.binder.compression-level |
0 |
|
spring.cloud.stream.rabbit.binder.nodes |
[] |
|
spring.cloud.stream.rabbit.binder.password |
||
spring.cloud.stream.rabbit.binder.ssl-properties-location |
||
spring.cloud.stream.rabbit.binder.use-ssl |
false |
|
spring.cloud.stream.rabbit.binder.username |
||
spring.cloud.stream.rabbit.binder.vhost |
||
spring.cloud.stream.rabbit.bindings |
||
spring.cloud.zookeeper.default-health-endpoint |
Default health endpoint that will be checked to verify that a dependency is alive |
|
spring.cloud.zookeeper.dependencies |
Mapping of alias to ZookeeperDependency. From Ribbon perspective the alias is actually serviceID since Ribbon can’t accept nested structures in serviceID |
|
spring.cloud.zookeeper.dependency-configurations |
||
spring.cloud.zookeeper.dependency-names |
||
spring.cloud.zookeeper.discovery.enabled |
true |
|
spring.cloud.zookeeper.discovery.instance-host |
||
spring.cloud.zookeeper.discovery.metadata |
Gets the metadata name/value pairs associated with this instance. This information is sent to zookeeper and can be used by other instances. |
|
spring.cloud.zookeeper.discovery.root |
/services |
|
spring.cloud.zookeeper.discovery.uri-spec |
{scheme}://{address}:{port} |
|
spring.cloud.zookeeper.prefix |
Common prefix that will be applied to all Zookeeper dependencies' paths |
|
spring.integration.poller.fixed-delay |
1000 |
Fixed delay for default poller. |
spring.integration.poller.max-messages-per-poll |
1 |
Maximum messages per poll for the default poller. |
spring.sleuth.keys.async.class-name-key |
class |
Simple name of the class with a method annotated with {@code @Async} from which the asynchronous process started @see org.springframework.scheduling.annotation.Async |
spring.sleuth.keys.async.method-name-key |
method |
Name of the method annotated with {@code @Async} @see org.springframework.scheduling.annotation.Async |
spring.sleuth.keys.async.prefix |
Prefix for header names if they are added as tags. |
|
spring.sleuth.keys.async.thread-name-key |
thread |
Name of the thread that executed the async method @see org.springframework.scheduling.annotation.Async |
spring.sleuth.keys.http.headers |
Additional headers that should be added as tags if they exist. If the header value is multi-valued, the tag value will be a comma-separated, single-quoted list. |
|
spring.sleuth.keys.http.host |
http.host |
The domain portion of the URL or host header. Example: "mybucket.s3.amazonaws.com". Used to filter by host as opposed to ip address. |
spring.sleuth.keys.http.method |
http.method |
The HTTP method, or verb, such as "GET" or "POST". Used to filter against an http route. |
spring.sleuth.keys.http.path |
http.path |
The absolute http path, without any query parameters. Example: "/objects/abcd-ff". Used to filter against an http route, portably with zipkin v1. In zipkin v1, only equals filters are supported. Dropping query parameters makes the number of distinct URIs less. For example, one can query for the same resource, regardless of signing parameters encoded in the query line. This does not reduce cardinality to a HTTP single route. For example, it is common to express a route as an http URI template like "/resource/{resource_id}". In systems where only equals queries are available, searching for {@code http.uri=/resource} won’t match if the actual request was "/resource/abcd-ff". Historical note: This was commonly expressed as "http.uri" in zipkin, eventhough it was most often just a path. |
spring.sleuth.keys.http.prefix |
http. |
Prefix for header names if they are added as tags. |
spring.sleuth.keys.http.request-size |
http.request.size |
The size of the non-empty HTTP request body, in bytes. Ex. "16384" <p>Large uploads can exceed limits or contribute directly to latency. |
spring.sleuth.keys.http.response-size |
http.response.size |
The size of the non-empty HTTP response body, in bytes. Ex. "16384" <p>Large downloads can exceed limits or contribute directly to latency. |
spring.sleuth.keys.http.status-code |
http.status_code |
The HTTP response code, when not in 2xx range. Ex. "503" Used to filter for error status. 2xx range are not logged as success codes are less interesting for latency troubleshooting. Omitting saves at least 20 bytes per span. |
spring.sleuth.keys.http.url |
http.url |
The entire URL, including the scheme, host and query parameters if available. Ex. "https://mybucket.s3.amazonaws.com/objects/abcd-ff?X-Amz-Algorithm=AWS4-HMAC-SHA256&X-Amz-Algorithm=AWS4-HMAC-SHA256…" Combined with {@link #method}, you can understand the fully-qualified request line. This is optional as it may include private data or be of considerable length. |
spring.sleuth.keys.hystrix.command-group |
commandGroup |
Name of the command group. Hystrix uses the command group key to group together commands such as for reporting, alerting, dashboards, or team/library ownership. @see com.netflix.hystrix.HystrixCommandGroupKey |
spring.sleuth.keys.hystrix.command-key |
commandKey |
Name of the command key. Describes the name for the given command. A key to represent a {@link com.netflix.hystrix.HystrixCommand} for monitoring, circuit-breakers, metrics publishing, caching and other such uses. @see com.netflix.hystrix.HystrixCommandKey |
spring.sleuth.keys.hystrix.prefix |
Prefix for header names if they are added as tags. |
|
spring.sleuth.keys.hystrix.thread-pool-key |
threadPoolKey |
Name of the thread pool key. The thread-pool key represents a {@link com.netflix.hystrix.HystrixThreadPool} for monitoring, metrics publishing, caching, and other such uses. A {@link com.netflix.hystrix.HystrixCommand} is associated with a single {@link com.netflix.hystrix.HystrixThreadPool} as retrieved by the {@link com.netflix.hystrix.HystrixThreadPoolKey} injected into it, or it defaults to one created using the {@link com.netflix.hystrix.HystrixCommandGroupKey} it is created with. @see com.netflix.hystrix.HystrixThreadPoolKey |
spring.sleuth.keys.message.headers |
Additional headers that should be added as tags if they exist. If the header value is not a String it will be converted to a String using its toString() method. |
|
spring.sleuth.keys.message.payload.size |
message/payload-size |
An estimate of the size of the payload if available. |
spring.sleuth.keys.message.payload.type |
message/payload-type |
The type of the payload. |
spring.sleuth.keys.message.prefix |
message/ |
Prefix for header names if they are added as tags. |
spring.sleuth.metric.span.accepted-name |
counter.span.accepted |
|
spring.sleuth.metric.span.dropped-name |
counter.span.dropped |
|
spring.sleuth.sampler.percentage |
0.1 |
Percentage of requests that should be sampled. E.g. 1.0 - 100% requests should be sampled. The precision is whole-numbers only (i.e. there’s no support for 0.1% of the traces). |
zuul.add-proxy-headers |
true |
|
zuul.host.max-per-route-connections |
20 |
|
zuul.host.max-total-connections |
200 |
|
zuul.ignore-local-service |
true |
|
zuul.ignored-headers |
||
zuul.ignored-patterns |
||
zuul.ignored-services |
||
zuul.prefix |
||
zuul.remove-semicolon-content |
true |
|
zuul.retryable |
||
zuul.routes |
||
zuul.security_headers |
||
zuul.servlet-path |
/zuul |
|
zuul.strip-prefix |
true |
|
zuul.trace-request-body |
true |